LiquidOffice Retry on Exception

Applies To: LiquidOffice

LiquidOffice tasks can fail for a number of reasons. By default, a failed task halts the entire process and you will have to manually skip the task, delete the process or take some other action using Management Console. Sometimes, however, wouldn’t it be nice if the failed task waited a certain amount of time then retried?

We have found this to be especially helpful for web service tasks. Calls to web services can fail if the server has gone offline for a minute, but could recover if tried in 10 minutes or so. So we have added an exception loop to each of our web service tasks that retries indefinitely.

Here is the process:

On this process you can see we have a Form task and then a script task called FailTask. The FailTask is pretty simple, it just throws an exception. Here is the code inside the FailTask:

void enteredActive(State state) {
 Log log = LogFactory.getLog();
 log.info("FAIL");
 thisProcess.setFieldValue("FakeField","panda");
}

So we write a message to the log then try to set the value on a field that doesn’t exist. FAIL! The next task, Other Stuff, will never be reached in this particular example, but is representative of the rest of your process.

The other four tasks are the interesting ones. First is an Exception task. An exception task is just a task that becomes active when the task it is connected to (with a red line) throws an exception – pretty straightforward. After the exception task we have placed a Delay task. This is the task that determines how long the process should wait before retrying.

The most important task is the Reset State script task. Here is the code inside:

void enteredActive(State state) {
  thisProcess.getTaskByName("FailTask").forceToState(State.READY);
}

(This Code can also be placed in the Delay task on the enteringDone event, we have separated it into a separate Script task just to make it easy to understand)

This code retrieves the failed task (whatever task you are attaching the exception loop too) and sets its’ state to READY. This command will fail if the task is not currently at state ABORT, so just make sure to only put this code inside your exception loop.

The last member of this loop is the strangest, the Loop task. The loop task is between the Delay task and the Exception task and does NOT link back to the main process (Fail Task). Resetting the state of the Failed task immediately activates it (which is why we reset AFTER the delay task). The loop is only there to reactivate the exception task so that if the Failed task fails again, the exception loop starts over.

In our example above the process will retry forever until it succeeds. You could easily add conditions to the loop task to determine how often it should run and this will be the equivalent of a retry count (since the exception task will never be reactivated).

Adding these types of loops to your processes can help them to be more robust and keep you from having to intervene on recoverable tasks.

UPDATE: Although the above guide can be greatly improve the reliability of your processes, LiquidOffice isn’t not a very reliable program. Depending on a variety of factors, Exception tasks themselves can have exceptions and there’s really no way to totally prevent these.

Originally published on wirebear.com/blog on January 18, 2011

Adding Color to Your Dynamic Tables in LiquidOffice

Applies To: LiquidOffice

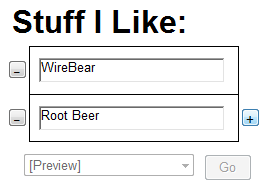
In many of our LiquidOffice forms we use the dynamic table controls with row addition and removal turned on. You can see a sample on the left of a very simple form showing this behavior in Internet Explorer.  This works pretty well, but we recently had a seemingly simple request to change the color of the add (+) and remove (-) buttons.  There are several things you can customize in your form just by adjusting some properties, but the color of these buttons are not currently available as settings.

So what are our options?  We posed that question to Autonomy technical support and they came back with a couple of methods to get to these buttons in javascript and to set their color there.  We needed this behavior on multiple tables on the same form and on multiple forms so we put together a method using their help to come up with a pretty simple solution…

The heart of it is the following code:

//Sets the colors of the + and - buttons for dynamic tables
function ColorizeButtons(tableName){
  var tbl = CSForm.getTable(tableName);
  var addColor = "699A41";
  var remColor = "BF3834";
  if (tbl != null && tbl.isDynamic()) {
    if (tbl.isRowAdditionAllowed()) {
      var addButton = CSForm.getField("DFS__" + tableName + "_addRow");
      if (addButton != null) {
        addButton.setFillColor(addColor);
        addButton.setTextColor("FFFFFF");
      }
    }
    if (tbl.isRowRemovalAllowed()) {
      for(var i=0;i<=(tbl.getNumberOfRows()-1);i++) {
        var remButton = CSForm.getField("DFS__"+tableName+"_removeRow_"+ i);
        if (remButton != null) {
          remButton.setFillColor(remColor);
          remButton.setTextColor("FFFFFF");
        }
      }
    }
  }
}

To use this, open up the script editor in the Form Designer (Tools > Script Editor).  Expand your form and click on the <Client> node and paste the above code.  Then expand the<Client> node and then expand the CSForm node and double click the OnLoad() event to add the function.  In this event add a call to the above function for EACH dynamic table on your form where you want the buttons colored using the name of the table as the parameter (Our sample table is named GreatStuff).  For the test form we’re using our OnLoad event looks like this:

function CSForm_OnLoad()
{
  ColorizeButtons("GreatStuff");
}

Then for EACH dynamic table on your form find the table’s main node in the <Client> node on the right and expand it and double click the OnRowAdded() event and set the code like this:

function GreatStuff_OnRowAdded()
{
  ColorizeButtons("GreatStuff");
}

Your Script Editor should look similar to this:

Press F5 to save and compile.  That’s it.  Just test the form (File > Preview > As HTML) .  With most recent versions of Internet Explorer you will be prompted during the preview with a yellow message bar at the top of the page saying that it has restricted content from the page. This will only happen on your local machine and is a good, but annoying, security feature. Just click on the message and choose Allow Blocked Content… and all your scripts will run just fine.

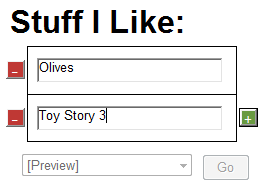
Now your plus (+) buttons should be green and your minus (-) buttons should be red:

That’s all there is to it.  The buttons aren’t beautiful, but now they’re easier to see and the colors you choose can help indicate their function or match your logo.  To customize the colors used, just edit the ColorizeButtons function listed above with the hexadecimal color values in a string (without the #).  This is a pretty standard format found in HTML and you can easily find sites out there to help you with these.  A good and easy one is ColorPicker.com.  You can just adjust your colors right on the site and it gives you the hex value right at the top.  Just copy it and remove the #.

  var addColor = "699A41";
  var remColor = "BF3834";

To change the text color just edit the setTextColor(“”) calls using the same types of values (the code above uses white “FFFFFF”).

Let me know if you find this useful or if there are other tricks you use to help customize your forms.

Originally Published on WireBear.com/blog on November 26, 2010

LiquidOffice Suicide Loops (Timeouts)

Applies To: LiquidOffice

If you’ve ever created a semi-complex process in LiquidOffice you might have run into a common problem – zombie processes.  Zombie Processes are processes that never completed but they aren’t being actively used either. Generally these have to be manually killed using the Management Console.

This isn’t LiquidOffice’s fault, it’s doing what it’s supposed to, but depending on your environment this can be a big problem and a huge irritation.  Fortunately, we can use LiquidOffice to solve this problem quickly and simply with just a few additions to your process.

The most common cause of zombie processes is having a “choose your own adventure” type process with multiple forms.  Consider the following process:

In the above generic process we have two forms and two script tasks.  The script tasks are just there to serve as placeholders for whatever tasks you might be doing between and after forms.  Often in a more complex process you would have some sort of branch task that changed what the second form was or altered some fields depending on the result of the first form.  But to keep things simple this is our sample process.

Note – We have checked the “Automatically Display Next Form on Submit” property in the Form section of the first form task’s properties.  At this point our process also does not take advantage of the Initial Form property (we will cover that further down).

In our common BeanShell script area we have the following generic function:

//Writes a message to the Log
void writeToLog(String Message) {
  Log log = LogFactory.getLog();
  log.info(Message);
}

This is a simple helper function we use to save time when we write to the log.  Using this in the More Stuff task (final script task) we have:

void enteredActive(State state) {
  writeToLog("All forms processed!");
}

So if everything goes well, the final thing our process does is to write to the event log to let us know it’s all done.  But what happens if when a user gets to the second process they realize they messed up the first form so they close the window and start over?  A good solution is to provide a back button (See our Multiple Submit Buttons in LiquidOffice article).  However, not everyone will use a back button no matter how convenient and it still doesn’t account for people who either accidentally or purposely closed the window for whatever reason.

When this happens as far as the user is concerned the process is gone, but LiquidOffice holds onto the instance, all of it’s data, the versions of the form(s) and the process that were used, and the current state of the process.  All of this will need to be cleaned out manually using Management Console and in some versions of LiquidOffice the process isn’t fully cleaned up on manual deletion.

Fixed Lifespan:

The Fixed Lifespan solution is very easy to implement.  Here is our example from above with a Fixed Lifespan:

Only two controls were added to the process.  An Or block and a Delay task with no parent tasks (no preceding connections).  The Delay time you set is equal to the lifespan of the entire process.  The Or block needs to be the last item in your process and allows us to say,“however you get here, end”. If the tasks all complete before the delay expires then the process performs as expected and the delay task is ignored.  However, if the delay expires, the Or block at the end cancels out the rest of the process tree and the process gracefully dies.

This works because both Form 1 and the Delay task are started at the same time (process instantiation).  So it’s a race.

This makes for a very simple solution but should be used with extreme caution.  This is especially true for large processes which require approval, manual operations, or special routing.  You will need to take into account all reasonable time frames for each task to complete and make sure your Delay task is set much higher.

Estimating an appropriate lifespan and maintaining adjustments to that lifespan as the process changes can be difficult and error prone.  Many times you only want specific tasks to timeout and you’d like that timeout to be relative to each task.  For example, once a user has submitted the form(s) you probably don’t want an automatic timeout.  So what do you do when you only want to target certain tasks and you’d like those timeouts to be relative to the task they are timing out?

A Better Solution:

With the help of Autonomy tech support (Thanks Simon!) we have come up with a solution that fits that criteria and that we add to nearly every process we publish.  We call it a suicide loop because that sounds cool (right??), but that might lead you to believe that we are just forcing a delete on the process from within the process.  In actuality, we are still gracefully completing the process allowing for standard cleanup and for statistics to maintain their integrity.  In addition, you can add whatever code you want when this happens (send an email, write to the log, etc.).

The solution involves adding an Escalate task, some other task(s), and an Or block:

The escalation task needs to be attached to the form causing the problem (Form 2 above). Ensure your Delay until escalation property is set to a relatively high number to allow the user the chance to fill it out.  For testing we set ours to 1 minute (0:01:00.000), but a value of 24-72 hours is generally more appropriate.  To be clear, this is the amount of time the form (NOT the entire process) can be left open (zombie or not) before the process is sent to heaven – so you will need to pick it carefully.

If the form is submitted before the escalation delay then the process continues on as expected and the escalation task is cancelled.  However, if the escalate occurs, the Or block at the end cancels out the rest of the process tree and the process gracefully dies.

Wait a second, what about that extra script task between the escalate task and the Or block? This is REQUIRED.  This can be a blank script task (does nothing) or something else like an email task (or whatever other business logic you want to insert), but you must have something here.  This is because although the escalate task is cancelled, it “shows” as completed which signals the Or block to be followed – cancelling the process immediately.  Placing something here changes that.  In our process above, when the escalate task is cancelled the Script task is set to Passive which prevents it from executing and therefore stops the path.

Our script task does this:

void enteredActive(State state) {
  writeToLog("Goodbye Cruel World!");
}

If you run this process, close the window on (don’t submit) the second form and you’ll see the “Goodbye Cruel World!” message in the System:EventLog within the Management Console (after the escalation delay).  You’ll also find the instance is marked as complete.  The process can also be completed normally (all forms submitted) and the suicide loop will never be entered.

Congratulations, it was really that simple!  Unless of course, it wasn’t…

Multiple Suicide Loops:

In most cases the above solution should have taken care of your problem.  But if any of the following are true, you will need to add additional loops:

  • Multiple forms where a user could stall out
  • Using the process Initial Form setting set to Instantiate Process Before Display Form

Using our same process from above we have now set the process Initial Form property to Use Initial Form and set it to Instantiate Process Before Displaying Form:

This effectively means our process has multiple forms where a user could stall out.  So this means we need a way to kill the process on either form 1 or form 2 being abandoned.  This really just means we have to add another suicide loop (one for each stall point).  This isn’t that complicated but it’s a little annoying.

LiquidOffice doesn’t allow the escalate task to be attached to more than one task (the pink line).  This means you need a separate escalate task for each stall point.  This creates a new path for each stall point that can be joined back together for one final suicide task(s) as needed, but ultimately every path in your process needs to end in that final Or block.

Unfortunately, you can’t just have each escalate task point to the same inbetween task (the “Goodbye Cruel World” script in our example).  Because then the process will stall out at this task since it will be waiting for the other escalate task(s) to also reach that point before continuing.  You also can’t simply add an Or block before the imbetween task or you will have the same problem as before with the Or block being activated when the escalate task is cancelled.

So you need to add the “full” suicide loop for each stall point like this:

This is a pretty simple implementation.  But what if you wanted to send an email (or some other logic) every time a process stalled out?  You could just cut and paste and replace the imbetween script tasks with these tasks, but maintenance would be a nightmare and your process tree could quickly get huge.  So do something like this:

As you can see we still have a generic script task after our escalate tasks, but these do nothing.  We have moved our Finally logic between the Or blocks.

Although the suicide loop is more complex than the fixed lifespan, the benefits are worth it. Regardless of exact implementation, the prevention of zombie processes is an important part of your design for EACH process. These are our methods, what do you guys do?  Any other process maintenance tips? Let us know in the comments!

Originally Published on WireBear.com/blog on November 22, 2010

Multiple Submit Buttons in LiquidOffice

Applies To: LiquidOffice

LiquidOffice is an enterprise forms processing and workflow suite from Cardiff (Now Autonomy).  It does some things very well (like routing forms), but it can be an incredibly frustrating piece of software for developers and designers.

Recently a client wanted to use LiquidOffice (v6.2.1) alongside a web service to provide a list of locations using a zip code and mile radius.  The requirements included the ability to return to a previous form and to change the zip code and/or mile radius.  Doing something like this in ASP.NET would be very easy and there are a ton of examples out there.  Doing this in LiquidOffice, however, presents quite a few challenges:

  • The LiquidOffice Web Service task is just awful
  • Populating a table from the process isn’t straightforward
  • By default you can have only one submit button on a form (although there is a list of actions which can have various values)
  • Navigating between forms isn’t intuitive either

The good news is that we got it working.  To try and help others that may be struggling with how to do some of these things we will present our solutions.

The LiquidOffice Web Service Task

We could probably write an entire post just about this alone, but instead we’ll show you how to work around some of the difficulties and get it working.

A couple of warnings though:
(all of these issues have been confirmed with Autonomy technical support)

  • The WS Task does NOT do authentication of any kind
  • The WS Task will NOT create complex objects
  • Once you have set a WS location and saved it, you can NEVER change it without recreating the task.  You can change it, save it and it will be reflected in the task properties, but it will continue to point to the previous WSDL.

Fortunately, there are work arounds to all of the above.  We didn’t need authentication for this particular web service.  We’ve needed it before (like when connecting to SharePoint), and we hope to cover how we overcame that obstacle in a future post.

We did however need a complex object.  In this case our locations were being returned in an array of location objects.  To get around this we created our own intermediate web service sitting on the LiquidOffice Process Server.  Calling this web service called the location service and wrapped those objects into a single string (very similar to JSON).  Then using a Script Task we parse out the string (using the split command) into an array and use it as a complex object again.

Populating the table should be done on the Form task and accessed using thisTask.getTable(“TableName”);  If you use the thisProcess.getTable(“TableName”); command you will have to find the internal name of the table.  This name is actually your table’s name plus a random number (I’m sure it’s not random but tech support could not tell us where it came from or guarantee it wouldn’t change).

Multiple Submit Buttons

For our form we needed a button that would return the user to the previous form, a button that would reload the list of locations, and of course a submit button.  These could all be accomplished by using the default submitaction control and using the form task properties to customize the Submit Action List.  Unfortunately, the end result on the form is not very user friendly.  It puts a combo box with the submit actions next to a button and the user is expected to choose their action and then hit the button.

You can, however, hide this control and use javascript attached to other buttons to simulate selecting an action and pressing the submitaction button.  To do this you still need to setup your Submit Actions.  For this form our Submit Actions look like this:

On the form we create three buttons (Back, Reload, and Submit) and use client side code to hide the submitaction control.  Here is our Javascript:

function CSForm_OnLoad()
{
  document.getElementById("DFS__ActionList").style.display = 'none';
  document.getElementById("DFS__GO").style.display = 'none';
}

function ReloadButton_OnButtonClick()
{
  CSForm.getField("SearchZipCode").setRequired(true);
  SubmitForm("Reload Locations");
}

function LocationSelected() {
  var locations = CSForm.getTable("Locations");
  for (var i=0;i<locations.getNumberOfRows();i++) {
    if (locations.getAt(i,"Selected").getValue()=="1") {
      return true;
    }
  }
  return false;
}

function SubmitButton_OnButtonClick()
{
  CSForm.getField("SearchZipCode").setRequired(false);
  if (LocationSelected()) {
    SubmitForm("Submit Choices");
  } else {
    CSClient.alert("You must choose at least 1 location!",0,1);
  }
}

function BackButton_OnButtonClick()
{
  SubmitForm("Back");
}

function SubmitForm(result) {
  document.body.style.cursor = 'wait';
  var choices = CSForm.getField("DFS__ActionList").getChoices();
  for(var i=0;i<choices.getCount();i++) {
    if (choices.getAt(i,true)==result) {
      document.getElementById("DFS__ActionList").selectedIndex = i;
      document.getElementById("DFS__GO").onclick();
      break;
    }
  }
}

Then in our process we add two loop objects so that it looks like this:

In the loop tasks we edit the Loop properties to set the Follow Path Based On section toAnother Task.  The Location Search Loop task looks like this:

The Task Output should match the submit action value from above.  The Navigation Loop is exactly the same except it’s Task Output value is set to -1.

So, yes it’s possible to do some complicated navigation in your forms and, yes, you can have multiple submit buttons.  It just takes a little work!

Originally Published on WireBear.com/blog on October 25, 2010