Embedded Chromium in WinForms

Applies To: WinForms, VB.NET, CefSharp

Getting Chromium to show up inside a .NET WinForms application is relatively easy using CefSharp. CefSharp is an open source project which provides Embedded Chromium for .NET (WPF & WinForms). It’s a great way to get Chrome hosted inside of your .NET application.

You can get a simple browser up and running in 5 minutes – which I’ll show you first. There are some additional steps required to use local resources and to handle console messages and dialog prompts which I’ll also show you.

Embedding a Chromium Browser

There’s an easy example over on the CefSharp project page called the MinimalExample that will get you up and running quickly with a bunch of the basics. I’m going to walk you through some very quick steps to just get an embedded browser working in a WinForm.

Getting CefSharp

First, create a new WinForms project. I’m using VB.NET (but C# works great too, of course) and am targeting .NET 4.5. Once you’ve got a project, you’ll need to add the CefSharp binaries. This is done through NuGet and is really simple.

In Visual Studio choose PROJECT > Manage NuGet Packages… In the Package Manager window switch to Online and search for CefSharp. You’ll select CefSharp.WinForms (My version is 37.0.0 but the package should always have the latest stable release) and choose Install:

CefSharpWinFormsNuGet

This will take just a few seconds while it also adds all of the dependent packages. In the end you’ll have 4 packages (CefSharp.WinForms, CefSharp.Common, cef.redist.x64 and cef.redist.x86).

Initial Build

CefSharp doesn’t support the default AnyCPU build configuration. You’ll need to choose BUILDConfiguration Manager… Then change the Active solution platform to either x64 or x86 (just choose new and it’ll walk you through it). Here’s what my Debug configuration looks like:

ConfigurationManager

Go ahead and build the project to make sure there are no reference errors.

Adding the Browser

Open your form and slap a Panel control on there (I’ve named mine panBrowser and set it’s Dock property to Fill). This isn’t required, but it certainly makes it easier to move around when changing your form later.

Switch to the Form’s code and go to the New sub (Constructor in C#). Here’s the code:

Imports CefSharp.WinForms
Imports CefSharp

Public Class Form1

    Private WithEvents browser As ChromiumWebBrowser

    Public Sub New()
        InitializeComponent()

        Dim settings As New CefSettings()
        CefSharp.Cef.Initialize(settings)

        browser = New ChromiumWebBrowser("http://thechriskent.com") With {
            .Dock = DockStyle.Fill
        }
        panBrowser.Controls.Add(browser)

    End Sub
End Class

Be sure to make the appropriate references above (lines 1-2). In this code, we have a ChromiumWebBrowser object (line 6) that we create with a default address and a dock style of Fill (lines 14-15). We then add that control to the Panel we added above. The only other thing we need to do is to call the Cef.Initialize function (line 12). We’re just passing default settings for now (line 11). Run it and you should see something similar to this:

WinFormsBasicBrowser

Congratulations, you’ve got Chrome in your Form!

Loading From Local Resources

In a previous article, Use Local Files in CefSharp, I showed you how to make the necessary objects to register a CefCustomScheme that would load resources from the local file system. I also posted a similar article, Use Embedded Resources in CefSharp, to demonstrate how to load files directly from your project’s manifest. Those articles will give you more detail about how to do this. If you’re following along in C# just head over to that article and copy the objects. Otherwise, here they are in VB.NET:

LocalSchemeHandler

Add a new Class to your project called LocalSchemeHandler.vb and copy/paste the following:

Imports CefSharp
Imports System.IO
Public Class LocalSchemeHandler
    Implements ISchemeHandler

    Public Function ProcessRequestAsync(request As IRequest, response As ISchemeHandlerResponse, requestCompletedCallback As OnRequestCompletedHandler) As Boolean Implements ISchemeHandler.ProcessRequestAsync
        Dim u As New Uri(request.Url)
        Dim filepath As String = u.Authority & u.AbsolutePath

        If File.Exists(filepath) Then
            Dim bytes As Byte() = File.ReadAllBytes(filepath)
            response.ResponseStream = New MemoryStream(bytes)
            Select Case Path.GetExtension(filepath)
                Case ".html"
                    response.MimeType = "text/html"
                Case ".js"
                    response.MimeType = "text/javascript"
                Case ".png"
                    response.MimeType = "image/png"
                Case ".appcache" OrElse ".manifest"
                    response.MimeType = "text/cache-manifest"
                Case Else
                    response.MimeType = "application/octet-stream"
            End Select
            requestCompletedCallback()
            Return True
        End If
        Return False
    End Function

End Class
LocalSchemeHandlerFactory

Add another new Class to your project called LocalSchemeHandlerFactory.vb and copy/paste the following:

Imports CefSharp
Public Class LocalSchemeHandlerFactory
    Implements ISchemeHandlerFactory

    Public Function Create() As ISchemeHandler Implements ISchemeHandlerFactory.Create
        Return New LocalSchemeHandler
    End Function

    Public Shared ReadOnly Property SchemeName() As String
        Get
            Return "local"
        End Get
    End Property

End Class
Registering the Scheme

To tell the browser to use the LocalSchemeHandler we just need to adjust our settings object before the Cef.Initalize function from our Form constructor above:

        Dim settings As New CefSettings()
        settings.RegisterScheme(New CefCustomScheme() With {
                                .SchemeName = LocalSchemeHandlerFactory.SchemeName,
                                .SchemeHandlerFactory = New LocalSchemeHandlerFactory
                                })
        CefSharp.Cef.Initialize(settings)
Proving it Works

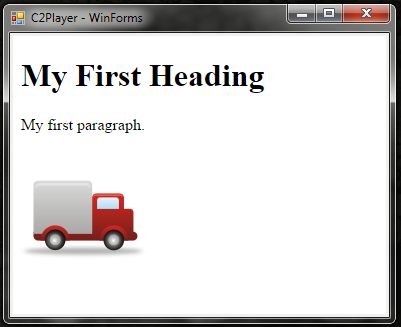
To make sure everything is working we’ll need to have an actual local resource to load. Open your application’s directory (mine is bin/x64/debug) and create a folder called web. Cut and paste the following into a text file and save it as index.html in that web folder:

<!DOCTYPE html>
<html>
    <body>
        <h1>My First Heading</h1>
        <p>My first paragraph.</p>
        <img src="images/truck.png"/>
        <script type="text/javascript">
            console.log("Hello from the console!");
            //alert("Hello from a dialog!");
        </script>
    </body>
</html>

Create an images folder inside the web folder and save this image as truck.png in there:

truck

None of these files need to be added to your project, they just need to be in the directory with your executable. Now if you switch the address from the browser initialization code above to local://web/index.html and run the project you should see something like this:

LocalResource

Mapping the Console

You might have noticed a <script> tag in our index.html above with a call to the console. CefSharp provides us with an easy event, ConsoleMessage, that allows us to grab those messages and do whatever we want with them. In our case we just want to display those messages in a TextBox.

I’ve added a Groupbox below the panBrowser Panel control from earlier and put a TextBox control called txtActivity inside it. I’ve set the txtActivity properties like so: Dock=Fill, Multiline=True and ScrollBars=Both. Now we just need to add the following code to our Form code right after the constructor:

    Private Sub onBrowserConsoleMessage(sender As Object, e As CefSharp.ConsoleMessageEventArgs) Handles browser.ConsoleMessage
        If e.Line > 0 Then
            addActivity(String.Format("CONSOLE: {0} ({1}|{2})", e.Message, e.Source, e.Line))
        Else
            addActivity(String.Format("CONSOLE: {0}", e.Message))
        End If
    End Sub

    Private Sub addActivity(Message As String)
        If txtActivity.InvokeRequired Then
            txtActivity.Invoke(New Action(Of String)(AddressOf addActivity), Message)
        Else
            txtActivity.AppendText(Message & vbCrLf)
        End If
    End Sub

We’ve added a handler for the ConsoleMessage event (lines 25-31). The ConsoleMessageEventArgs object provides us with three useful properties: Message, Source and Line. We always receive the Message and depending on how the call to the console was made we may receive information about the Source. When the Line is greater than 0 we output the Message and the Source/Line information, otherwise it’s just the Message.

We’ve also added a helper sub, addActivity, to take care of handling displaying the output. This allows us to easily change our handling in the future but it also simplifies thread considerations. Our embedded browser is multithreaded and the ConsoleMessage event generally doesn’t fire on the main thread. This is the reason for the InvokeRequired/Invoke code in lines 34-36. The actual display happens in line 37 where we use the AppendText method to ensure our textbox scrolls appropriately. Run the project and should see something similar to this:

ConsoleActivity

Handling Dialogs

What about dialog messages? If you uncomment the alert command from the index.html above and run the application you’ll see that in WinForms this gets automatically handled with a MsgBox:

dialogMsgBox

In our application we’d like to redirect these to our Activity feed as well. In CefSharp, you override the default handling of dialogs (alerts, confirmations and prompts) by implementing an IJsDialogHandler object.

In our case we just want everything noted in the activity feed and ignored. To do this, add a class to your project called LogDialogHandler.vb and copy/paste the following code into it:

Imports CefSharp
Public Class LogDialogHandler
    Implements IJsDialogHandler

    Private logReceiver As Action(Of String)

    Public Sub New(LogReceiverAction As Action(Of String))
        logReceiver = LogReceiverAction
    End Sub

    Public Function OnJSAlert(browser As IWebBrowser, url As String, message As String) As Boolean Implements IJsDialogHandler.OnJSAlert
        logReceiver(String.Format("ALERT: {0}", message))
        Return True
    End Function

    Public Function OnJSConfirm(browser As IWebBrowser, url As String, message As String, ByRef retval As Boolean) As Boolean Implements IJsDialogHandler.OnJSConfirm
        logReceiver(String.Format("CONFIRM: {0}", message))
        retval = True
        Return True
    End Function

    Public Function OnJSPrompt(browser As IWebBrowser, url As String, message As String, defaultValue As String, ByRef retval As Boolean, ByRef result As String) As Boolean Implements IJsDialogHandler.OnJSPrompt
        logReceiver(String.Format("PROMPT: {0} ({1})", message, defaultValue))
        result = defaultValue
        retval = True
        Return True
    End Function
End Class

The IJsDialogHandler interface requires us to implement the OnJSAlert, OnJSConfirm and OnJSPrompt functions. We’ve also added a construtor that takes an Action(Of String) which we will use to handle our logging. We store this Action into our private logReceiver object (line 8) so that we can use it later. Then in our implementation of the functions we just call logReceiver with an informative message regarding what’s occurred. In each case we return True to indicate that the alert, etc. has been handled.

To use our new object we just add the following line to the end of our Form constructor:

browser.JsDialogHandler = New LogDialogHandler(New Action(Of String)(AddressOf addActivity))

This allows us to direct any message from our LogDialogHandler to our txtActivity box just like our console messages. Now when we run the application we should see something like this:
AlertActivity

DevTools

Anyone that’s used Chrome for web development is very familiar with the F-12 DevTools and knows they can be invaluable in tracking down issues. Wouldn’t it be nice to have those when working within your .NET application? With CefSharp, it’s super easy. I’ve added a simple button underneath my Activity GroupBox called btnDevTools. Here’s the Click EventHandler:

    Private Sub btnDevTools_Click(sender As Object, e As EventArgs) Handles btnDevTools.Click
        browser.ShowDevTools()
    End Sub

That’s it! Now when you push the button you get the full power of the Chrome DevTools all while running in your form:

DevTools

Conclusion

Obviously, there is a lot you can do with this and there are many features we haven’t even begun to demonstrate, but this should get you started. For me the goal has been to get a Construct 2 game running in a .NET application. In my next post I’ll show you exactly that.

Use Embedded Resources in CefSharp

Applies to: CefSharp, C#

In my last post, Use Local Files in CefSharp, I showed you how to create a CefCustomScheme to pull web files directly from the file system. This post will follow along the same lines except this time I’ll show you how to pull web files directly from your assembly manifest (Embedded Resources). In practical terms, I’m using both. You just call the RegisterScheme method (see below) for each CefCustomScheme you want to use. This is especially helpful during development so that I can quickly tweak things in the file system and then when things are ready to include in my larger project I include everything in the project and embed them. This keeps my files from being browsable/editable outside of my application.

Intro

CefSharp is an open source project which provides Embedded Chromium for .NET (WPF & WinForms). It’s a great way to get Chrome hosted inside of your .NET application. Sometimes you want to load sites/files that aren’t hosted on the web. The easiest way to do that is to provide a custom scheme. You do this by creating an instance of CefSettings and using the RegisterScheme method with a CefCustomScheme wrapper object which requires an implementation of the ISchemeHandlerFactory which will in turn require an implementation of the ISchemeHandler. If you didn’t read my last post about doing this from the file system (or even if you did) you might be a little confused. Fortunately, it isn’t near as complicated as it seems.

Quick Note: This isn’t a tutorial on how to get CefSharp working or integrated into your product. You’ll want to install the packages using NuGet and go to the CefSharp project page for details.

ISchemeHandler

SchemeHandler objects process custom scheme-based requests asynchronously. In other words, you can provide a URL in the form customscheme://folder/yourfile.html”. The SchemeHandler object takes the request and gives you a chance to provide a custom response. In our case, we want to take anything with the scheme resource and pull it from our assembly’s manifest. Here’s what that looks like:

using CefSharp;
using System.IO;
using System.Reflection;
public class ResourceSchemeHandler : ISchemeHandler
{
    public bool ProcessRequestAsync(IRequest request, ISchemeHandlerResponse response, OnRequestCompletedHandler requestCompletedCallback)
    {
        Uri u = new Uri(request.Url);
        String file = u.Authority + u.AbsolutePath;

        Assembly ass = Assembly.GetExecutingAssembly();
        String resourcePath = ass.GetName().Name + "." + file.Replace("/", ".");

        if (ass.GetManifestResourceInfo(resourcePath) != null)
        {
            response.ResponseStream = ass.GetManifestResourceStream(resourcePath);
            switch (Path.GetExtension(file))
            {
                case ".html":
                    response.MimeType = "text/html";
                    break;
                case ".js":
                    response.MimeType = "text/javascript";
                    break;
                case ".png":
                    response.MimeType = "image/png";
                    break;
                case ".appcache":
                case ".manifest":
                    response.MimeType = "text/cache-manifest";
                    break;
                default:
                    response.MimeType = "application/octet-stream";
                    break;
            }
            requestCompletedCallback();
            return true;
        }
        return false;
    }
}

I’ve named my implementation ResourceSchemeHandler. You can see we are implementing the ISchemeHandler interface in line 4 (If this isn’t recognized be sure to include the using statements in lines 1-3 above). This interface only requires a single method, ProcessRequestAsync. Our job is to translate the request into a response stream, call requestCompletedCallback and indicate if we handled the request or not (return true or false).

The first thing we do is translate the request URL into a file path (lines 8-9). Embedded Resources are stored in the form of AppName.Namespace(s).File.Extension. So we need to translate our file path to our resource path. We do this in lines 11-12. First we grab the current assembly (ass, hehe) because we’re going to need it anyway. Next we build our resource path by slapping our AppName (ass.GetName()) followed by a period onto our file path where we replace all the forward slashes with periods.

This allows us to create a folder inside our project (which will get mapped to a namespace in C#) and put our files in there. So if we were to use the address “resource://web/index.html” the file path will be “web/index.html” and the resource path (if our application is named C2Player) will be “C2Player.web.index.html”.

If the resource doesn’t exist (no info returned), there isn’t any way for us to handle the request so we return false (line 39). Otherwise, we set the response.ResponseStream directly to the ManifestResourceStream (line 16). We then guess the Mime Type based on the file’s extension (lines 17-35). This is a pretty limited list but it was all I needed – Just expand as necessary. If you are using both this SchemeHandler and the LocalSchemeHandler created in my last post, you should refactor this to a common function.

Once we’ve got everything we need, we call the requestCompletedCallback and return true to indicate we have handled the request.

ISchemeHandlerFactory

SchemeHandlerFactory objects create the appropriate SchemeHandler objects. I’ve also added a convenience property to help out during registration. Here’s mine:

using CefSharp;
class ResourceSchemeHandlerFactory : ISchemeHandlerFactory
{
    public ISchemeHandler Create()
    {
        return new ResourceSchemeHandler();
    }

    public static string SchemeName { get { return "resource"; } }
}

This one is called ResourceSchemeHandlerFactory (wowzers!) and you can see we are implementing the ISchemeHandlerFactory interface in line 2 (If this isn’t recognized be sure to include the using statement in line 1). This interface also only requires a single method, Create. All we have to do is return a new instance of our custom SchemeHandler (line 6).

The SchemeName property in line 9 is just there to make things easier during registration.

Registering Your Custom Scheme

Now that we have our custom SchemeHandler and the corresponding Factory, how do we get the Chromium web browser controls to take advantage of them? This has to be done before things are initialized (before the controls are loaded). In WPF this can usually be done in your ViewModel’s constructor and in WinForms within the Form Load event. Here’s what it looks like:

CefSettings settings = new CefSettings();
settings.RegisterScheme(new CefCustomScheme()
    {
        SchemeName = ResourceSchemeHandlerFactory.SchemeName,
        SchemeHandlerFactory = new ResourceSchemeHandlerFactory()
    });
Cef.Initialize(settings);

You’ll create a new instance of a CefSettings object (line 1) and call the RegisterScheme method which takes a CefCustomScheme object (lines 2-6). the CefCustomScheme object needs to have its SchemeName set to whatever you are going to be using in the URLs to distinguish your custom scheme (we are using resource) and its SchemeHandlerFactory should be set to a new instance of your custom SchemeHandlerFactory. Then call the Cef.Intialize with the settings object and all the plumbing is hooked up. Again, if you want to use additional custom schemes (such as our LocalSchemeHandler) just add another settings.RegisterScheme call before the Cef.Initialize call.

Giving it a go

In my solution I have created a folder called web. Inside the folder is an html file (index.html) and an images folder with a single image (truck.png). Both the html file and the image have their Build Action set to Embedded Resource. Resource paths are case sensitive. For whatever reason, the request will always come back all lower case (regardless of your address casing) so you’ll need to ensure all your files and folders are lower case as well. Here’s what my test files look like in Solution Explorer:

EmbeddedResources

The html page is very simple:

<!DOCTYPE html>
<html>
<body>
<h1>My First Heading</h1>
<p>My first paragraph.</p>
<img src="images/truck.png"/>
</body>
</html>

Now if I set my ChromiumWebBrowser (WPF) or WebView (WinForms) Address property to resource://web/index.html I get the following:

LocalSchemeHandler

You can see the web page loaded both the HTML and the linked image from the assembly’s manifest. There’s even a couple of dummy buttons underneath the truck to show you that it’s just a standard WPF window.

Since I’m using WPF I also had the option of setting the Build Action to Resource and rewriting a small part of the SchemeHandler to pull from there. I chose Embedded Resource since it’s more widely applicable. Between these two posts hopefully you see that writing a CefCustomScheme is actually really straightforward. Have fun!

Use Local Files in CefSharp

Applies to: CefSharp, C#

CefSharp is an open source project which provides Embedded Chromium for .NET (WPF & WinForms). It’s a great way to get Chrome hosted inside of your .NET application. Recently I had the need of loading web files directly from the file system. The easiest way to do that is to provide a custom scheme. You do this by creating an instance of CefSettings and using the RegisterScheme method with a CefCustomScheme wrapper object which requires an implementation of the ISchemeHandlerFactory which will in turn require an implementation of the ISchemeHandler. Got it?! It’s actually much less confusing than it seems. It will make much more sense in a moment.

Quick Note: This isn’t a tutorial on how to get CefSharp working or integrated into your product. You’ll want to install the packages using NuGet and go to the CefSharp project page for details.

ISchemeHandler

SchemeHandler objects process custom scheme-based requests asynchronously. In other words, you can provide a URL in the form customscheme://folder/yourfile.html”. The SchemeHandler object takes the request and gives you a chance to provide a custom response. In our case, we want to take anything with the scheme local and pull it from the file system. Here’s what that looks like:

using CefSharp;
using System.IO;
public class LocalSchemeHandler : ISchemeHandler
{
    public bool ProcessRequestAsync(IRequest request, ISchemeHandlerResponse response, OnRequestCompletedHandler requestCompletedCallback)
    {
        Uri u = new Uri(request.Url);
        String file = u.Authority + u.AbsolutePath;

        if (File.Exists(file))
        {
            Byte[] bytes = File.ReadAllBytes(file);
            response.ResponseStream = new MemoryStream(bytes);
            switch (Path.GetExtension(file))
            {
                case ".html":
                    response.MimeType = "text/html";
                    break;
                case ".js":
                    response.MimeType = "text/javascript";
                    break;
                case ".png":
                    response.MimeType = "image/png";
                    break;
                case ".appcache":
                case ".manifest":
                    response.MimeType = "text/cache-manifest";
                    break;
                default:
                    response.MimeType = "application/octet-stream";
                    break;
            }
            requestCompletedCallback();
            return true;
        }
        return false;
    }
}

I’ve named my implementation LocalSchemeHandler because I’m creative like that. You can see we are implementing the ISchemeHandler interface in line 3 (If this isn’t recognized be sure to include the using statements in lines 1 and 2 above). This interface only requires a single method, ProcessRequestAsync. Our job is to translate the request into a response stream, call requestCompletedCallback and indicate if we handled the request or not (return true or false).

The first thing we do is translate the request URL into a local file path (lines 7-8). If the file doesn’t exist, there isn’t any way for us to handle the request so we return false (line 36). Otherwise, we set the response.ResponseStream to a MemoryStream from the file’s bytes (lines 12-13). We then guess the Mime Type based on the file’s extension (lines 14-32). This is a pretty limited list but it was all I needed – Just expand as necessary.

Once we’ve got everything we need, we call the requestCompletedCallback and return true to indicate we have handled the request.

ISchemeHandlerFactory

SchemeHandlerFactory objects create the appropriate SchemeHandler objects. I’ve also added a convenience property to help out during registration. Here’s mine:

using CefSharp;
public class LocalSchemeHandlerFactory : ISchemeHandlerFactory
{
    public ISchemeHandler Create()
    {
        return new LocalSchemeHandler();
    }

    public static string SchemeName { get { return "local"; } }
}

This one is called LocalSchemeHandlerFactory (surprise!) and you can see we are implementing the ISchemeHandlerFactory interface in line 2 (If this isn’t recognized be sure to include the using statement in line 1). This interface also only requires a single method, Create. All we have to do is return a new instance of our custom SchemeHandler (line 6).

The SchemeName property in line 9 is just there to make things easier during registration.

Registering Your Custom Scheme

Now that we have our custom SchemeHandler and the corresponding Factory, how do we get the Chromium web browser controls to take advantage of them? This has to be done before things are initialized (before the controls are loaded). In WPF this can usually be done in your ViewModel’s constructor and in WinForms within the Form Load event. Here’s what it looks like:

CefSettings settings = new CefSettings();
settings.RegisterScheme(new CefCustomScheme()
    {
        SchemeName = LocalSchemeHandlerFactory.SchemeName,
        SchemeHandlerFactory = new LocalSchemeHandlerFactory()
    });
Cef.Initialize(settings);

You’ll create a new instance of a CefSettings object (line 1) and call the RegisterScheme method which takes a CefCustomScheme object (lines 2-6). the CefCustomScheme object needs to have its SchemeName set to whatever you are going to be using in the URLs to distinguish your custom scheme (we are using local) and its SchemeHandlerFactory should be set to a new instance of your custom SchemeHandlerFactory. Then call the Cef.Intialize with the settings object and all the plumbing is hooked up.

Giving it a go

In my application’s directory (bin/x64/debug) I have created a folder called web. Inside the folder is an html file (index.html) and an images folder with a single image (truck.png). The html page is very simple:

<!DOCTYPE html>
<html>
<body>
<h1>My First Heading</h1>
<p>My first paragraph.</p>
<img src="images/truck.png"/>
</body>
</html>

Now if I set my ChromiumWebBrowser (WPF) or WebView (WinForms) Address property to local://web/index.html I get the following:

LocalSchemeHandler

You can see the web page loaded both the HTML and the linked image from the file system. There’s even a couple of dummy buttons underneath the truck to show you that it’s just a standard WPF window. This is all you need for simple web files stored locally. In some advanced cases you will need to adjust the BrowserSettings for your control to adjust permission levels (specifically FileAccessFromFileUrlsAllowed and UniversalAccessFromFileUrlsAllowed).