Applies To: SharePoint 2010, User Profile Service, Active Directory, Nintex Workflow
We have done a lot of work on our User Profiles lately. One of the key things we are now doing is pulling our employee information from our Human Resources database rather than AD and then updating the information in AD using SharePoint’s User Profile Synchronization. Individual fields don’t allow both an import and an export so we are using a Nintex Workflow to pull in the information and the User Profile Service to update AD. That’s a whole bunch of posts all by themselves. Instead this post is about an extremely annoying bug in how SharePoint handles exporting date attributes to AD.
The Setup
One of the fields we are attempting to write to Active Directory is the Hire Date field from the User Profiles. First thing I did was request that the team that handles AD create a new attribute to hold the Hire Date information. I didn’t know the attribute type so I just took a look at the available options for the User Property (Central Administration > Application Management > Manage service applications > User Profile Service Application > People > Manage User Properties, then choose Edit in the context menu for the Hire Date property).
When you scroll down to the bottom there is a Add New Mapping section and if you’ve already setup your Active Directory source (beyond the scope of this article), you’ll see a list of available attributes. For the Hire Date you’ll see things like createTimeStamp, expirationTime, whenCreated, etc. All I did was tell the AD guys that it needed to be the same type as those. They did their magic and created a new attribute called employeeHireDate.
In order for SharePoint to see that new attribute you’ll have to refresh the schema. You can do this by opening the Synchronization Service Manager on the app server where you run your synchronization job (By default this can be found at “C:\Program Files\Microsoft Office Servers\14.0\Synchronization Service\UIShell\miisclient.exe”).
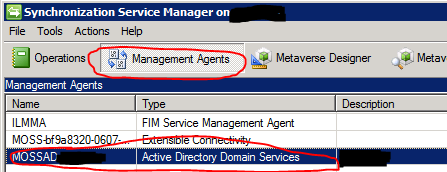
Switch to the Management Agents tab and select your Active Directory Domain Services agent:
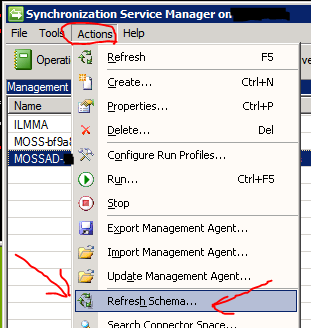
Then with the agent selected use the Actions menu and select Refresh Schema…:
This shouldn’t take too long. Refreshing the User Property window in Central Administration should show your new AD attribute in the list (assuming they created it with the right type). Simply add a new Export for that attribute and click OK to save:

Now run a Full Synchronization (Central Administration > Application Management > Manage service applications > User Profile Service Application > Synchronization > Start Profile Synchronization > Start Full Synchronization > OK).
The Error
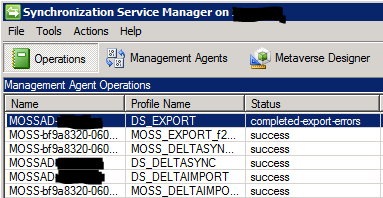
If you have any non-date fields they should all synchronize fine. However, taking a look at the Synchronization Service Manager under the Operations tab will show a status of completed-export-errors for the DS_Export:
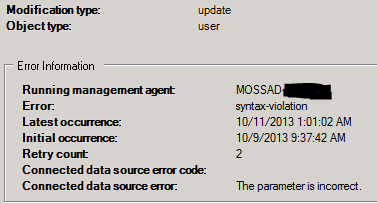
You’ll find the individual errors listed by Distinguished Name. Clicking on any of these will give you more detail. You’ll see something along the lines of “syntax-violation” and “The parameter is incorrect.”:
Taking a look at the Export in Progress tab you can see exactly which attribute it was trying to update. In our case the error was occurring on the add change to the employeeHireDate.
The Extreme Solution
After a ton of searching I finally found someone with the same problem over on MSDN. The user, VIH, eventually identifies the issue as a bug in SharePoint. He indicates the issue is that SharePoint is attempting to export date fields in the local date/time string rather than the format required by Active Directory. Fortunately, he also posts a solution. Unfortunately, it involves creating an Rules Extension Library for the Synchronization Service Manager.
I really appreciate the solution, but that is far more drastic an approach than I am willing to do. For those that found that solution and feel the same way, I came up with a much simpler approach but it relies on Nintex Workflow.
The Straightforward Nintex Solution
As mentioned previously we are already using a scheduled Nintex Site Workflow to query our Human Resources database and to update everyone’s user profile. So sticking this solution in there was really simple. However, creating a new Nintex Site Workflow just to do this sync shouldn’t be too difficult.
The key is having a way to loop through each user. This can be done with the For Each action on the results of either a database lookup (Execute SQL action) or the Query AD action with a custom LDAP query. We were already using the database lookup and storing the Username in a collection variable then using a for each on that collection.
Within your loop you’ll want to make sure your Username variables are in the form DomainName\Username. you can use a simple String Builder action if necessary since this variable just needs to be a simple single line of text.
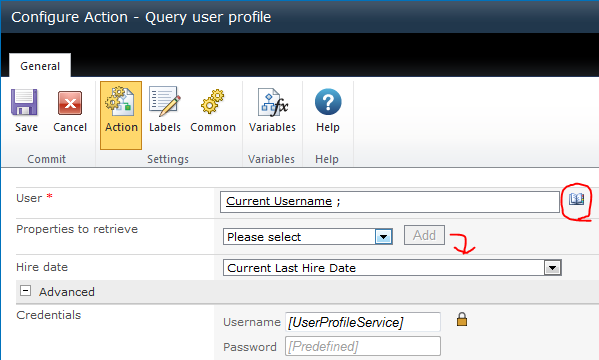
If you already have the date value for each user (say from the same database lookup) you can skip this step. Otherwise, you can use the Query user profile action to get the date attribute value into a date/time variable. Just use the lookup button next to the User field to use your Username variable. Select the property and click Add. If you don’t yet have a Date/Time variable, use the Variables button in the ribbon to add one then select it for your date field. Be sure to set the Credentials in the Advanced section (I’ve used a Workflow Constant of type Credentials, but you can just type it in if needed). Once configured, click Save:
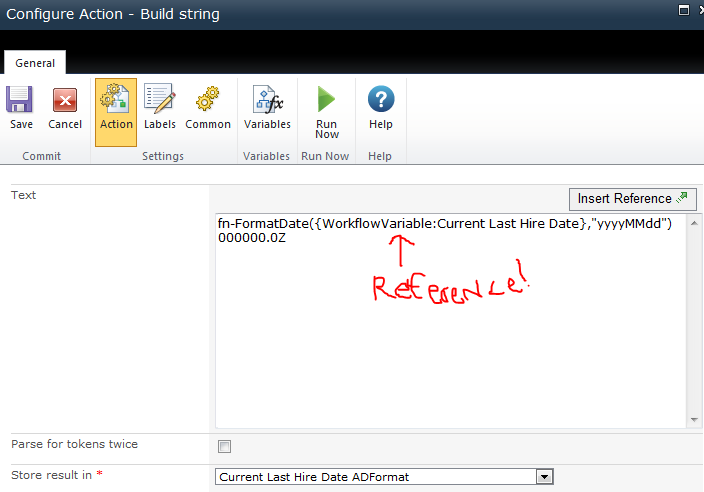
Now that you have the Account name (username with domain) and the date attribute as variables you need to format the date into the format AD wants. You can do this with a String Builder action and a simple inline formula. Just create a new Single line of text variable to store it in. The inline function is the fn-FormatDate() and it takes 2 parameters. The first should be a lookup of your date attribute variable. The second is the format string (in quotes) of “yyyyMMdd”. Then immediately follow the closing parenthesis with the following string 000000.0Z
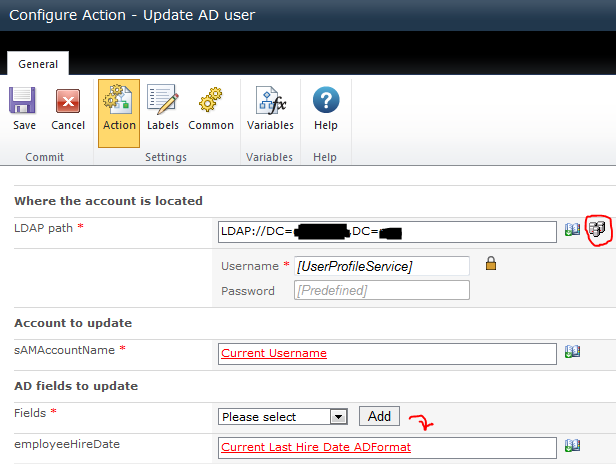
Now you can use the Update AD user action. Just click the Active Directory lookup button for the LDAP path (selecting the highest level of your domain is just fine) and fill out credentials with the appropriate AD permissions (same as needed in order to export using the User Profile Synchronization). Use a reference to your username variable for the sAMAccountName. If your AD attribute is not listed in the Fields dropdown just select other and type the name, then click Add. Use a reference to your formatted date variable and click Save:
Give that sucker a whirl. Using ADSI Edit you should see that at least one or more (depending on how fast they propagate) of your domain controllers has the new value. Remove the export mapping from the User Profile Property and schedule this workflow to run shortly after your sync job, and you’re good to go.

Wow, great article.Really thank you! Keep writing. Shingleton