Thank you M365 Collaboration Conference!

I had the opportunity to speak at the M365 Collaboration Conference in Las Vegas this past week and it was awesome! I loved seeing all the friends I haven’t been able to see and I always enjoy the energy and excitement of a bunch of people gathered to learn and teach about stuff we all care about.

I helped teach 2 full day workshops and was able to once again give one of my favorite sessions: Advanced List Formatting. I love presenting this session because it’s demo heavy and it’s so fun being creative with lists and watching people’s eyes light up at all the possibilities.

The Grammys were happening at the same time. People were wearing the fanciest, most expensive Halloween costumes you could imagine!

For those that are interested, my Advanced List Formatting slides can be downloaded here:

Feel free to use the slides in your own presentations (internally or externally). If you feel like giving me credit, that’s great! But it’s not required. Sharing is caring afterall! The slides have several extra slides we didn’t go over (I prefer the demos) that will hopefully provide some additional insight. Feel free to reach out with questions.

Here is the list of samples I used in the demos so you can recreate what we went over:

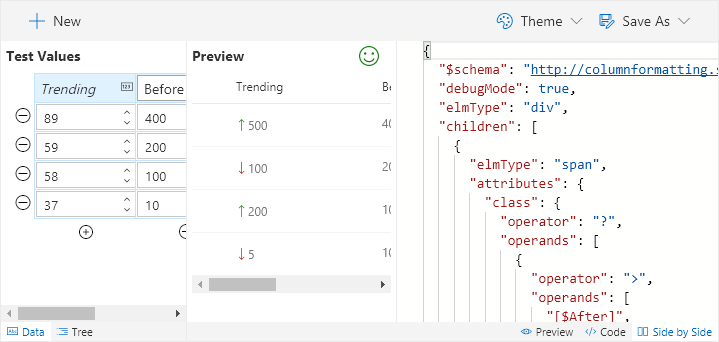
  • Recruitment Tracker – We took the out of the box recruitment tracker list template and customized the existing column formats using the design panel to add icons to our choice fields. Then we went into Advanced Mode and swapped out the icons with ones we picked out from flicon.io

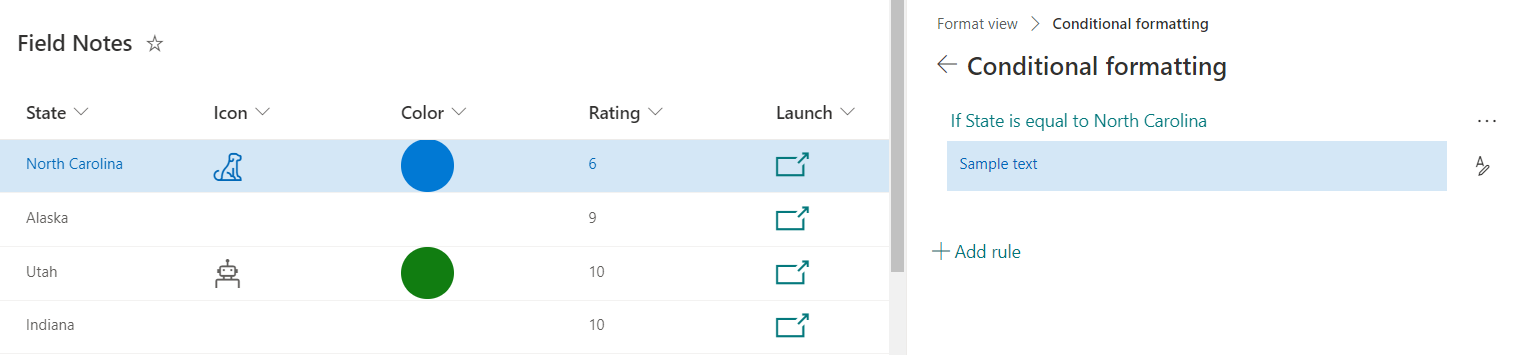
  • Field Notes – We looked at adding conditional rules to format our rows and also demonstrated a deep link into a custom Power App using the Launch Power App Button sample
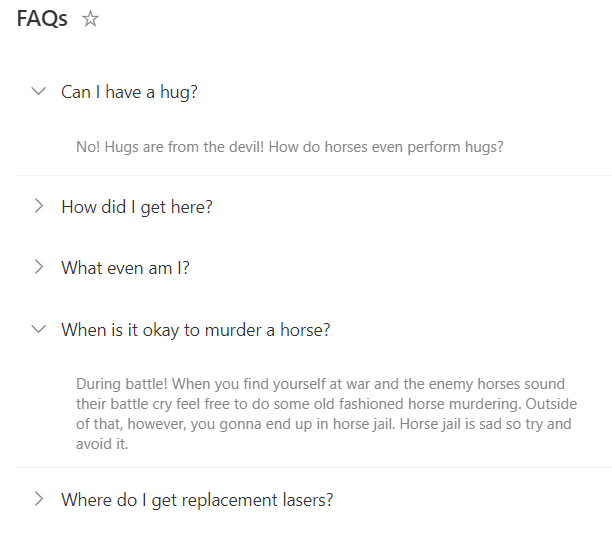
  • Grouped FAQs – We looked at how we can use groupProps to customize grouped fields to create a miniature application. We also briefly looked at an alternative FAQ Format

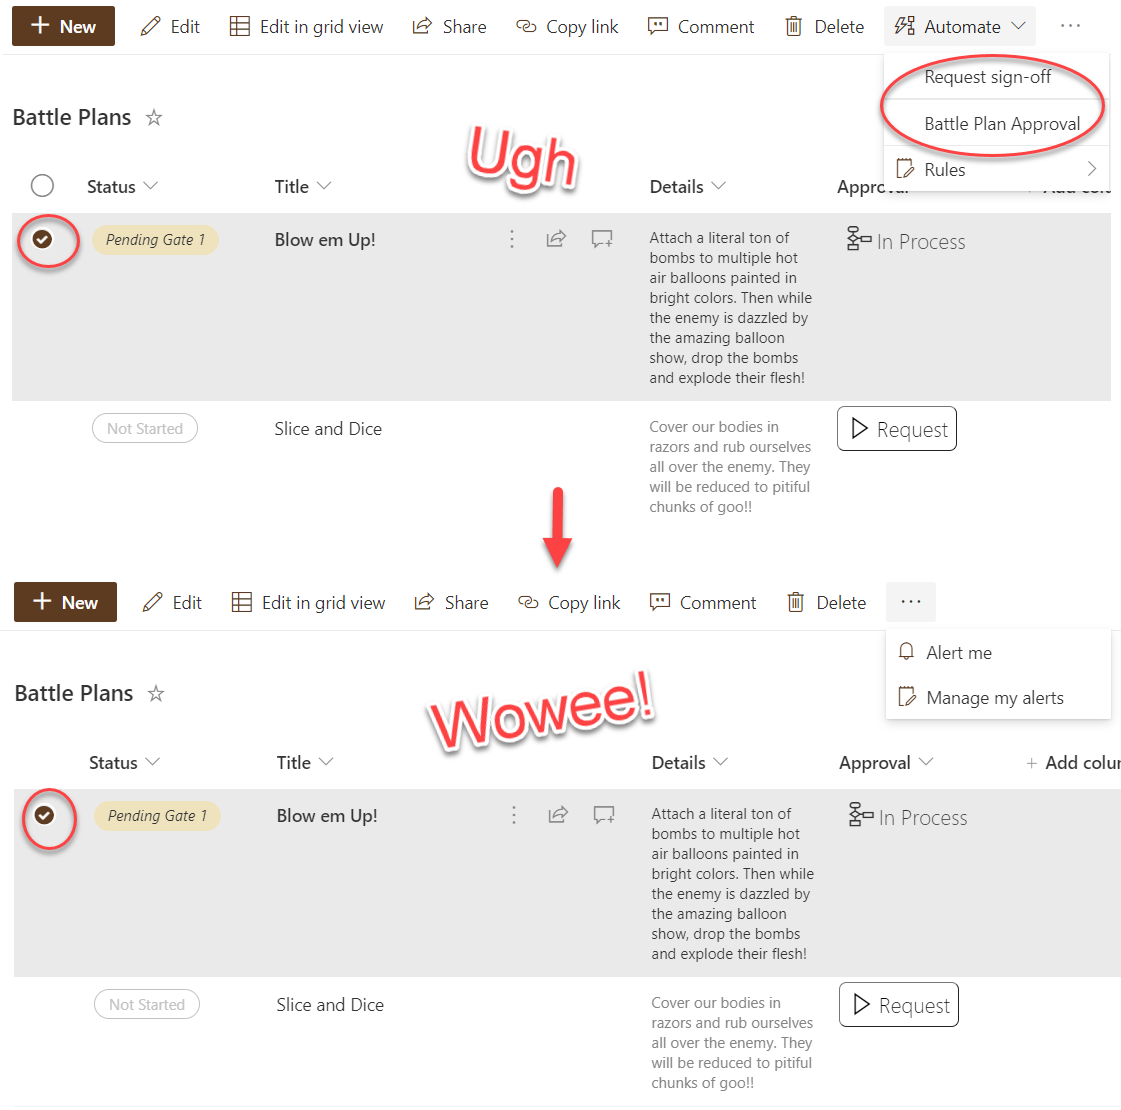
  • Flow Status – We looked at how we can conditionally launch flows and display a dynamic flow chart to represent flow progress as well as a link to the exact flow instance
  • CommandBar Hide Automate – We expanded the flow status sample shown above to conditionally hide the Automate button when an item is selected
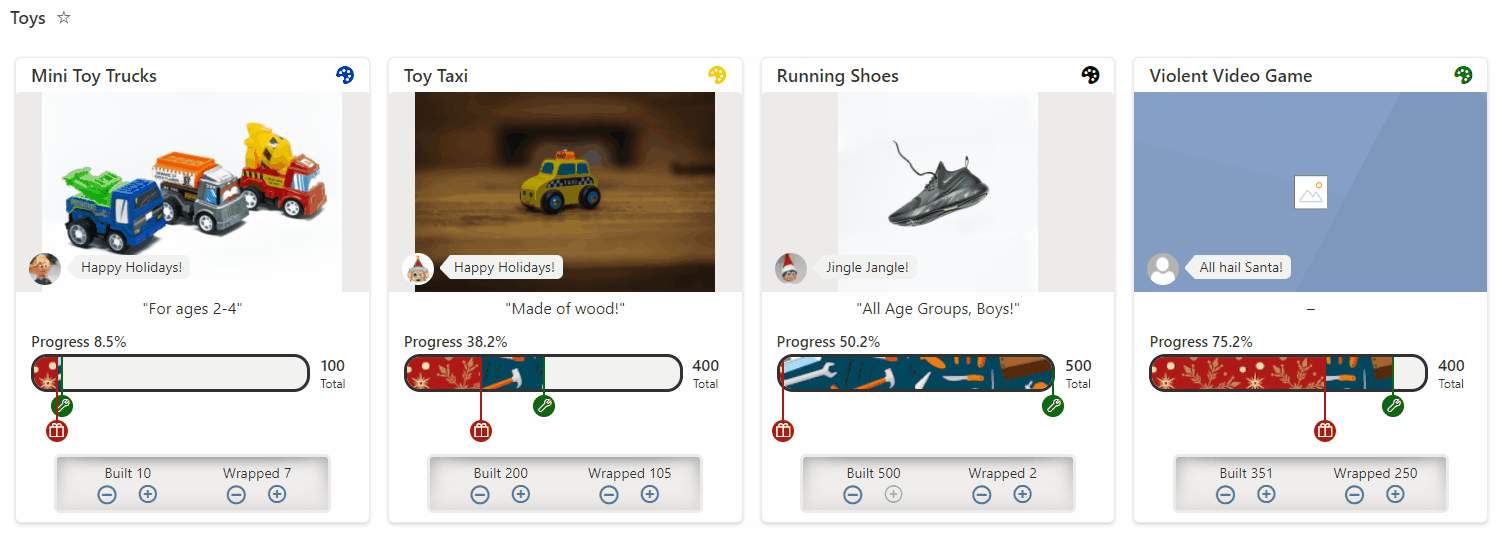
  • Elf Progress Board – We looked at building multi-layered progress bars, randomization, and inline editing with the elf progress board
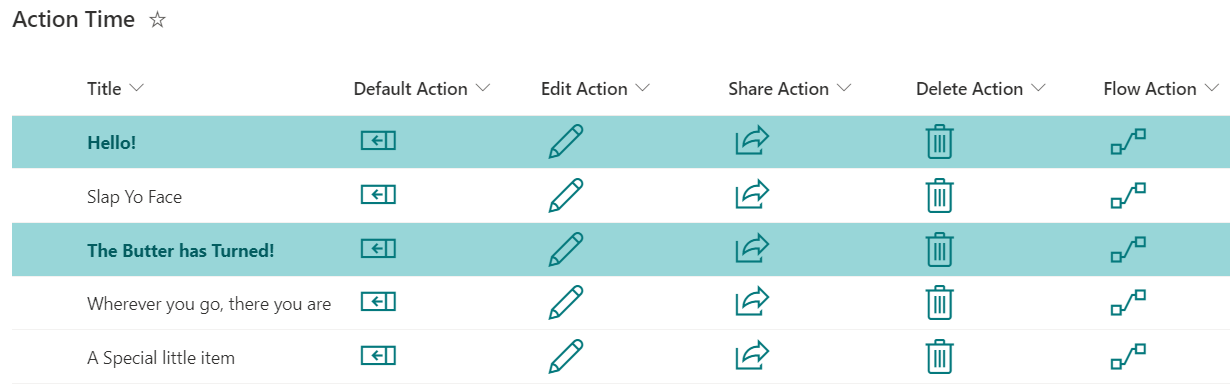
  • Row Actions – We looked at the different default row actions and demonstrated live list updates and format rerendering
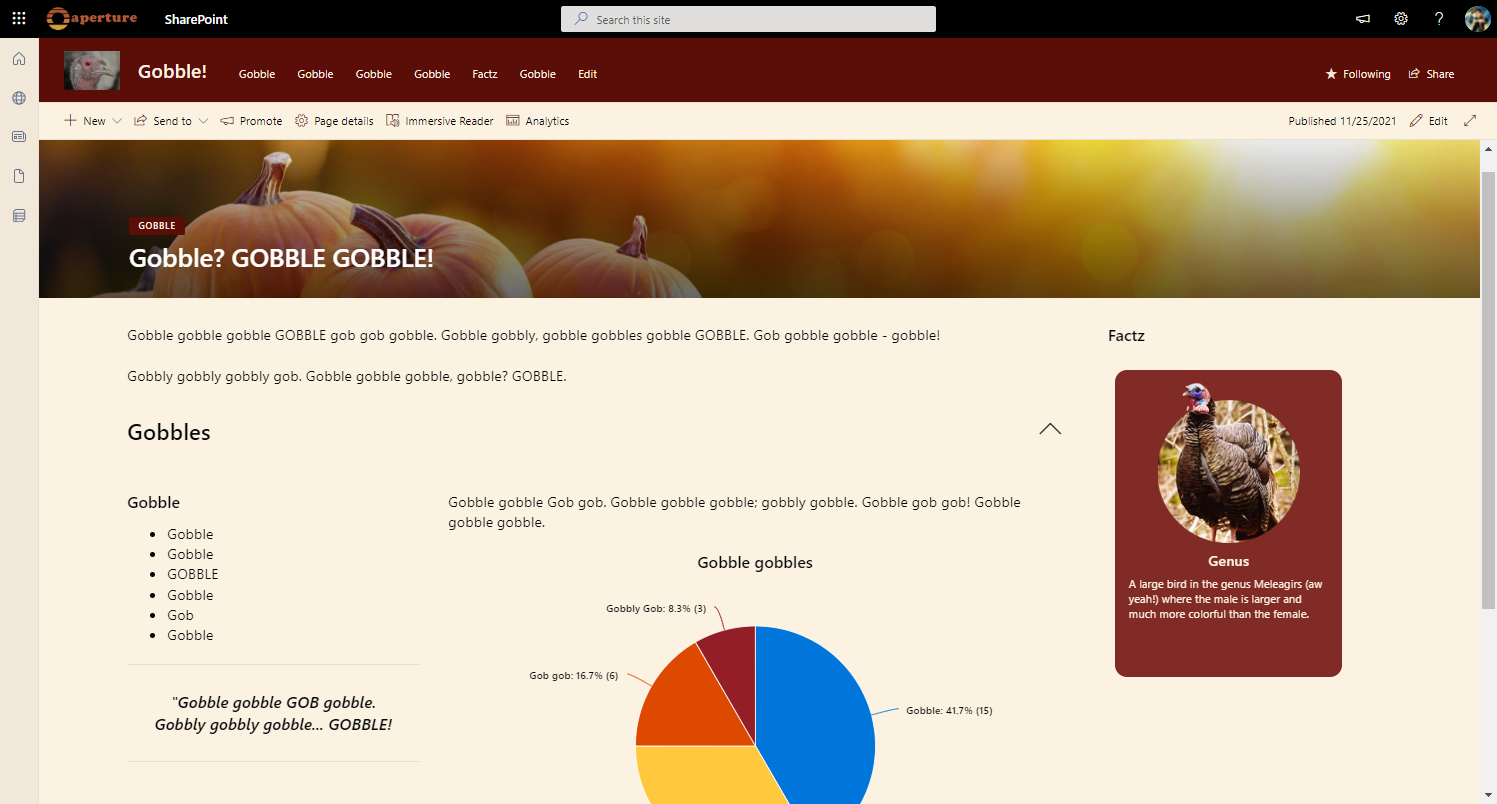
  • Random Item – We looked at how we can use layering and randomization to pick a random list item (turkey fact) to show on a page
  • Content Navigator – We demonstrated how to setup 2 views on a list and use them in conjunction as webparts on a page to enable simple navigation
  • Video Navigation – We showed how to use the list webpart with a dynamic connection to the embed webpart to create a custom video navigation application
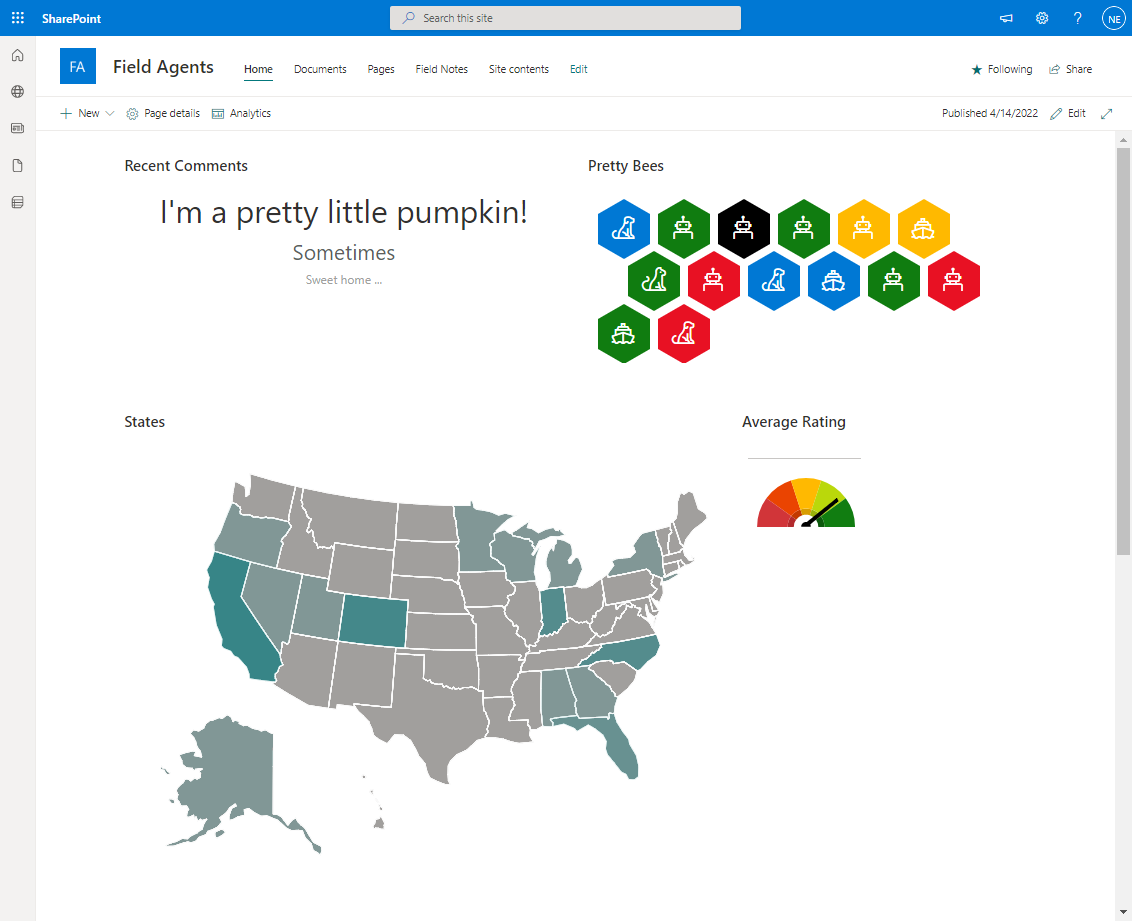
Alternating Row Styles with List Formatting

An easy way to make your list views far more readable is to provide alternating styles between rows. This is especially helpful for wide lists with lots of columns.

Importantly, the alternating colors need to alternate regardless of the content of the list items. This means that even with changing sorts and filters applied, the alternating styles should remain consistent. Up until a few days ago, this wasn’t possible with List Formatting. However, thanks to a new operation and magic string, applying alternating styles is super easy!

Although you can use this same basic concept for advanced visualizations within column formatting or row format style view formatting, the most common usage is to apply a color across the whole row for every other row. That’s what I’ll demonstrate here using a row class style view format.

@rowIndex

A new magic string has been added that will provide you the index (relative to the view) for a given row. The index starts at 0. So, when a view is rendered, the row at the top has a @rowIndex of 0, the next is 1, the next is 2 and so on. If the sort changes, whatever row just became the new top row has a @rowIndex of 0.

We can see this in action with a simple column format:

{
  "$schema": "https://developer.microsoft.com/json-schemas/sp/column-formatting.schema.json",
  "elmType": "div",
  "txtContent": "@rowIndex"
}
The @rowIndex value remains consistent based on render position!

Awesome! But just showing the index isn’t very helpful. Fortunately, a new operation has been added that makes using this value in an expression super easy.

Modulus (Remainder)

The modulus operator is the % sign. This operator returns the remainder left over when one operand is divided by a second operand. Here are some examples:

ExpressionResult
“=13 % 5”3
“=0 % 2”0
“=1 % 2”1
“=2 % 2”0
“=3 % 2”1

It’s those last 4 examples that are particularly relevant for us. By using the remainder operator with the second operand of 2, we can consistently get results for every other value!

Alternating Row Class

View formats provide an additionalRowClass property that allows us to apply a class(es) to whole rows. We can even do this conditionally! So, using what we learned above we can use this simple format to apply a class to every other row:

alternating-rowclass:

{
  "$schema": "https://developer.microsoft.com/json-schemas/sp/view-formatting.schema.json",
  "additionalRowClass": "=if(@rowIndex % 2 == 0,'ms-bgColor-themeLighter ms-bgColor-themeLight--hover','')"
}

We are checking to see if the remainder of dividing the @rowIndex by 2 is 0 (even numbers will be 0 and odd numbers will be 1). When it’s 0, we use the UI Fabric theme classes to apply a theme color across the whole row. We also add an additional class to add a hover effect as well. Here’s the result:

So beautiful!
On the fly sorts? No Problem!
On the fly filters? No Problem!

That’s all there is to it!

New List Formatting Magic String @currentWeb!

There are several special string values that can be used within both view and column formatting. The most common is, of course, @currentField which will return the value of the field you are formatting in column formatting or the title field in view formatting.

These “magic strings” are placeholders for contextual information that are replaced when the format is applied. For instance, @now will be replaced with the exact date/time the format is rendered. This is really helpful to provide dynamic formats.

While poking around today, I found a new one! @currentWeb can now be used to return the absolute url for the site! This is the equivalent of the page context’s webAbsoluteUrl.

Why is this exciting? Previously, you had 2 options when trying to link to something on your site or pulling in an image and they each had major drawbacks:

  • Hardcode the Base URL (https://tenant.sharepoint.com/yourresource)
    • Pro: You’ll always get the image/link you wanted
    • Con: Your format can’t be reused on other sites without manually fixing these links
  • Use a Relative URL (../../yourresource)
    • Pro: Your format is reusable across sites
    • Con: Your URLs are dependent on your relative location. So if someone uses your format within a web part on a different level of your site (folder), your URLs could break

Now, by using @currentWeb, you can have all the good with none of the bad!

For instance, just recently I demoed a quick tip on the PnP call that showed you how to use a relative URL to reference a local image in order to keep the format generic enough to be used with PnP Remote Provisioning. Now my dots can just be replaced with @currentWeb!

Here’s the original relative URL in the contenttype-format view formatting sample:

  "elmType": "img",
  "attributes": {
    "src": "='../../Shared Documents/Fruit/' + if([$ContentType]=='Apple',[$AppleType],[$OrangeType]) + '.png'"
  },

Again, that works fine as long as the format is being applied at the same relative distance from the image files. But now, we can just write:

  "elmType": "img",
  "attributes": {
    "src": "=@currentWeb + '/Shared Documents/Fruit/' + if([$ContentType]=='Apple',[$AppleType],[$OrangeType]) + '.png'"
  },

Now, the resulting URL will always resolve to my images regardless of where in the site my format is being rendered!

Here’s an even simpler example for when I want to link to a document in my documents library:

{
  "$schema": "https://developer.microsoft.com/json-schemas/sp/column-formatting.schema.json",
  "elmType": "a",
  "attributes": {
    "href": "=@currentWeb + '/Shared Documents/MyDoc.pdf"
  }
}

What a great addition! Now List Formatting is even more powerful!

Note: @currentWeb is only supported in SharePoint Online and is not available in SharePoint 2019

Update!

See this demoed on the PnP Call (Live from MVP Summit):

Love List Formatting?

Join the Bi-weekly (every other Thursday) SharePoint Patterns and Practices special interest group for general development call where I will be presenting a new List Formatting Quick Tip on each call!

Also, come get the full picture in my sessions about List Formatting at the SharePoint Conference in Las Vegas in May, or the European Collaboration Summit in Germany in May:

Join me at SPC to learn all about List Formatting in O365 and SP2019!

I love List Formatting (column formatting and view formatting). I’ve contributed many samples, created an editor, and I present List Formatting Quick Tips during the Patterns and Practices (PnP) Special Interest Group call for general SharePoint Development. Now, I get to speak about it at the SharePoint Conference in Las Vegas this May!

List Formatting in O365 and SharePoint 2019

Did you know you can quickly and easily provide dynamic visualizations directly in List views? Both non developers and developers can change how fields and rows look in modern list views by creating simple JSON objects. Learn how to conditionally format fields and rows to take your lists from simple tables to meaningful views. We’ll cover the basics of list formatting, tips and tricks, and the tools and resources available to enable you to get started immediately.

That’s the quick blurb about the session, but what kinds of things will we actually cover?

We’ll start with the basics and show you the many options for applying formats. I’ll cover both the out of the box options (JSON and preformatted options) as well as show you the PnP List Formatter tool I wrote.

We’ll talk about syntax and possibilities primarily by walking through many of the amazing community samples. You’ll be inspired by what you can do and how easily you can do it. They’ll be some code, of course, and we’ll talk about how it works, but if that’s not your thing, I’ll also be showing you lots of ways you can skip the code altogether.

We’ll also talk about some of the limitations and the alternatives you might consider when your needs go beyond what List Formatting can do (hint, attend my other session on SharePoint Framework Extensions). I’ll share several clever tricks for working around these limitations.

My goal is for you to leave the session excited about what you can do without having to be a developer or deploying code (You only need Designer level permissions on your site). I’ll assume nothing about your experience level and they’ll be plenty of material for those of you just getting started. But, I’ll also be providing lots of advice and advanced scenarios so that even those that have been using List Formatting for a while are sure to get a lot as well.

If you still have questions or ideas, I’ll also be helping with the Patterns and Practices booth and will be happy to talk with you further! I seriously love this stuff and would love to talk with you.

Register!

It’s almost January, and if your company is just about to get new budgets for the new year. Make sure you’re on the list! The sooner you register, the cheaper it is. You can even use KENT to save an additional $50! WOWEE!

Employees that attend conferences are generally some of the best. Take advantage of access to so much knowledge. Don’t just attend your co-worker’s talk about what they learned – be the one giving the talk! Show off your own expertise and use this conference to grow your career.

My day job is consulting. My company would be happy to take your money, but it’s even cheaper to ensure your team is up to date on what’s available and how to do it. The more of your team you send the better.

Attend!

I attended the conference last year and it was awesome! If you are a SharePoint professional (user, admin, manager, developer, etc.) then you should attend! There are tons of sessions from both experts in the community and Microsoft themselves.

Many of the biggest announcements are made at the conference and Microsoft engineering is out in full force. It’s the perfect time to find out what’s happening in SharePoint (and related technologies like PowerApps, Flow, OneDrive, Yammer, Teams, and more) and to get answers to your questions. The speakers, Microsoft engineers, and other members of the community are highly accessible. Find them! Ask them things and suggest ideas directly. Seriously, it’s one of the most valuable parts of the conference and you’re missing out if you aren’t doing this!

Even better? Find one of the experts and buy them a drink (or hand them one of the free ones). There are lots of networking opportunities and people are often amazed at how approachable so many members of the community are!

Have Fun!

Attend as many sessions as you can and participate in the after hours events if you’re interested. But you’ll also be in Las Vegas. So go catch a show! The MGM Grand itself is host to David Copperfield. Paolo Pialorsi and I attended it last year and it was awesome!

This is us in the FRONT ROW taking a picture in front of the no pictures sign

Whether you attend my sessions or not, I hope you’ll come and say hello. In the meantime, feel free to reach out on this blog, twitter, or attend one of the PnP Calls!

Join me at SharePoint Saturday Charlotte on August 11th!

I will be presenting Getting Started with the SharePoint Framework (SPFx) and O365 List Formatting on Saturday, August 11th 2018 in Charlotte as part of SPSCLT!

SPSCLTvan

Last year’s event was awesome! Don’t miss this opportunity for free training with keynotes by Bill Baer, Brian Alderman, AND Naomi Moneypenny (Not to mention all the other great speakers)!

I’ll be presenting Getting Started with the SharePoint Framework (SPFx) at 10 am. This session will provide an overview of all your customization options and focus on where the SharePoint Framework fits in that ecosystem. You’ll leave this session knowing what the SharePoint Framework is, what it can do, when to use it, and how to get there. I’ll also provide you a bunch of tips and tricks to get you going right away.

Then I’ll be presenting O365 List Formatting at 11:15 am. We’ll cover Column Formatting and take a look at the soon to be released View formatting. We’ll talk about both the power and flexibility of this approach along with some of the limitations. I’ll share the basics of list formatting, tips and tricks, and tools and resources available to enable you to get started immediately (including a demo of Column Formatter 2.0).

I’m really excited to return to SPS Charlotte. Great attendees, great speakers, and great SWAG all at a FREE event – don’t miss it!

Tracking SharePoint Popular Items Accessed through JavaScript

Applies to: SharePoint 2013+

A while back I wrote an AngularJS app running in SharePoint 2013 and using lists as the backing store for some components. Without getting into the reasons this particular architecture was chosen, let’s look at an issue that came up.

The client asked us to show the popular items. There is a standard web part for this, but you can also query the search API directly by sorting by ViewsLifeTime:descending which is what we did so that we could display it in a custom Angular directive. No problem! Right?

It wasn’t until some time later that the client asked about the results we were displaying. The most “popular” items appeared to be the ones they had had trouble with behind the scenes and didn’t match their expectations about what users would be viewing.

Unpopular

When you view a list item (dispform.aspx?id=X) this view is tracked in SharePoint’s Usage Analytics (assuming you’ve configured this correctly). It’s this information that is used by search to determine an item’s popularity.

Unfortunately, it turns out pulling items from the REST API triggers no such view event. This seems obvious in retrospect, but until we really thought about it, usage tracking is just one of those magical behind the scenes things SharePoint does and we just assumed it would work.

This explains the results the client was seeing. The items they were having trouble with are the ones they were viewing directly (outside of the Angular app). While this wasn’t a ton of traffic, it was far more than any other list item was getting since they were only being viewed via the REST API inside a custom application. Ugh.

Fortunately, the fix for this isn’t too complicated, it’s just not very obvious.

Spoofing Item Views in JavaScript

You can log a View event using the SP.Analytics.AnalyticsUsageEntry.logAnalyticsEvent2 method. I had trouble finding any helpful documentation on this method or what the parameters should be. Fortunately, after some experimentation (and patience as the entries are not immediately available), I got it working.

Here’s the basic JS code which you can then adapt and make smarter:


function logItemUsage(itemId, listName) {
SP.SOD.executeOrDelayUntilScriptLoaded(function() {
var stuff = {
ctx: SP.ClientContext.get_current()
};
stuff.user = stuff.ctx.get_web().get_currentUser();
stuff.ctx.load(stuff.user);
stuff.scope = "{00000000-0000-0000-0000-000000000000}";
stuff.site = stuff.ctx.get_site();
stuff.ctx.load(stuff.site);
this.stuff.ctx.executeQueryAsync(
function () {
stuff.siteId = stuff.site.get_id();
var itemUrl = _spPageContextInfo.webAbsoluteUrl + "/Lists/" + listName + "/DispForm.aspx?ID=" + itemId;
SP.Analytics.AnalyticsUsageEntry.logAnalyticsEvent2(
stuff.ctx,
1,
itemUrl,
stuff.scope,
stuff.siteId,
stuff.user
);
stuff.ctx.executeQueryAsync(
function() {
console.log("Logged: " + itemUrl);
}, function (s, a) {
console.log(a.get_message());
}
}, function (s, a) {
console.log(a.get_message());
}
);
}, "SP.js");
}

view raw

LogItemUsage.js

hosted with ❤ by GitHub

For instance, I adapted the above into an AngularJS service and wrapped the call to get the site Id and user into a promise so that I only had to pull that once in my app, but all of that is up to you.

One nice thing about doing this manually is you can control when it fires. For instance, you might want to only log usage during reads but not during edits or exclude administrative accounts, etc.

That’s it! Now your custom interface can participate in the internal popularity contest!

Column Formatting Client-Side Web Part: Column Formatter

Applies To: Office 365

Update

This solution is now officially a part of SharePoint PnP! Please use this repo for all updates, issues, contributions, and more. Whoo Whoo!


Modern listviews support the addition of custom formatting for most field types. This is an awesome feature designed to make custom formatting simpler and less administratively difficult than packaged solutions.

Unfortunately, the tooling is still very minimal. Users are given a simple text field within a panel to paste the JSON code and a preview and save button. The panel is clearly not designed to enable editing meaning that not only do users have to write code, they have to find someplace to do it.

The official suggestion is to use VS Code which will provide some auto completion using the standard schema. However, there are several downsides to this approach:

  • Requires a desktop client to be installed
    • Non developers that may have hung on past the initial mention of JSON are mostly gone by now
  • Once you do get VS Code up and running and begin editing your JSON:
    • The intellisense and syntax checking are very limited
    • There is no preview of your format
    • While some examples exist, there’s still a huge learning curve

I previously released a verbose schema which makes editing in VS Code a lot easier, but still doesn’t solve the preview problems, learning curve, or the need to use a tool outside of O365.

Column Formatter

ColumnFormattingChristmas4

Column Formatter is a SharePoint Framework client-side webpart I’ve created using React and Redux. It’s designed to give the full power of VS Code editing while providing easy to use templates and wizards all within the browser! The goal is to make writing and applying Column Formatting easier and quicker for both developers and end users.

Development Details

I originally set out to make an Application Customizer SPFx extension that would sit directly on the modern listview page. Unfortunately, there aren’t APIs available (at least that I could find) to load the CustomFormatter library on the page if none of the columns are using it yet, nor a way to trigger applying the formatting to the listview without actually changing the field’s CustomFormat value.

So I’ve extracted the CustomFormatter library into my project and am faking it by providing it only the dependencies it actually needs. While this gives me full control to enable “as you type” live preview of rendering, it also means that things could get out of sync with O365 development. For now, I’ll do my best to keep things updated but ultimately I’d like to be able to load the office CustomFormatter module on demand.

Similarly, I had to extract the styles of the modern listview and the unique classes for CustomFormatter.

The editor is a custom build of the Monaco Editor (the editor that powers VS Code). Getting this built as a module that worked in SPFx was a real challenge, but worth it because of the immense power it adds.

This was my first experience with Redux. It was hard to wrap my head around at first and there is a significant amount of boilerplate code required (largely to play nice with Typescript), but I wouldn’t do any React webpart of even minor complexity without it! It simplifies state management and makes additional iterations of features much easier.

What’s next

There are a few templates and wizards included currently, but there are way more that could be added. I plan to keep adding these and am open to both pull requests and suggestions.

DataBarsWizard
Wizards make it easy to generate Column Formatting without writing any code

TrendingTemplate
Templates provide you with starter code and sample data

I have submitted this webpart as an entry in the Hack Productivity 3 hackathon (Go vote for it, please!) which is why it’s currently hosted on my github. I’d like to get it included in SharePoint PnP if they’re open to it, although I’m not sure where it should go just yet.

More Information

You can find a lot more details about features and how to use Column Formatter in the ReadMe in the repo. I also created a demonstration video that covers a lot of the features:

Utilizing SPFx serveConfigurations

Recently a new serveConfigurations section was added to the serve.json config file in new SPFx Extension projects. These are a huge help when it comes to debugging extensions and are especially helpful when testing ClientSideProperties.

Robot-Tennis--33121

Background

Prior to the introduction of serveConfigurations, you couldn’t just run the gulp serve command like you do for webparts since that launches the local workbench where extensions couldn’t (and still can’t) be tested.

So the advice was to use gulp serve –nobrowser and then just navigate manually to a page in O365 and paste an ugly (and easy to screw up) set of querystrings.

Waldek Mastykarz even created a gulp task, gulp serve-info, that made this a little easier. I used it in my extensions and it was a huge leg up, but the whole thing was still clunky and a significant complexity preventing new developers from getting into extension development (or at least frustrating them).

What was needed was something as simple as gulp serve that took into account your custom locations and unique property settings. Fortunately, that’s where serveConfigurations comes in!

Setting up your serveConfigurations

When you generate a new SPFx Extension you’ll find a couple of initial serveConfiguration entries were created for you automatically in the config/serve.json file:

Default serveConfigurations

The values of these configurations should remind you of all of those querystring parameters because that’s exactly how these are going to be used. These values will build the URL for you when you serve your solution. The IDs and properties all match what was generated (although you are unlikely to keep the testMessage property for long).

The first thing you should do is replace the pageUrl property with the page address in your O365 tenant where you want to test the extension. Keep in mind these values are NOT used in the final package and are only for testing.

The sample above is for an Application Customizer (which is why the location property exists). Each type of extension will have slightly different properties (same as the debug querystrings), but will be added for you with your extension.

Multiple serveConfigurations

If you’re only doing a single extension in your solution and you aren’t using ClientSideProperties then all you need is the default entry using your own pageUrl value. If however, you have multiple extensions, then you’ll want an entry for each so that you can selectively decide which one you are serving when running gulp serve.

It is also comes in handy when you want to test different ClientSideProperty configurations. For my Field Customizer sample SPFx Item Order I allowed users to specify an OrderField property. When it was present the extension did one thing and when it wasn’t it did another.

To make this easy I included 2 serveConfigurations entries (one with the property and one without):

custom serveConfigurations

Using the serveConfigurations

Text in a json file! WOW! But how does this help?

Now when you run gulp serve the default serveConfiguration entry will be used and the browser will go to the pageUrl you specified and the debug querystring will be built using the values you provided!

Even better, you can specify which serveConfiguration you want to use using the –config parameter. So for the Item Order Field Customizer shown above, I could test the custom field configuration by entering this at a command prompt:

gulp serve --config=customField

Now the browser will be launched and my custom property will be set!

You can even see the URL that the browser will be sent to directly in the command output:

GeneratedURL

Aren’t you glad you didn’t have to type that (and get it right)? So, if you’re doing SPFx Extension development, serveConfigurations makes your life much easier!

Join us at Cincinnati SharePoint Saturday on October 14th!

Matt Jimison and I will be presenting Getting Started with the SharePoint Framework (SPFx) on Saturday, October 14th, 2017 in Cincinnati as part of ScarePoint Saturday (SPS Cincinnati)!

SPSCinci17-TitleSlide

Bill Baer will be delivering the keynote: SharePoint, OneDrive, and Digital Transformation – and there are a ton of other great speakers (plus it’s free)!

Our session is at 10:40 and will introduce you to the SharePoint Framework (both web parts and extensions). We’ll actually walk you through getting the various tools installed and ready (bring your laptop) so that by the time you leave you’ll know not only what the SharePoint Framework is, what it can do, and when to use it – you’ll be ready to start experimenting immediately!

Join me at Kansas City SharePoint Saturday on September 16th!

I will be presenting 10 Ways SharePoint Online Will Benefit Your Intranet on Saturday, September 16th, 2017 in Kansas City as part of SPS Kansas City!

There are 20 different sessions across 5 tracks presented by some great speakers and MVPs. All of that for the low low price of free!

1400-hero-kansas-city-mo-dusk-city-view-imgcache-rev1394030674270-web-1400-720

My session:

While many companies have already initiated transformation around their products and customers, that same level of transformation is often not happening around employees. Yet increasing employee productivity can come with an enormous ROI, by streamlining collaboration, reducing the amount of time employees search for content, eliminating manual tasks, and creating faster decision-making that leads to more agile employees and companies.

Discover how you can build a Digital Workspace for your employees by utilizing Office 365 and SharePoint Online to take your Intranet to the next level. By moving to the cloud, we’ll cover how your organization can start delivering more value at an even lower cost. Whether you’re considering a full migration to SharePoint Online or looking at a hybrid scenario, this session will help you envision an even more powerful Intranet for your company.

Key Takeaways:

  • Keep your team connected
    • Access your Intranet from any location and any device, with the ability to also include external parties. Keep information at the fingertips of your employees
  • Embrace an Agile Environment
    • Capitalize on regularly scheduled enhancements to the platform, as well as powerful development capabilities, such as the SharePoint Framework, Microsoft Graph API, PowerApps, and Flow
  • Safe and Secure
    • Discover how SharePoint Online meets security and compliance requirements in even the most demanding environments, while also providing a high level of reliability

What are you waiting for? Go get Registered!