Thank you SPTechCon Austin!

I had the honor of attending and speaking at SPTechCon West this week. It was great! I attended several really awesome sessions, attendees were super engaged, and I even got some sweet swag. Even better? I crushed Vlad Catrinescu at Mario Kart on the same big screen we both presented on the next day.

Getting the Most out of SharePoint Patterns and Practices (PnP)

Photo via David Warner II

On Monday I presented one of my favorite sessions. This session is like a sampler platter of the awesome stuff the PnP team and community has made available for everyone to use and learn from. There were lots of people who hadn’t heard of PnP, which means their jobs are now going to be so much easier. Whoo!

There was a lot of great feedback and participation. People were very excited about Page Transformation for Modernization and, as always, PnP PowerShell. The samples and contribution opportunities were also of great interest.

Slides: Getting the Most out of SharePoint Patterns and Practices

List Formatting in O365 and 2019

Earlier today I got to present on my other favorite topic: List Formatting. Unfortunately, I got over ambitious and tried to fill my session with tons of information AND demos. I ran out of time. Sadness.

It was a big crowd and lots of people were very excited about the amazing things you can do with List Formatting. I had lots of people asking questions afterwards and even helped setup some formats for attendees right in the room. That’s the power of List Formatting, we can apply them with no installations, deployments, or admin privileges!

Slides: O365 List Formatting

Thank you so much to all the attendees, speakers, sponsors, and organizers. SPTechCon has lots of user targeted information, but so many of the sessions went into a lot of depth that I left with lots of great tips and I’m sure everyone else did too!

Applying Column Formats to Multi-line Text Fields

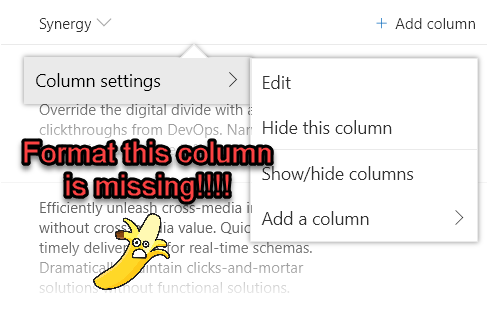
Multi-line text columns don’t provide the standard “Format this column” option under Column settings in the modern list view column menu. They used to, but now they don’t. Fortunately, there is still a way to apply column formatting to these fields!

There are 2 ways in within the interface to apply column formatting for a column (you can also do it programatically). The easiest and most common way is to use the “Format this column” option mentioned above, but it’s not the only way! The advanced settings for a column provide an additional spot where you can paste your formats. Aw yeah!

The Format

I’m using the text-wrap-format sample from PnP created by Aaron Miao. This is a great format for when you really want to see your full text (instead of the cut-off fade provided by default). I’ve modified the sample slightly to apply the primary theme color for the text to make it even more obvious. Here’s the full format:

{
  "$schema": "https://developer.microsoft.com/json-schemas/sp/column-formatting.schema.json",
  "elmType": "div",
  "txtContent": "@currentField",
  "style": {
    "white-space": "normal",
    "padding": "11px 0"
  },
  "attributes": {
    "class": "ms-fontColor-themePrimary"
  }
}

Applying the Format

Here’s what our list view looks like before applying column formatting to the multi-line text field, “Synergy”:

To apply column formatting to a multi-line text column:

  • Navigate to the List Settings (Site Actions > List Settings):
  • Choose the multi-line column from the column settings
  • Scroll to the bottom of the multi-line column settings and paste your format in the Column Formatting section:
This same option is also available for site columns!
  • Click OK, then return to your list view and refresh to see the format applied:
The blue is the theme color and was added to the sample just to make it more obvious a format was applied. The key thing to notice is that the full text is now shown.
  • Weep at the beauty of thy column!

NOTE – List Formatting encodes values prior to rendering which makes the use of enhanced (rich text) multi-line fields basically unusable in your formats. These values come back as HTML and that HTML will be encoded and then displayed inline with your values. It is NOT recommended to use Rich text fields in your formats.

Update

See this demoed on the PnP Call (Live from MVP Summit):

Love List Formatting?

Join the Bi-weekly (every other Thursday) SharePoint Patterns and Practices special interest group for general development call where I will be presenting a new List Formatting Quick Tip on each call!

Also, come get the full picture in my sessions about List Formatting at the SharePoint Conference in Las Vegas in May, or the European Collaboration Summit in Germany in May:

Join me at SPC to learn all about List Formatting in O365 and SP2019!

I love List Formatting (column formatting and view formatting). I’ve contributed many samples, created an editor, and I present List Formatting Quick Tips during the Patterns and Practices (PnP) Special Interest Group call for general SharePoint Development. Now, I get to speak about it at the SharePoint Conference in Las Vegas this May!

List Formatting in O365 and SharePoint 2019

Did you know you can quickly and easily provide dynamic visualizations directly in List views? Both non developers and developers can change how fields and rows look in modern list views by creating simple JSON objects. Learn how to conditionally format fields and rows to take your lists from simple tables to meaningful views. We’ll cover the basics of list formatting, tips and tricks, and the tools and resources available to enable you to get started immediately.

That’s the quick blurb about the session, but what kinds of things will we actually cover?

We’ll start with the basics and show you the many options for applying formats. I’ll cover both the out of the box options (JSON and preformatted options) as well as show you the PnP List Formatter tool I wrote.

We’ll talk about syntax and possibilities primarily by walking through many of the amazing community samples. You’ll be inspired by what you can do and how easily you can do it. They’ll be some code, of course, and we’ll talk about how it works, but if that’s not your thing, I’ll also be showing you lots of ways you can skip the code altogether.

We’ll also talk about some of the limitations and the alternatives you might consider when your needs go beyond what List Formatting can do (hint, attend my other session on SharePoint Framework Extensions). I’ll share several clever tricks for working around these limitations.

My goal is for you to leave the session excited about what you can do without having to be a developer or deploying code (You only need Designer level permissions on your site). I’ll assume nothing about your experience level and they’ll be plenty of material for those of you just getting started. But, I’ll also be providing lots of advice and advanced scenarios so that even those that have been using List Formatting for a while are sure to get a lot as well.

If you still have questions or ideas, I’ll also be helping with the Patterns and Practices booth and will be happy to talk with you further! I seriously love this stuff and would love to talk with you.

Register!

It’s almost January, and if your company is just about to get new budgets for the new year. Make sure you’re on the list! The sooner you register, the cheaper it is. You can even use KENT to save an additional $50! WOWEE!

Employees that attend conferences are generally some of the best. Take advantage of access to so much knowledge. Don’t just attend your co-worker’s talk about what they learned – be the one giving the talk! Show off your own expertise and use this conference to grow your career.

My day job is consulting. My company would be happy to take your money, but it’s even cheaper to ensure your team is up to date on what’s available and how to do it. The more of your team you send the better.

Attend!

I attended the conference last year and it was awesome! If you are a SharePoint professional (user, admin, manager, developer, etc.) then you should attend! There are tons of sessions from both experts in the community and Microsoft themselves.

Many of the biggest announcements are made at the conference and Microsoft engineering is out in full force. It’s the perfect time to find out what’s happening in SharePoint (and related technologies like PowerApps, Flow, OneDrive, Yammer, Teams, and more) and to get answers to your questions. The speakers, Microsoft engineers, and other members of the community are highly accessible. Find them! Ask them things and suggest ideas directly. Seriously, it’s one of the most valuable parts of the conference and you’re missing out if you aren’t doing this!

Even better? Find one of the experts and buy them a drink (or hand them one of the free ones). There are lots of networking opportunities and people are often amazed at how approachable so many members of the community are!

Have Fun!

Attend as many sessions as you can and participate in the after hours events if you’re interested. But you’ll also be in Las Vegas. So go catch a show! The MGM Grand itself is host to David Copperfield. Paolo Pialorsi and I attended it last year and it was awesome!

This is us in the FRONT ROW taking a picture in front of the no pictures sign

Whether you attend my sessions or not, I hope you’ll come and say hello. In the meantime, feel free to reach out on this blog, twitter, or attend one of the PnP Calls!

List Formatting Quick Tip: Format Only Columns

Sometimes you want to create a column but you don’t care about it’s contents. I do this all the time when creating Flow buttons:

LaunchFlowFormat

By providing a button directly in the list view that launches a flow for the given item you make it far easier for users to know about the availability of the flow, make it easy to quickly get their job done, and you can even provide additional context such as a tooltip or specific icon. You can see how to do this (and then just cut/paste/modify the format) using the Launch Flow for the Selected Item column formatting sample.

It’s a great sample and a great use case for column formatting. However, the quick tip I want to share with you is how to easily make a format only column. A format only column is part of your view but doesn’t get in the way while editing or creating items.

The values of Calculated columns can’t be retrieved in list formatting, but these columns can still have column formats associated with them. So the trick is to use an empty calculated column!

  1. In your list view choose Add column then in the list of types choose More…
    AddAColumnMore
  2. Give the column a name and choose Calculated for the type. In the formula box enter =”” then click OK:
    EmptyCalculatedColumn
  3. Now you can apply whatever format you want by using the column menu and choosing Column Settings > Format this column and pasting it in.

Now you have a column that can have a format applied to make your views look awesome, but won’t show up in the information panel!

FormatOnlyInformationPanel

Update!

See this demoed on the PnP Call (Live from MVP Summit):

Love List Formatting?

Join the Bi-weekly (every other Thursday) SharePoint Patterns and Practices special interest group for general development call where I will be presenting a new List Formatting Quick Tip on each call!

Also, come get the full picture in my sessions about List Formatting at the SharePoint Conference in Las Vegas in May, or the European Collaboration Summit in Germany in May:

A Verbose Schema for SharePoint Column Formatting (Proposal)

Declarative customization through Column Formatting in SharePoint Online is a really cool new way to customize how fields in lists and libraries are displayed. It’s all done through JSON and it’s pretty awesome.

I think there are a few minor areas it’s currently falling short, however. Such as:

Unfortunately, although there is an open source repo of great samples, Column Formatting itself is not something we can directly contribute to (outside of issues and user voice like the above). But, I had another issue that I really wanted solved so I solved it (at least for me) and thought I’d share and suggest it (or some version of it) should be adopted officially.

While a UI for generating the JSON would be awesome, the alternative suggestion of writing your column formatter in VS Code using the schema.json is a good one. However, I really wanted better intellisense to help me track down what I can and can’t do. So, I added a bunch of stuff to the schema.json file to do exactly that.

A Verbose Schema

Using my version of the columnFormattingSchema.json (currently available as a gist), you get fancy stuff like this:

VerboseColumnFormatting

Here’s what’s in here compared to the original:

  • Valid operations toLocalString(), toLocaleDateString(), and toLocaleTimeString() are no longer marked as invalid (added them to the operator enum)
  • The style property now only allows values corresponding to supported style attributes
    • Additionally, each style property has enum values corresponding to possible values
  • Valid attributes iconName, rel, and title are no longer marked as invalid
  • class attribute provides enum values (using the predefined classes)
  • target attribute provides enum values
  • role attribute provides enum values
  • rel attribute provides enum values
  • iconName attribute provides enum values
  • Most properties (like txtContent and operators) provide special string enums (@currentField, @me, @now, etc.)

It’s important to note that every value can still be an expression and even where enums are provided for convenience (like class or txtContent), you can still supply a string not in the list.

Using the Schema

When you apply column formatting the JSON is validated, but the actual schema isn’t really restricted like you might expect (this is why you could previously specify an iconName property without issue even though it was technically invalid). This also means that using the Verbose schema won’t cause any problems for you (I’ve actually tested it against every sample available to me) and is actually much more likely to prevent you from getting multiple console error messages about unsupported style attributes, etc.

For now, you can just save the file to your machine and use a local reference (as shown in the image above) or, even better, you can reference it directly from the gist (raw) like this:

{
    "$schema": "https://gist.githubusercontent.com/thechriskent/2e09be14a4b491cfae256220cfca6310/raw/eb9f675bf523208eb840c462d4f716fa92ce14c2/columnFormattingSchema.json"
}

Now, as long as you save that file with a .json extension, VS Code will automatically add the intellisense and extra validation!

You don’t even need to remove the $schema property (you can even leave it out, it is not currently used by SharePoint at all).

Also, for anyone that is wondering what the column formatter shown in the animation above looks like, here it is for a Person field:

Final
My name is red since I’m the logged in user

Using SharePoint RPC to Create Directories

Applies To: SharePoint, VB.NET

SharePoint provides many ways to create directories and to upload documents. One of the oldest, and possibly least understood, ways is to use the SharePoint Foundation RPC Protocol.

Generally, using RPC can be more trouble than it’s worth. However, RPC performs and scales well. It supports uploading your content and setting the metadata in one call. You can also use streams rather than just byte arrays. There are a few other reasons why you might choose RPC over the more common solutions, but I’ll assume you know what you’re trying to accomplish.

You can find a decent overview of options by Steve Curran that might give you a little more insight. If you’re still convinced RPC is the way to go, follow along!

In this post I’ll give you some basics about executing RPC methods and demonstrate by showing you how to create multiple directories in a single call.

Getting Started with RPC

The most frustrating part of working with RPC can be trying to track down working examples. In addition, the documentation is pretty sparse. It can also be difficult to find out exactly how you should be encoding your commands and exactly which part(s) should be encoded. Ultimately, you are just making an HTTP POST, but figuring out the correct payload can take a lot of trial and error. Especially since RPC is a little light on helpful error messages.

I’ve broken things down into several utility functions that should help keep things relatively simple and eliminate a lot of the low level troubleshooting that can slow you down.

I’m using VB.NET because the project I initially integrated these calls into was written in VB.NET. Nearly every example I saw out there was in C# and it shouldn’t be too hard to translate my code as needed. Should you have any difficulty, just leave a comment below. I have also placed all of my code inside a Module named SPUploader for convenience.

Basic Encoding Functions

Imports System.Net
Imports System.Text
Imports System.Web
Imports System.IO
Public Module SPUploader

    Public Function EncodeString(value As String) As String
        Return HttpUtility.UrlEncode(value).Replace(".", "%2e")
    End Function

    Private Function escapeVectorCharacters(value As String) As String
        Return value.Replace("\", "\\").Replace(";", "\;").Replace("|", "\|").Replace("[", "\[").Replace("]", "\]").Replace("=", "\=")
    End Function

Above are just a couple of simple functions that help to prepare strings. The characters that need to be escaped and the way in which certain parts are encoded can be difficult to sort through in RPC. We’ll be using these both quite a bit.

The EncodeString function uses the standard UrlEncode method with one additional encoding for periods. Some RPC methods don’t seem to have a problem with periods, but they all work with encoded ones. The escapeVectorCharacters function escapes the following characters \;|[]=

RPC Method Helpers

RPC methods are called using the method name, exact SharePoint version, service name and then any parameters. For instance, the create url-directories method that we will be using to create directories should be called like this:

method=create url-directories:server_extension_version&service_name=/&urldirs=list_of_url_directories

This presents a few challenges. First, we need the exact version of SharePoint before we make any calls. Hardcoding this is just asking for trouble. Second, what is the service_name? (Hint: It generally doesn’t matter and can almost always be left as /) and finally what are the parameters and how should those be included?

We’ll get to the specifics of the create url-directories method, but first let’s look at a series of functions that simplify how we call RPC methods in general:

    Public Function SharePointVersion(sharepointURL As String) As String
        Using client As New WebClient()
            client.UseDefaultCredentials = True
            client.DownloadString(sharepointURL)
            Return client.ResponseHeaders("MicrosoftSharePointTeamServices")
        End Using
    End Function

I adapted the above function from Joshua on Stackoverflow. This is a quick call to SharePoint that will give you that exact version string needed in all RPC methods. The general idea is that you can call this before an RPC method and cache the result for additional calls.

Here’s a helper method that takes care of building the properly encoded method string:

    Private Function methodValue(method As String, SPVersion As String) As String
        Return EncodeString(String.Format("{0}:{1}", method, SPVersion))
    End Function

This function simplifies generating the method:server_extension_version portion of the command.

Helper Class: RPCParameter

When dealing with additional parameters for methods (anything beyond method and service_name), the encoding of those parameters can get a little tricky. I’ve written a helper class called RPCParameter that can help smooth this trickiness:

Imports System.Web
Public Class RPCParameter
    Public Key As String
    Public Value As String = String.Empty
    Public IsMultiValue As Boolean = False
    Public Encode As Boolean = True

    Public Sub New(_key As String, _value As String, Optional _isMultiValue As Boolean = False, Optional _encode As Boolean = True)
        Key = _key
        Value = _value
        IsMultiValue = _isMultiValue
        Encode = _encode
    End Sub

    Public Function IsValid() As Boolean
        Return Not String.IsNullOrEmpty(Key)
    End Function


    Public Overrides Function ToString() As String
        If IsMultiValue Then
            Return String.Format("{0}=[{1}]", Key, IIf(Encode, SPUploader.EncodeString(Value), Value))
        Else
            Return String.Format("{0}={1}", Key, IIf(Encode, SPUploader.EncodeString(Value), Value))
        End If
    End Function
End Class

In general, parameters come exactly as you’d expect with a key=encodedvalue. However, there are some variations that can complicate things. This object may seem a little strange but it will become more obvious when we actually see it used. By default, a simple RPCParameter object is just a Key Value Pair with a custom ToString override that outputs key=encodedvalue.

There are some additional properties, however, that can customize this behavior. You can turn off encoding for the value by specifying the Encode property as false. The IsMultiValue property will insert the square brackets before encoding the value. This is important because often the values need to be encoded, but not the brackets.

Generating the Command

Every RPC method is just a string of parameters (Command String) that we convert to a byte array to upload as part of an HTTP POST. Here are a series of overloaded functions to help generate that command string into a byte array:

    Public Function CommandBytes(method As String, SPVersion As String, parameter As RPCParameter, Optional serviceName As String = "/") As Byte()
        Return Encoding.UTF8.GetBytes(CommandString(method, SPVersion, parameter, serviceName))
    End Function

    Public Function CommandBytes(method As String, SPVersion As String, parameters As List(Of RPCParameter), Optional serviceName As String = "/") As Byte()
        Return Encoding.UTF8.GetBytes(CommandString(method, SPVersion, parameters, serviceName))
    End Function

    Public Function CommandString(method As String, SPVersion As String, parameter As RPCParameter, Optional serviceName As String = "/") As String
        Dim parameters As New List(Of RPCParameter)
        parameters.Add(parameter)
        Return CommandString(method, SPVersion, parameters, serviceName)
    End Function

    Public Function CommandString(method As String, SPVersion As String, parameters As List(Of RPCParameter), Optional serviceName As String = "/") As String
        Dim command As New StringBuilder
        command.AppendFormat("method={0}&service_name={1}", methodValue(method, SPVersion), EncodeString(serviceName))
        For Each parameter As RPCParameter In parameters
            If parameter.IsValid Then
                command.AppendFormat("&{0}", parameter.ToString)
            End If
        Next
        Return command.ToString
    End Function

The CommandBytes functions (lines 27-33) encode the result string into a byte array and allow you to specify either a single RPCParameter object or a List of RPCParameter objects.

The CommandString fuctions actually build the string (lines 35-50). The only difference between them is that if you specify a single parameter, it gets converted to a List of parameters.

The real work for all 4 of these functions occurs in the final CommandString function (lines 41-50). We build the initial method=method&service_name=/ string that is used for every RPC method (line 43). Notice that we use our methodValue helper function to simplify things and and we always encode the service_name value.

Finally, we loop through the RPCParameter objects and append them if they have keys (IsValidusing the RPCParameter.ToString call that takes into account our individual encoding preferences.

So now that we can build the Command String, how do we actually send it to the server?

Executing an RPC Method

Executing an RPC method is really just sending an HTTP POST to a specific dll using the Command String as the payload. This can be easily done using a WebClient object:

    Public Function ExecuteRPC(webURL As String, data As Byte(), Optional creds As NetworkCredential = Nothing) As String
        Dim result As String = String.Empty
        If creds Is Nothing Then creds = CredentialCache.DefaultCredentials

        Using client As New WebClient With {.UseDefaultCredentials = False, .Credentials = creds}
            client.Headers("Content") = "application/x-vermeer-urlencoded"
            client.Headers("X-Vermeer-Content-Type") = "application/x-vermeer-urlencoded"
            client.Headers("user-agent") = "FrontPage"
            result = Encoding.UTF8.GetString(client.UploadData(webURL & "/_vti_bin/_vti_aut/author.dll", "POST", data))
        End Using

        Return result
    End Function

The ExecuteRPC function creates a WebClient object and sets the Content, X-Vermeer-Content-Type, and user-agent headers (lines 56-59). The main action happens in line 60 when we call the UploadData method causing the POST to the author.dll (there are additional dlls that can be used depending on your method, but this was the only one I’ve needed so I left it this way for simplicity) using the byte array we generate from the CommandString functions.

So far all we’ve done is setup all the helper functions so that we can call generic RPC methods. Any confusion on how we take advantage of all this code should clear up once we look at actually executing a real method.

Creating Directories

Our goal is to create a directory (or more often, multiple directories) using the create url-directories RPC method. We want to be able to take a folder path and ensure every folder in that path exists or is created. For instance, given the folder path “Some Folder/Sub Folder 1/Some Other Folder” we need to potentially create 3 directories in a single RPC method call.

The create url-directories method has only one parameter: urldirs. This parameter is an array of directories, along with properties for each, that we would like created if they don’t already exist. For our purposes, we’re just going to create standard folders without specifying any additional properties. Here’s what the code looks like:

    Public Function CreateFolder(webURL As String, libraryName As String, folderPath As String, SPVersion As String, Optional creds As NetworkCredential = Nothing) As String
        If Not String.IsNullOrEmpty(folderPath) Then
            folderPath = folderPath.Trim("/")

            'create url-directories method: http://msdn.microsoft.com/en-us/library/ms431862(v=office.14).aspx
            Return ExecuteRPC(webURL, CommandBytes("create url-directories", SPVersion, New RPCParameter("urldirs", folderPathToURLDirectories(libraryName, folderPath), True)), creds)
        End If
        Return "folderPath is Empty!"
    End Function

    Private Function folderPathToURLDirectories(libraryName As String, folderPath As String) As String
        Dim directories As New StringBuilder
        Dim parent As New StringBuilder

        folderPath = folderPath.Trim("/")
        libraryName = libraryName.Trim("/")

        parent.Append(libraryName & "/")

        Dim folders As String() = Split(folderPath, "/")
        For Each folder As String In folders
            directories.Append("[url=")
            directories.Append(parent.ToString & escapeVectorCharacters(folder))
            directories.Append(";meta_info=[]]")
            parent.Append(escapeVectorCharacters(folder) & "/")
        Next

        Return directories.ToString
    End Function

The CreateFolder function takes a web URL (this does not have to be the root site in a site collection), the name of the library in which to create the folder(s), the folderpath, the SharePoint version, and optionally the credentials to be used during the call (if not specified, the default credentials are used).

If the folderPath isn’t a blank string (line 67), then we strip off any trailing forward slashes (line 68). We then call our ExecuteRPC function using the bytes generated by calling the CommandBytes function using the method create url-directories.

In our ExecuteRPC function call we pass a single RPCParameter object. This is the urldirs parameter and we specify that it is a MultiValue parameter (this will ensure we have the required square brackets around the value). We set the value of the RPCParameter to the result of the folderPathToURLDirectories function. Finally we return the result from the server.

The folderPathToURLDirectories function is used to build our urldirs parameter. Directories need to be created in the proper order (parents first) and each need to have their full path (including the libraryName) in the form [url=path;meta_info=[]]. So if we have the path “Some Folder/Sub Folder 1/Some Other Folder” for the library Documents we want to end up with:

[url=Documents/Some Folder;meta_info=[]][url=Documents/Some Folder/Sub Folder 1;meta_info=[]][url=Documents/Some Folder/Sub Folder 1/Some Other Folder;meta_info=[]]

We do this by splitting the folderPath (line 85) and tracking the parent (including the libraryName) as we create each entry (lines 86-91).


That’s it! Now we can create a bunch of directories in SharePoint using the RPC Protocol! WOWEE! Stay tuned for my next post where we will add to our code to allow us to upload documents and set metadata all within a single call!

Unpublished View

Applies To: SharePoint

Versioning is a great feature in SharePoint but can cause administrators headaches when it comes to something like branding or other resource files. I’ve previously shown you how to automatically publish a major version and to approve documents as your solution deploys. In a perfect world you’ll never touch these files except through your solution.

However, sometimes you’ll need to quickly fix something or tweak something and you end up in a common situation: You can see the change but no one else can. This happens when versioning is turned on and you either haven’t published a major version (versions below 1) or the changes you’ve made are in draft state (ie 1.1 instead of 2.0).

Tracking these down can be frustrating since everything works for those with the right permissions. So here’s a quick view to add to your library to help you identify these problems. We’ll be filtering the library on 2 columns: Approval Status and Checked Out To.

First thing to do is to create a new view (I’ve named mine Unpublished). Choose whatever columns you want but some helpful ones are Type, Name, Modified, Modified By, Checked Out To and Version. You’ll also want to scroll down to the Folders settings and choose Show all items without folders.

You’ll notice that your view is now showing everything in a giant list because we didn’t apply any kind of filter. The reason for this is that the browser based view editor won’t let us select either IsNotNull as our comparison type or the Approval Status column. Fortunately, both of these things can be done very easily in SharePoint Designer. So switch to the Library ribbon and choose Modify in SharePoint Designer (Advanced) from the Modify View dropdown.

In the Code view just paste the following into your View’s XML inside the Query element:

<Where>
	<Or>
		<Eq>
			<FieldRef Name="_ModerationStatus"/>
			<Value Type="ModStat">Draft</Value>
		</Eq>
		<IsNotNull>
			<FieldRef Name="CheckoutUser"/>
		</IsNotNull>
	</Or>
</Where>

Things should look similar to this:

ViewCAML

What our view is doing is showing any files that are checked out (so the CheckoutUser column is not blank) or that don’t have a major version. For whatever reason Microsoft won’t give you easy access to the _ModerationStatus column unless your library is requiring approvals, but we can still use it. When it’s set to Draft then it’s a minor version.

Save and refresh in the browser and you should only see those documents that may be causing you problems. Check them in or Publish a Major Version as needed and things should be good. We’ve found this simple view to be very helpful, hopefully you do as well.

Broken Add New Document Links

Applies To: SharePoint 2010

We ran into an interesting problem the other day where a user called and said that everytime they clicked the Add New Document link they got a giant error message. I went to the site and was able to confirm that it was indeed blowing up.

This was only happening when the document library was being exposed through a web part on another page. Going directly to the library and clicking New Document or Upload Document in the ribbon worked just fine. The problem was obviously with the web part toolbar, which in this case was set to Summary Toolbar.

It appears this is something left over from our upgrade from SharePoint 2007 to SharePoint 2010. I would’ve thought the Visual Upgrade would have fixed this and it’s amazing no one noticed for well over a year! It seems that Microsoft changed not only the look of the link (switching the icon from a little square to a green plus and removing the word new) the underlying address also changed.

AddNewDocumentLink
Broken Old Style Link
NewDocumentLink
Correct Style Link

Taking a look at where these links were pointed, I could see that the old style link was pointed at listform.aspx:

/_Layouts/listform.aspx?PageType=8&ListId={LISTGUID}?RootFolder=

While the new style link was pointed at Upload.aspx:

/_layouts/Upload.aspx?List=LISTGUID&RootFolder

Fixing this is pretty easy. Just edit the web part and change the Toolbar Type to No Toolbar and click Apply:

ToolBarTypeNone

Then immediately switch the Toolbar Type back to Summary Toolbar and press OK:

ToolBarTypeSummary

Interestingly, other web parts sometimes show the old style link too (links, announcements, etc.) but since these all seem to still use the listform.aspx they continue to work. However, you can use the above technique to get them to match visually as well (green plus icon).

Dates With Relative Countdowns and Pretty Colors in List Views

Applies To: SharePoint 2010

Every list in SharePoint automatically comes with two date columns (Created & Modified). Often times other date columns get added in there and it can be nice to format these to make the lists more intuitive. Out of the box you can format these a few different ways (mostly whether to show the time or not). With a little XSL you can use the ddwrt:formatdatetime function to really customize things (you’ll see a couple of examples of this below) – but can’t we do more?

Large lists of data (whether they are numbers, statuses, dates, etc.) can be overwhelming. One of the greatest improvements we can make is to provide visual clues or analysis on this data to help end-users understand what they are looking at. When it comes to dates, what most people really want to know is what that date means relative to now. This is especially true when it comes to Due Dates such as seen in a Tasks list:

TaskList

We’ve greatly improved the readability of this list with some quick icons as demonstrated in my previous post: Showing Icons in a List View, but those due dates don’t really mean much at quick glance. We can do a couple of things to make these instantly understandable. We can add some color to indicate when the due date is near and/or missed. Even more powerful is showing how much time is left until the Due Date.

Adding Some Color

Flagging these dates with some quick color is pretty straightforward using SharePoint Designer. Designer will be generating some XSL and we’ll take a look at it at the end of this section, but we’ll be using the wizards and so no knowledge of XSL will be needed.

Open the site in SharePoint Designer (Site Actions > Edit in SharePoint Designer) and browse to the page/view you want to edit, or if this is a specific view just choose the Modify View dropdown and select Modify in SharePoint Designer (Advanced):

ModifyView

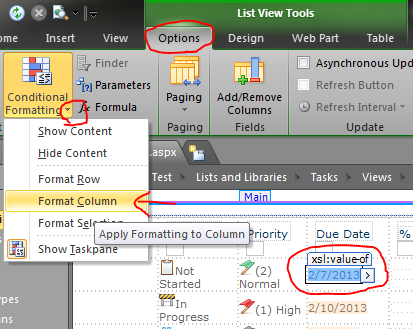
In Design view, click on one of the date values in the list and choose Format Column in the Conditional Formatting dropdown on the Options tab in the ribbon:

FormatDate

Our goal is to turn the cell red if the due date has passed; So in the Condition Criteria dialog set Field Name to Due Date, the Comparison to Less Than and the Value should remain the default of [Current Date]. Then press the Set Style button:

ConditionCriteriaPastDue

This formula reads: if the Due Date is older than (less) than now, set this style. We’re now setting up that style in the Modify Style dialog. In the Font category set the font-weight to bold (I’m also setting the color to Black since the default theme’s grayish font color doesn’t look great with a red background). Switch to the Background category and select a shade of red for the background-color and press OK:

PastDueStyle

I also like to provide a little warning before things get past due; So let’s make things turn yellow on the Due Date. So again, click on one of the date values in the list and choose Format Column in the Conditional Formatting dropdown on the Options tab in the ribbon. In the Condition Criteria dialog set Field Name to Due Date, the Comparison to Equal and the Value should remain the default of [Current Date]. Then press the Set Style button:

ConditionCriteriaWarning

This formula reads: if the Due Date is today, set this style. We’re now setting up that style in the Modify Style dialog. In the Font category set the font-weight to bold (I’m also setting the color to Black since the default theme’s grayish font color doesn’t look great with the yellow background either). Switch to the Background category and select a shade of yellow for the background-color and press OK:

WarningStyle

Save the view in Designer and refresh the view in the browser and you should see something similar to this (The date this screenshot was taken was 2/7/2013):

TaskListWithColors

For those that are interested, here’s the XSL that designer generated:

<xsl:attribute name="style">
	<xsl:if test="ddwrt:DateTimeTick(ddwrt:GenDisplayName(string($thisNode/@DueDate))) &lt; ddwrt:DateTimeTick(ddwrt:GenDisplayName(string($Today)))"
	 ddwrt:cf_explicit="1">
		font-weight: bold; background-color: #DF1515; color: #000000;
	</xsl:if>
	<xsl:if test="ddwrt:DateTimeTick(ddwrt:GenDisplayName(string($thisNode/@DueDate))) = ddwrt:DateTimeTick(ddwrt:GenDisplayName(string($Today)))"
	 ddwrt:cf_explicit="1">
		font-weight: bold; color: #000000; background-color: #FAE032;
	</xsl:if>
</xsl:attribute>

Relative Dates

With Due Dates there are 2 things you want to know: which ones have been missed and how much time is left. Quick color indicators are very effective in drawing the eye to important information and the red and yellow rules we put in place above help quickly answer the first question.

So how do we communicate how much time is left? Calculated columns are no help here (you can’t use Today and even when you hack it, they only get evaluated on modifications, NOT on view). The answer is some XSL tweaking. We won’t be using the same wizard-like interface as above, but I promise the type of XSL we’re going to be doing isn’t too scary.

The first thing we need to do is add some XSL templates to help us perform some basic date calculations. The easiest way is to use Andy Lewis’ DateTemplates. We’re going to pull out the needed templates and paste them directly into our XSL (since I’ve had a lot of trouble referencing external XSL when using Designer). Here’s the templates we want:

<xsl:template name="getDayDelta">
	<xsl:param name="paramDateA"/>
	<xsl:param name="paramDateB"/>
	<xsl:variable name="dateADays">
		<xsl:call-template name="countDaysInDateWithLeapYearDays">
			<xsl:with-param name="paramDate" select="$paramDateA"/>
		</xsl:call-template>
	</xsl:variable>
	<xsl:variable name="dateBDays">
		<xsl:call-template name="countDaysInDateWithLeapYearDays">
			<xsl:with-param name="paramDate" select="$paramDateB"/>
		</xsl:call-template>
	</xsl:variable>
	<xsl:value-of select="number($dateADays) - number($dateBDays)"/>
</xsl:template>

<xsl:template name="countDaysInDateWithLeapYearDays">
	<xsl:param name="paramDate"/>
	<xsl:variable name="year" select="substring-before($paramDate,'-')"/>
	<xsl:variable name="month" select="substring(substring-after($paramDate,'-'),1,2)"/>
	<xsl:variable name="day" select="substring(substring-after(substring-after($paramDate,'-'),'-'),1,2)"/>
	<xsl:variable name="rawYearDays" select="number($year) * 365"/>
	<xsl:variable name="rawLeapYears" select="floor($year div 4)"/>
	<xsl:variable name="centurySpan" select="floor($year div 100)"/>
	<xsl:variable name="fourCenturySpan" select="floor($year div 400)"/>
	<xsl:variable name="boolYearLeap">
		<xsl:call-template name="isLeapYear">
			<xsl:with-param name="paramYear" select="$year"/>
		</xsl:call-template>
	</xsl:variable>
	<xsl:variable name="yearLeapAdjust">
		<xsl:choose>
			<xsl:when test="$boolYearLeap = 1 and (($month = 1) or ($month = 2 and $day != 29))">-1</xsl:when>
			<xsl:otherwise>0</xsl:otherwise>
		</xsl:choose>
	</xsl:variable>
	<xsl:variable name="yearDays" select="$rawYearDays + $rawLeapYears - $centurySpan + $fourCenturySpan + $yearLeapAdjust "/>
	<xsl:variable name="monthDays">
		<xsl:call-template name="ConvertMonthToTotalDays">
			<xsl:with-param name="paramMonth" select="$month"/>
		</xsl:call-template>
	</xsl:variable>
	<xsl:variable name="totalDays" select="$yearDays + number($monthDays) + number($day)"/>
	<xsl:value-of select="$totalDays"/>
</xsl:template>

<xsl:template name="isLeapYear">
	<xsl:param name="paramYear"/>
	<xsl:choose>
		<xsl:when test="$paramYear mod 4 = 0 and ($paramYear mod 100 != 0) or ($paramYear mod 400 = 0)">1</xsl:when>
		<xsl:otherwise>0</xsl:otherwise>
	</xsl:choose>
</xsl:template>

<xsl:template name="ConvertMonthToTotalDays">
	<xsl:param name="paramMonth"/>
	<xsl:choose>
		<xsl:when test="$paramMonth=01">0</xsl:when>
		<xsl:when test="$paramMonth=02">31</xsl:when>
		<xsl:when test="$paramMonth=03">59</xsl:when>
		<xsl:when test="$paramMonth=04">90</xsl:when>
		<xsl:when test="$paramMonth=05">120</xsl:when>
		<xsl:when test="$paramMonth=06">151</xsl:when>
		<xsl:when test="$paramMonth=07">181</xsl:when>
		<xsl:when test="$paramMonth=08">212</xsl:when>
		<xsl:when test="$paramMonth=09">243</xsl:when>
		<xsl:when test="$paramMonth=10">273</xsl:when>
		<xsl:when test="$paramMonth=11">304</xsl:when>
		<xsl:when test="$paramMonth=12">334</xsl:when>
	</xsl:choose>
</xsl:template>

There are several templates above. We’re only going to call the getDayDelta function (it calls all the others). Copy the above XSL and in the Code view for your view of SharePoint Designer find the <Xsl> element. Skip a few lines down just past the last <xsl:param> element and paste the above. It should look something like this:

DateTemplates

Just putting these templates in the XSL doesn’t actually do anything yet. So switch to the Split view and select one of the Due Date values. The corresponding XSL should be highlighted in the code section:

DueDateOriginalXSL

Replace the highlighted section from above with the following:

<xsl:variable name="DateDueDayDelta">
	<xsl:call-template name="getDayDelta">
		<xsl:with-param name="paramDateA" select="ddwrt:FormatDateTime(string($thisNode/@*[name()=current()/@Name]),1033,'yyyy-MM-dd')"/>
		<xsl:with-param name="paramDateB" select="ddwrt:FormatDateTime(string(ddwrt:Today()),1033,'yyyy-MM-dd')"/>
	</xsl:call-template>
</xsl:variable>

<xsl:choose>
	<xsl:when test="$DateDueDayDelta=0">
		<xsl:text>Today</xsl:text>
	</xsl:when>
	<xsl:when test="$DateDueDayDelta=1">
		<xsl:text>1 Day</xsl:text>
	</xsl:when>
	<xsl:when test="$DateDueDayDelta=-1">
		<xsl:text>Yesterday!</xsl:text>
	</xsl:when>
	<xsl:when test="$DateDueDayDelta&lt;-1">
		<xsl:value-of select="concat($DateDueDayDelta,' Days!')"/>
	</xsl:when>
	<xsl:when test="$DateDueDayDelta&gt;1">
		<xsl:value-of select="concat($DateDueDayDelta,' Days')"/>
	</xsl:when>
</xsl:choose>

In lines 1-6 we’re calling the getDayDelta function from the DateTemplates and storing the value in a new variable called DateDueDayDelta. This value is the number of days between the first parameter, Due Date, and the second parameter, Today. We’re using the ddwrt:FormatDateTime function to ensure the parameters are in the form expected by the template. We’re also using the ddwrt:Today() function to get the current date.

Lines 8-24 is an XSL switch statement. We’re using it to give friendly text based on the number of days between. If the dates are the same, then we print “Today“. If the Due Date is still 1 day in the future, we print “1 Day“. If the Due Date is 1 day in the past (-1), we print “Yesterday!“. If the Due Date is even further in the past (< -1), we print “# Days!“. If the Due Date is more than a day away (> 1), we print “# Days“. This will probably make more sense if you just save the view and refresh it in the browser:

TasksWithRelativeDates

WOO HOO! That’s a huge improvement – but it could be better. Although I think it makes more sense to see the dates as relative for quickly glancing at the list, I don’t like losing that information altogether. So let’s put it back in as a tooltip.

In the code view, right above where you pasted the <xsl:variable> element, paste the following:

<span>
	<xsl:attribute name="title">
		<xsl:value-of select="ddwrt:FormatDateTime(string($thisNode/@DueDate),1033,'dddd, M/d/yy ')"/>
	</xsl:attribute>

Then scroll down to the closing <xsl:choose> element and close the <span> tag. Altogether, things should look similar to this:

FinalDueDateXSL

We just wrapped everything in a span so that we could set the title attribute (tooltip). We are again using the ddwrt:FormatDateTime function so that we can format the Due Date to show not just the date but the day of the week as well since this really helps people visualize the date when a calendar isn’t available. Save the view, refresh it in the browser and you should have something like this (The date this screenshot was taken was 2/7/2013):

FinalTasksList

You can quickly see how stacking these techniques can start to make lists much more intuitive and useful. WOWEE!