Thank you North American Collaboration Summit 2018!

Over the weekend I was able to attend and speak at the North American Collaboration Summit (Sharepointalooza) in Branson, Missouri. It was an extremely well run and attended event. It’s unbelievable to me that attendees were only paying $65 for content and experience that would cost $1500-2000+ elsewhere!

I spoke on Understanding SharePoint Patterns and Practices (PnP). I love this topic because it allows me to show off amazing stuff that always has immediate “Monday” value. People always leave this session with at least one or two things they’ll start using as soon as they get back to work. SharePoint PnP is awesome but it can be difficult to know about everything that is available.

I was able to demo:

  • SharePoint PnP PowerShell
  • Remote Provisioning
  • Site Designs with Remote Provisioning
  • PnPJS
  • Column Formatter

I even demonstrated how to do the simplest (but still very much appreciated) contribution by live fixing documentation!

Thanks to everyone who attended. I got a lot of great questions and once again people were really impressed with what PnP has to offer! Awesome event, awesome sponsors, awesome speakers, and awesome attendees!

Resources


Using SharePoint PnP PowerShell Modules Side-by-Side (2013, 2016, & Online)

Applies to SharePoint 2013, 2016, O365

Are you using SharePoint PnP PowerShell yet? Why not!?! Developers, IT Pros, and Power Users can all benefit from the SharePoint PnP PowerShell modules. The cmdlets wrap up a bunch of complex CSOM and REST calls into 280+ awesome commands. If you’re not using SharePoint PnP PowerShell you’re doing things on hard mode.

Installing SharePoint PnP PowerShell is super easy. You just choose your target version (2013, 2016, or Online) and install. If you’re on Windows 10 you can literally type Install-Module SharePointPnPPowerShellOnline into an administrator shell and you’re done.

But what if you’re like me and have multiple versions you need to target? I find myself needing to switch between SharePoint on premises and online all the time. Unfortunately the modules are often not cross-version compatible due to the different CSOM versions supported between the products. Something as simple as Get-PnPFolder against a 2013 site using the Online module won’t work and the errors aren’t always super obvious:

Error

For a while I’ve just used the Uninstall-Module command and just switched between them that way. This has struck me as dumb for a while now so I finally reached out to The Father himself, Erwin van Hunen, and he responded right away:

Tweet

Awesome! Here’s how to do that (with screenshots!):

Install All the Modules

Although you can install all the modules, you can only have 1 active within any given session. So if you want to switch modules (once you’ve already loaded one) you’ll need to close and reopen PowerShell.

Option 1 – SharePoint On-Premises as Default

If you install the modules using the PowerShell Gallery they will be installed into the default modules path. As a result, when you use a PnP PowerShell Command the first module will be auto loaded (but the other 2 won’t because of conflicts). This appears to be alphabetical. So if you installed all 3 then the default module will be 2013. If you want to use the Online module instead, you would simply run Import-Module SharePointPnPPowerShellOnline before running any PnP PowerShell Commands.

You can’t just run the simple install command for each module. You’ll end up with some version of this error on your second module:

ClobberError

You’ll need to use the -AllowClobber parameter:

Install

You can then check what versions you have installed using this command:

Get-Module SharePointPnPPowerShell* -ListAvailable | Select-Object Name,Version | Sort-Object Version -Descending

Now you can use any of the modules without having to uninstall/install first! By default you’ll be using 2013 (or 2016 if you skipped 2013) which may match your use case perfectly! You can always use the Import-Module command to target one of the other versions.

Option 2 – SharePoint Online as Default

To have the Online module be the one that is auto loaded when you use a PnP PowerShell Command but still have the option to load one of the on premises modules, you should only install the Online module through the PowerShell Gallery:

Install-OnlineOnly

You can then check what versions you have installed using this command to ensure you only have the Online module installed here:

Get-Module SharePointPnPPowerShell* -ListAvailable | Select-Object Name,Version | Sort-Object Version -Descending

To install the other module(s) you’ll use the Releases page to download the corresponding msi installers:

Releases

Just run these as normal to get these installed. Once the module(s) are installed, open System Properties from your control panel. Under the Advanced tab, click the Environment Variables… button. Under User variables, find the PSMODULEPATH variable. If the path(s) to the PnP PowerShell modules are the only values you can just delete it. Otherwise, you can edit it to remove those paths:

EnvironmentVariables

Now when you run a PnP PowerShell Command the Online module will be auto loaded (default). If you want to use one of the on premises modules instead, you have to run Import-Module PATHTOMODULE before running any PnP PowerShell Commands.

Unfortunately, the module path can be pretty long. For instance, here’s mine:

Import-Module C:\Users\ckent\AppData\Local\Apps\SharePointPnPPowerShell2013\Modules\SharePointPnPPowerShell2013

That’s not very convenient! Fortunately, the Windows PowerShell ISE provides snippets that can make it much simpler. You can create snippets using the New-IseSnippet command:

New-IseSnippet -Title " PnP2013" -Description "Imports the SharePointPnPPowerShell2013 Module" -Text "Import-Module $env:LOCALAPPDATA\Apps\SharePointPnPPowerShell2013\Modules\SharePointPnPPowerShell2013"

I put a space before the name so it would be at the top of the snippets. You can then access the snippet from either the script editor or the ISE prompt by pressing Ctrl-J:

Snippets


Now you can use the Online module by default but quickly load the on premises module as needed without having to uninstall/install all the time!

Creating a PnP TemplateProviderExtension

Applies To: OfficeDev PnP, SharePoint, PowerShell

The SharePoint PnP Remote Provisioning engine is awesome. With just a couple of lines of code or some quick PowerShell you can have a deployable “template” for your SharePoint site (on-premises or O365). OfficeDev PnP offers much more, but it’s the provisioning aspect of things we’re going to talk about today.

Specifically, we’re going to talk about extending the process through the new ITemplateProviderExtension interface. In the August 2016 release the PnP team released the ability to create your own provider extensions and incorporate them directly in the retrieval and application of your PnP templates (Read the announcement here, see an example here).

These new extensions allow you to stick your custom logic directly into the generation of templates and the application of templates. This allows you to apply special tweaks, adjust output, generate additional objects/calls, etc. There are 4 entry points (see the interface below) that give you a lot of flexibility.

The Project

An extension is just a class that implements the ITemplateProviderExtension (more about this in a bit). If you are interfacing with the provisioning engine using .NET directly then you can just add the class to your project. More likely, however, you’ll want to add it as a Class Library (this is true for calling it through PowerShell as well).

In Visual Studio, add a new project of type Class Library (File > New > Project and select Class Library from the list of templates, give it a name, and click OK).

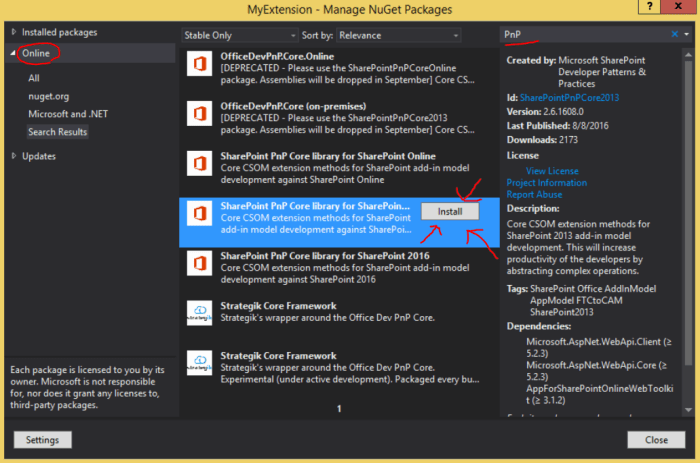
You’ll need to add the SharePoint PnP Core library NuGet package to your project. Right-Click on your project in Solution Explorer and choose Manage NuGet Packages… In the NuGet Package Manager click on Online in the left pane and type PnP into the Search Online box in the upper-right. From the results pick the SharePoint PnP Core library that matches your targeted version and click Install (I’m using SharePoint PnP Core library for SharePoint 2013 since I am targeting On-Premises SharePoint 2013):

PnP Package

This will take just a minute or so to copy everything into your project. You’ll probably be promoted to accept some licenses (just click accept). Once this is done, you can click Close.

The Interface

In your project you have a few files like Class1.cs, SharePointContext.cs and TokenHelper.cs. You can leave all of these (they won’t hurt anything). Right-click on Class1.cs and choose Rename. Enter the name of your extension. Visual Studio will also prompt you to rename the references for Class1 – Click Yes.

To implement the interface, you’ll want to slap a using statement up on top of your extension class for OfficeDevPnP.Core.Framework.Provisioning.Providers then implement the ITemplateProviderExtension like this:

using System;
using System.Collections.Generic;
using System.Linq;
using System.Text;
using System.Threading.Tasks;
using OfficeDevPnP.Core.Framework.Provisioning.Providers;

namespace MyExtension
{
    public class CommentIt : ITemplateProviderExtension
    {
    }
}

Right-Click on ITemplateProviderExtension and select Implement Interface > Implement Interface to have the class stubbed out for you:

ImplementInterface

So what the heck is all this? Let’s go through the methods and talk about what you’re going to want to use.

Entry Points

Your template provider extension can intercept the template at 4 different entry points and then do whatever it is you want to do. I find the name of the entry points a little difficult to follow, but here’s where they’re called within the life cycle of the template:

  • From SharePoint to Template (Get-SPOProvisioningTemplate)
    • Template object generated from SharePoint
      • PreProcessSaveTemplate
    • Template serialized into XML
      • PostProcessSaveTemplate
    • Template saved to file system


  • From Template to SharePoint (Apply-SPOProvisioningTemplate)
    • Template loaded from file system as XML
      • PreProcessGetTemplate
    • Template deserialized from XML to Template object
      • PostProcessGetTemplate
    • Template object applied to SharePoint

And here’s a reference chart:

Template Is
Action Template Object XML Stream
From SP to Template (Save) PreProcessSaveTemplate PostProcessSaveTemplate
Applying Template (Apply) PostProcessGetTemplate PreProcessGetTemplate

Supports Properties

The Supports properties indicate to the provisioning engine which entry points your extension supports (where you want to inject your logic). You’ll need to edit each of these to remove the NotImplementedException and to return true when you want to inject during that point and false when you don’t.

For my extension, I just want to tweak the XML when someone is saving the template from SharePoint so here’s what mine look like:

public bool SupportsGetTemplatePostProcessing
{
    get { return (false); }
}

public bool SupportsGetTemplatePreProcessing
{
    get { return (false); }
}

public bool SupportsSaveTemplatePostProcessing
{
    get { return (true); }
}

public bool SupportsSaveTemplatePreProcessing
{
    get { return (false); }
}

Initialize

The Initialize method is where you can pass any settings and do any setup. For my extension, I am just passing a string that I will inserting into the template XML:

private string _comment;
public void Initialize(object settings)
{
    _comment = settings as string;
}

Processing Methods

You only need to implement the methods where you indicated you were supporting them in the Supports properties. You can leave the rest with the default NotImplementedException in place.

For this example, I just want to tweak the XML when someone is saving the template from SharePoint so I returned true for the SupportsSaveTemplatePostProcessing property which means I need to implement the PostProcessSaveTemplate method. For what I’m doing, you’ll need a few more using statements:

using System.IO;
using System.Xml;
using OfficeDevPnP.Core.Framework.Provisioning.Providers.Xml;

Here’s are my methods:

public OfficeDevPnP.Core.Framework.Provisioning.Model.ProvisioningTemplate PostProcessGetTemplate(OfficeDevPnP.Core.Framework.Provisioning.Model.ProvisioningTemplate template)
{
    throw new NotImplementedException();
}

public System.IO.Stream PostProcessSaveTemplate(System.IO.Stream stream)
{
    MemoryStream result = new MemoryStream();

    //Load up the Template Stream to an XmlDocument so that we can manipulate it directly
    XmlDocument doc = new XmlDocument();
    doc.Load(stream);
    XmlNamespaceManager nspMgr = new XmlNamespaceManager(doc.NameTable);
    nspMgr.AddNamespace("pnp", XMLConstants.PROVISIONING_SCHEMA_NAMESPACE_2016_05);

    XmlNode root = doc.SelectSingleNode("//pnp:Provisioning", nspMgr);
    XmlNode commentNode = doc.CreateComment(_comment);
    root.PrependChild(commentNode);

    //Put it back into stream form for other provider extensions to have a go and to finish processing
    doc.Save(result);
    result.Position = 0;

    return (result);
}

public System.IO.Stream PreProcessGetTemplate(System.IO.Stream stream)
{
    throw new NotImplementedException();
}

public OfficeDevPnP.Core.Framework.Provisioning.Model.ProvisioningTemplate PreProcessSaveTemplate(OfficeDevPnP.Core.Framework.Provisioning.Model.ProvisioningTemplate template)
{
    throw new NotImplementedException();
}

This is a pretty silly example, but here’s what the code above is doing in the PostProcessSaveTemplate method:

  • Line 28, The method expects us to return the transformed XML steam when we’re done making our tweaks, so just getting it ready
  • Lines 31-34, We can use the native XmlDocument objects to interact with the XML Stream. We just load it into a document and account for the pnp namespace.
  • Line 36, We find the root node of the XML Template using xpath and the namespace
  • Line 37, We generate a new XML Comment using the string passed into our Initialize method
  • Line 38, We jam the comment into the root node so it shows up right at the top
  • Lines 41-44, We save the modified XmlDocument to our result stream, reset it, then pass it along its way

Using Your Extension

Great, so now we’ve got an extension! How do we use this thing? In .NET it’s as simple as initializing our extension class and passing it into the XMLTemplateProvider’s SaveAs method (see the announcement for an example).

In PowerShell, we can write a script to load the extension from our dll and provide it in the TemplateProviderExtensions argument to the Get-SPOProvisioningTemplate or Apply-SPOProvisioningTemplate cmdlets.

Here’s an example of a PowerShell script that uses my custom CommentIt extension (Be sure to heck your dll location):

[CmdletBinding()]
param
(
    [Parameter(Mandatory = $true, HelpMessage="Enter the URL of the target site, e.g. 'https://intranet.mydomain.com/sites/targetSite'")]
    [String]
    $TargetSiteUrl,

    [Parameter(Mandatory = $false, HelpMessage="Enter the filepath for the template, e.q. Folder\File.xml or Folder\File.pnp")]
    [String]
    $FilePath,

    [Parameter(Mandatory = $true, HelpMessage="Enter the comment to add!")]
    [String]
    $TemplateComment,

    [Parameter(Mandatory = $false, HelpMessage="Optional administration credentials")]
    [PSCredential]
    $Credentials
)

if(!$FilePath)
{
    $FilePath = "Extractions\site.xml"
}

if($Credentials -eq $null)
{
	$Credentials = Get-Credential -Message "Enter Admin Credentials"
}

Write-Host -ForegroundColor Yellow "Target Site URL: $targetSiteUrl"

try
{
    Connect-SPOnline $TargetSiteUrl -Credentials $Credentials -ErrorAction Stop

    [System.Reflection.Assembly]::LoadFrom("MyExtension\bin\Debug\MyExtension.dll") | Out-Null
    $commentIt = New-Object MyExtension.CommentIt
    $commentIt.Initialize($TemplateComment)

    Get-SPOProvisioningTemplate -Out $FilePath -Handlers Lists,Fields,ContentTypes,CustomActions -TemplateProviderExtensions $commentIt

    Disconnect-SPOnline

}
catch
{
    Write-Host -ForegroundColor Red "Exception occurred!"
    Write-Host -ForegroundColor Red "Exception Type: $($_.Exception.GetType().FullName)"
    Write-Host -ForegroundColor Red "Exception Message: $($_.Exception.Message)"
}

Please note, that you’ll need the PnP PowerShell Cmdlets installed for this to work. Instructions can be found here. I am using the 2013 On-Premise version but this script will work with whatever version you’re using.

Here’s what’s happening in this script:

  • Lines 1-29, Just setting up the parameters for the script. Nothing too special here
  • Line 31, Always nice to remind the user of important details
  • Line 35, Connect to SharePoint with a single line – wowee!
  • Line 37, Load up your dll from the file system (You can provide a full or relative path here). The pipe to Out-Null just keeps us from printing dll information to the console which would be strange to an end user
  • Line 38, Get your extension class as an object using the namespace from your dll
  • Line 39, Call the Initialize method of the extension. In this case we are passing in the comment received as a parameter to the script
  • Line 41, This is a standard call to Get-SPOProvisioningTemplate with the exception that we are specifying our custom extension in the TemplateProviderExtensions parameter
  • Line 43, Close up that connection

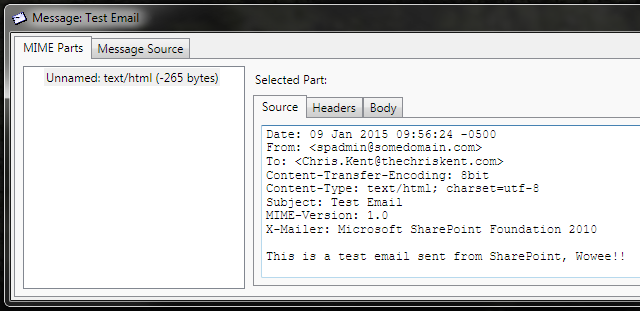
If we take a look at the XML file generated by our template (With a TemplateComment parameter of Look at this sweet comment!), we can see:

Comment.PNG

Aw yeah, boyo!

Debugging Your Extension

Generally, you’re going to be doing something more complicated than that and you’ll probably want to debug the thing. If you are calling your extension in .NET within Visual Studio then things are pretty much as you’d expect – Set your breakpoints and run the thing. PowerShell is a little less obvious.

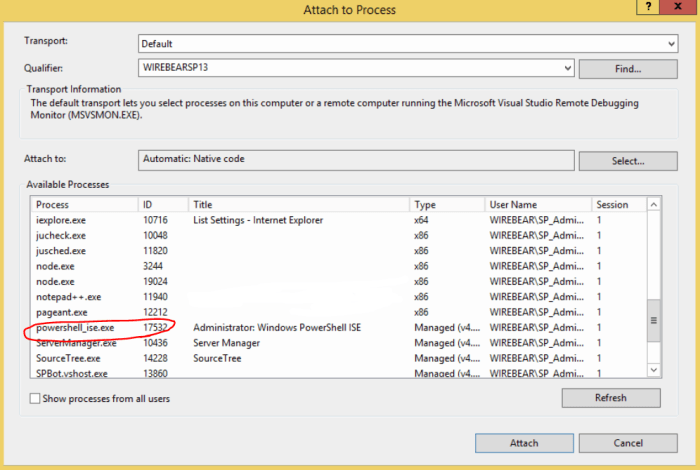
To debug your extension in the script above, you just need to see your breakpoints within the extension (say on the Initialize method). Then use the Debug > Attach to Process command within Visual Studio. Scroll through the processes until you find where your PowerShell script is running. I generally use the Windows PowerShell ISE to edit my scripts and that shows up as powershell_ise.exe. Choose it then click Attach:

AttachToProcess.PNG

Now when you run your script, your breakpoints should be hit. Fun Note, you’ll need to close and open the powershell window in order to release the dll when you want to make adjustments and build it.

Now you’re ready to take advantage of this incredibly powerful extension point! You can find the full code for this sample extension here. Have fun!

Intercepting SharePoint Email and Testing Outgoing E-Mail Settings

Applies To: SharePoint

I’m going to show you how to temporarily reroute SharePoint’s outgoing email to your desktop where you can either ignore it or forward it as necessary. There are a variety of legitimate reasons to do this. Generally I’ve used this when working in a small development or testing environment where email isn’t setup and it would be a huge hassle. However, I’ve also done this to test changes that involve email blasts (like false alarms on mysite deletions or screwy workflow debugging). As with anything, use some common sense about how and when to use this.

To run a dummy SMTP server on your desktop you’ll want to use smtp4dev by RNWood. This is a great little program that sits in the system tray and intercepts messages sent to it. You can then view, save or even forward them (from your account) and more. I’ve used it for years for all sorts of projects and I highly recommend it.

Configuring Outgoing Email

Generally your outgoing email settings in SharePoint were configured as part of your initial farm setup. To adjust these settings you’ll need to head to Central Administration. In SharePoint 2010 you’ll want to click on System Settings then choose Configure outgoing e-mail settings under E-Mail and Text Messages (SMS):

CentralAdmin

There’s only one thing we need to adjust here and that’s the Outbound SMTP server. If this is just a temporary change, be sure to write down the current value somewhere so you can set it back. Just put the name of your desktop here (Depending on your environment you may need to use your IP Address or whatever DNS entry points to where you are running smtp4dev). If you haven’t already configured your From address and Reply-to address go ahead and do that. you can just make them up (they don’t have to correspond to an actual mailbox, they just need to be email addresses). Your settings should look something like this:

MailSettings

Once you hit okay you will start receiving emails in smtp4dev (So be sure it’s running). You can also make these changes using Stsadm and can apply them to individual web applications instead of the whole farm like shown above. See this article for more details: Configure outgoing e-mail.

Sending a Test Email from SharePoint

So how do you know it’s working? Unless this is a large production farm with lots of alerts and other things flying off all the time you may not see anything at all. You can of course setup alerts on some list and then trigger events that would send the alert, but that can be a big hassle. Fortunately, you can have SharePoint send you an email through PowerShell.

Just copy and paste the script below and save as TestEmail.ps1:

$sd = New-Object System.Collections.Specialized.StringDictionary
$sd.Add("to","you@somedomain.com")
$sd.Add("from","spadmin@somedomain.com")
$sd.Add("subject","Test Email")
$w = Get-SPWeb http://somedomain.com
$body = "This is a test email sent from SharePoint, Wowee!!"

try {
	[Microsoft.SharePoint.Utilities.SPUtility]::SendEmail($w,$sd,$body)
}
finally {
	$w.Dispose()
}

This is a pretty straightforward script. It builds a StringDictionary with some obvious entries and then calls the SendEmail function of the SPUtility class to have SharePoint send the email. Just replace the dictionary entries with appropriate values and be sure to switch the web address (line 5) to one of yours. To run it, open the SharePoint Management Shell (You’ll want to run-as a farm administrator) and navigate to the location of the script. You can run it by typing: .\TestEmail.ps1

TestEmail

If you switch back over to where you are running smtp4dev you should see a new entry:

smtp4devTestEmail

You can double click the message to open it in your mail program:

MessageTestEmail

You can also click Inspect to see all the details:

InspectTestEmail


That’s it! Just be sure to switch the settings back if this was a temporary test. Of course, as long as you use your real email address in the to entry above then you can run the TestEmail.ps1 script again to ensure things are sending properly after you switch things back.

Top Link Bar Navigation From XML

Applies To: SharePoint

In my last post, Top Link Bar Navigation To XML, I provided you with a script to serialize a site collection’s Global Navigation Nodes to XML. In the post before that, Multi-Level Top Link Bar Navigation (Sub Menus), I showed you how to enable additional sub menus using the native control in SharePoint by editing a simple attribute in the Master Page. However, it quickly became clear that the native navigation editor (Site Actions > Site Settings > Navigation) won’t allow you to edit anything greater than 2 levels despite the control’s support for it. In this final post I’ll show you how to edit the exported XML to add multiple levels and then to import it.

The Script

Copy and paste the code below into notepad and save it as NavigationFromXml.ps1

$xmlFile = "d:\scripts\navigation\ExportedNavigation.xml"
$sourcewebApp = "http://somesite.com"
$destweb = "http://somesite.com"
$keepAudiences = $true #set to false to have it totally ignore audiences (good for testing)

Function CreateNode($xNode,$destCollection){
    Write-Host $xNode.Title

    #make URLs relative to destination
    $hnUrl = $xNode.Url
    #Write-Host "O URL: $hnUrl"
    $hnUrl = SwapUrl $hnUrl $sourceWebApp $destWeb
    #Write-Host "N URL: $hnUrl"

    $hnType = $xNode.NodeType
    if($hnType -eq $null){
        $hnType = "None"
    }

    $hNode = [Microsoft.SharePoint.Publishing.Navigation.SPNavigationSiteMapNode]::CreateSPNavigationNode($xNode.Title,$hnUrl,[Microsoft.SharePoint.Publishing.NodeTypes]$hnType, $destCollection)
    $hNode.Properties.Description = $xNode.Description
    if($keepAudiences){
        $hNode.Properties.Audience = $xNode.Audience
    }
    $hNode.Properties.Target = $xNode.Target
    $hNode.Update()

    if($xNode.Children.Count -gt 0) {
        foreach($child in $xNode.Children) {
            CreateNode $child $hNode.Children
        }
    } elseif($xNode.Children.IsNode -eq "yes") {
        #single child
        CreateNode $xNode.Children $hNode.Children
    }
}

Function SwapUrl([string]$currentUrl,[string]$sourceRoot,[string]$destRoot) {
	if ($currentUrl -ne "/") {
		if ($currentUrl.StartsWith("/")) {
            #Relative URL
			$currentUrl = $sourceRoot + $currentUrl
		} elseif ($currentUrl.StartsWith($destRoot)) {
            #May be a problem for non root sites
			$currentUrl = $currentUrl.Replace($destRoot,"")
		}
	} else {
		$currentUrl = [System.String]::Empty
	}
	$currentUrl
}

$dw = Get-SPWeb $destweb
$pdw = [Microsoft.SharePoint.Publishing.PublishingWeb]::GetPublishingWeb($dw)

$gnn = Import-Clixml $xmlFile

$nodeCount = $pdw.Navigation.GlobalNavigationNodes.Count
Write-Host "  Removing Current Nodes ($nodeCount)..." -ForegroundColor DarkYellow
for ($i=$nodeCount-1; $i -ge 0; $i--) {
    $pdw.Navigation.GlobalNavigationNodes[$i].Delete()
}

if($gnn.IsNode -Eq "yes"){
    #not an array (just 1 top level nav item)
    #Write-Host "1 Only!"
    [void](CreateNode $gnn $pdw.Navigation.GlobalNavigationNodes)
} else {
    #array of nodes, so add each one
    foreach($n in $gnn){
        [void](CreateNode $n $pdw.Navigation.GlobalNavigationNodes)
    }
}

#cleanup
$dw.dispose()

What it Does and How to Use It

There are 4 parameters at the top of the script for you to adjust:

  • $xmlFile: The path to use for the XML input
  • $sourcewebApp: The URL of the web application (Needed to ensure relative links are imported correctly)
  • $destweb: The URL of the site collection you are importing the navigation nodes to
  • $keepAudiences: When $true audience values are used, when $false they are ignored (helpful for testing)

Once you set those and save, open the SharePoint Management Shell (You’ll want to run-as a farm administrator) and navigate to the location of the script. You can run it by typing: .\NavigationToXml.ps1

RunNavigationFromXMLScript

The script will delete all global navigation nodes from the $destweb. It will then use the Import-Clixml command to hydrate a series of custom objects that it will use to build the new navigation nodes. It will build the nodes recursively allowing any number of levels of child nodes (You will have to adjust your Master Page as outlined in my post, Multi-Level Top Link Bar Navigation (Sub Menus), to see any more than the default 2 levels).

How it Works

The main code begins at line 53 where we retrieve the $destweb and then hydrate the $gnn object from the $xmlFile. One of the custom properties used in our NavigationToXml.ps1 script we output was IsNode. In PowerShell an array of one object does not serialize to an array. Rather, it serializes directly to the single object. Using IsNode allows us to know if the object we are working with is an actual node or an array of nodes so that we can avoid exceptions when accessing other properties.

For every node we hydrated we call the function CreateNode (lines 6-36) which creates a node using the custom properties in the passed collection. URLs are made relative to the web application using the function SwapUrl (lines 38-51). This will process every node in the collection along with all of their children.

Editing the XML

So why go through this at all? If you just want to copy global navigation from one site collection to another then just use the simpler NavigationPropagation.ps1 script provided in this article: SharePoint Top Link Bar Synchronization.

However, doing it this way allows you a chance to tweak the XML using notepad (I recommend notepad++). This is the easiest way to add Multiple Levels. For now I’ll explain the basics of the XML document and how to edit it. We’ll go over more of the whys in the Putting it All Together section below.

Structure

To get your base structure it’s best to use the native navigation editor (Site Actions > Site SettingsNavigation) and setup as many of your nodes as you can. Then you can use the NavigationToXml.ps1 script provided in the previous article, Top Link Bar Navigation To XML, as your base document. Trust me, trying to write it all from scratch is dumb. Here’s a quick summary of the results of running that script against navigation that looks like this:

IMG_0347

Skipping the automatic link for the site (Navigation Propagation) here is the current structure of those nodes:

  • Some Sites (Heading)
    • theChrisKent (AuthoredLinkPlain)
    • Microsoft (AuthoredLinkPlain)
  • Google (AuthoredLinkPlain)

Here’s what the exported XML looks like for that same set of nodes:

<Objs Version="1.1.0.1" xmlns="http://schemas.microsoft.com/powershell/2004/04">
  <Obj RefId="0">
    <TN RefId="0">
      <T>System.Object</T>
    </TN>
    <ToString>System.Object</ToString>
    <MS>
      <S N="IsNode">yes</S>
      <S N="Title">Some Sites</S>
      <S N="Url">/personal/ckent/navtest</S>
      <S N="NodeType">Heading</S>
      <S N="Description"></S>
      <S N="Audience"></S>
      <Nil N="Target" />
      <Obj N="Children" RefId="1">
        <TN RefId="1">
          <T>System.Object[]</T>
          <T>System.Array</T>
          <T>System.Object</T>
        </TN>
        <LST>
          <Obj RefId="2">
            <TNRef RefId="0" />
            <ToString>System.Object</ToString>
            <MS>
              <S N="IsNode">yes</S>
              <S N="Title">theChrisKent</S>
              <S N="Url">http://thechriskent.com</S>
              <S N="NodeType">AuthoredLinkPlain</S>
              <S N="Description"></S>
              <S N="Audience"></S>
              <Nil N="Target" />
              <Obj N="Children" RefId="3">
                <TNRef RefId="1" />
                <LST />
              </Obj>
            </MS>
          </Obj>
          <Obj RefId="4">
            <TNRef RefId="0" />
            <ToString>System.Object</ToString>
            <MS>
              <S N="IsNode">yes</S>
              <S N="Title">Microsoft</S>
              <S N="Url">http://microsoft.com</S>
              <S N="NodeType">AuthoredLinkPlain</S>
              <S N="Description"></S>
              <S N="Audience"></S>
              <Nil N="Target" />
              <Ref N="Children" RefId="3" />
            </MS>
          </Obj>
        </LST>
      </Obj>
    </MS>
  </Obj>
  <Obj RefId="5">
    <TNRef RefId="0" />
    <ToString>System.Object</ToString>
    <MS>
      <S N="IsNode">yes</S>
      <S N="Title">Google</S>
      <S N="Url">http://google.com</S>
      <S N="NodeType">AuthoredLinkPlain</S>
      <S N="Description"></S>
      <S N="Audience"></S>
      <Nil N="Target" />
      <Ref N="Children" RefId="3" />
    </MS>
  </Obj>
</Objs>

Each node can be found in an Obj element where you can easily find the list of custom properties in the MS section (IsNode, Title, Url, NodeType, Description, Audience, Target and Children). Each of these are simple strings. The only one that can be a little tricky is Audience which we’ll cover in depth in the Adding Nodes section below.

Each Obj element has a unique (to this document) value for it’s RefId. This is just an integer. The only thing to really note here is that each one needs to be unique. They will be the case in any export since this is part of the Export-Clixml command, but you’ll need to pay close attention to this when adding additional nodes. These are also used in Ref elements which you’ll see in various spots. If an object is the exact same as an object previously defined in the document it won’t be defined. Rather it will just get a Ref element instead of an Obj element. The Ref element will have a RefId that is equal to the previously defined Obj‘s RefId.

This mostly comes up with blank children. A good example is the first node with no children above is the node for theChrisKent (lines 22-38). You can see that the Children Obj is defined in lines 33-36. Whereas, the very next node without children (Microsoft lines 39-52) doesn’t have an Obj for Children but rather a Ref (line 50) with a RefId of 3 which you’ll recognize as the RefId specified in line 33. This can seem very confusing at first but it will get easier using the examples below.

Adding Nodes

Adding a single node with no children is pretty easy. Just cut and paste a similar node (Obj) and switch up the RefId to something unique for the document. For instance if I wanted to create another link under Some Sites right after the Microsoft one, I could just copy the Microsoft node (lines 39-52) and paste it directly below its closing tag (</Obj>). It would look something like this:

<Objs Version="1.1.0.1" xmlns="http://schemas.microsoft.com/powershell/2004/04">
  <Obj RefId="0">
    <TN RefId="0">
      <T>System.Object</T>
    </TN>
    <ToString>System.Object</ToString>
    <MS>
      <S N="IsNode">yes</S>
      <S N="Title">Some Sites</S>
      <S N="Url">/personal/ckent/navtest</S>
      <S N="NodeType">Heading</S>
      <S N="Description"></S>
      <S N="Audience"></S>
      <Nil N="Target" />
      <Obj N="Children" RefId="1">
        <TN RefId="1">
          <T>System.Object[]</T>
          <T>System.Array</T>
          <T>System.Object</T>
        </TN>
        <LST>
          <Obj RefId="2">
            <TNRef RefId="0" />
            <ToString>System.Object</ToString>
            <MS>
              <S N="IsNode">yes</S>
              <S N="Title">theChrisKent</S>
              <S N="Url">http://thechriskent.com</S>
              <S N="NodeType">AuthoredLinkPlain</S>
              <S N="Description"></S>
              <S N="Audience"></S>
              <Nil N="Target" />
              <Obj N="Children" RefId="3">
                <TNRef RefId="1" />
                <LST />
              </Obj>
            </MS>
          </Obj>
          <Obj RefId="4">
            <TNRef RefId="0" />
            <ToString>System.Object</ToString>
            <MS>
              <S N="IsNode">yes</S>
              <S N="Title">Microsoft</S>
              <S N="Url">http://microsoft.com</S>
              <S N="NodeType">AuthoredLinkPlain</S>
              <S N="Description"></S>
              <S N="Audience"></S>
              <Nil N="Target" />
              <Ref N="Children" RefId="3" />
            </MS>
          </Obj>
          <Obj RefId="10">
            <TNRef RefId="0" />
            <ToString>System.Object</ToString>
            <MS>
              <S N="IsNode">yes</S>
              <S N="Title">Apple</S>
              <S N="Url">http://apple.com</S>
              <S N="NodeType">AuthoredLinkPlain</S>
              <S N="Description"></S>
              <S N="Audience"></S>
              <Nil N="Target" />
              <Ref N="Children" RefId="3" />
            </MS>
          </Obj>
        </LST>
      </Obj>
    </MS>
  </Obj>
  <Obj RefId="5">
    <TNRef RefId="0" />
    <ToString>System.Object</ToString>
    <MS>
      <S N="IsNode">yes</S>
      <S N="Title">Google</S>
      <S N="Url">http://google.com</S>
      <S N="NodeType">AuthoredLinkPlain</S>
      <S N="Description"></S>
      <S N="Audience"></S>
      <Nil N="Target" />
      <Ref N="Children" RefId="3" />
    </MS>
  </Obj>
</Objs>

Pretty straightforward overall. Notice that in line 53 I’ve set the RefId to 10. This is because the only requirement is for it to be unique – It does not have to be in sequence. If you run the NavigationFromXml.ps1 script on the above the site now looks like this:

TopLinkBarWithAppleLink

What about an additional level? For this example we’ll be adding a new sub menu under Some Sites called Pizza with 2 links. Our structure should look like this:

  • Some Sites (Heading)
    • theChrisKent (AuthoredLinkPlain)
    • Microsoft (AuthoredLinkPlain)
    • Apple (AuthoredLinkPlain)
    • Pizza (Heading)
      • Pizza Hut (AuthoredLinkPlain)
      • Little Caesars (AuthoredLinkPlain)
  • Google (AuthoredLinkPlain)

Here’s what our modified XML looks like now:

<Objs Version="1.1.0.1" xmlns="http://schemas.microsoft.com/powershell/2004/04">
  <Obj RefId="0">
    <TN RefId="0">
      <T>System.Object</T>
    </TN>
    <ToString>System.Object</ToString>
    <MS>
      <S N="IsNode">yes</S>
      <S N="Title">Some Sites</S>
      <S N="Url">/personal/ckent/navtest</S>
      <S N="NodeType">Heading</S>
      <S N="Description"></S>
      <S N="Audience"></S>
      <Nil N="Target" />
      <Obj N="Children" RefId="1">
        <TN RefId="1">
          <T>System.Object[]</T>
          <T>System.Array</T>
          <T>System.Object</T>
        </TN>
        <LST>
          <Obj RefId="2">
            <TNRef RefId="0" />
            <ToString>System.Object</ToString>
            <MS>
              <S N="IsNode">yes</S>
              <S N="Title">theChrisKent</S>
              <S N="Url">http://thechriskent.com</S>
              <S N="NodeType">AuthoredLinkPlain</S>
              <S N="Description"></S>
              <S N="Audience"></S>
              <Nil N="Target" />
              <Obj N="Children" RefId="3">
                <TNRef RefId="1" />
                <LST />
              </Obj>
            </MS>
          </Obj>
          <Obj RefId="4">
            <TNRef RefId="0" />
            <ToString>System.Object</ToString>
            <MS>
              <S N="IsNode">yes</S>
              <S N="Title">Microsoft</S>
              <S N="Url">http://microsoft.com</S>
              <S N="NodeType">AuthoredLinkPlain</S>
              <S N="Description"></S>
              <S N="Audience"></S>
              <Nil N="Target" />
              <Ref N="Children" RefId="3" />
            </MS>
          </Obj>
          <Obj RefId="10">
            <TNRef RefId="0" />
            <ToString>System.Object</ToString>
            <MS>
              <S N="IsNode">yes</S>
              <S N="Title">Apple</S>
              <S N="Url">http://apple.com</S>
              <S N="NodeType">AuthoredLinkPlain</S>
              <S N="Description"></S>
              <S N="Audience"></S>
              <Nil N="Target" />
              <Ref N="Children" RefId="3" />
            </MS>
          </Obj>
          <Obj RefId="11">
            <TNRef RefId="0" />
            <ToString>System.Object</ToString>
            <MS>
              <S N="IsNode">yes</S>
              <S N="Title">Pizza</S>
              <S N="Url">http://apple.com</S>
              <S N="NodeType">Heading</S>
              <S N="Description"></S>
              <S N="Audience"></S>
              <Nil N="Target" />
              <Obj N="Children" RefId="12">
                <TNRef RefId="1" />
                <LST>
                  <Obj RefId="13">
                    <TNRef RefId="0" />
                    <ToString>System.Object</ToString>
                    <MS>
                      <S N="IsNode">yes</S>
                      <S N="Title">Pizza Hut</S>
                      <S N="Url">http://www.pizzahut.com</S>
                      <S N="NodeType">AuthoredLinkPlain</S>
                      <S N="Description"></S>
                      <S N="Audience"></S>
                      <Nil N="Target" />
                      <Ref N="Children" RefId="3" />
                    </MS>
                  </Obj>
                  <Obj RefId="14">
                    <TNRef RefId="0" />
                    <ToString>System.Object</ToString>
                    <MS>
                      <S N="IsNode">yes</S>
                      <S N="Title">Little Caesars</S>
                      <S N="Url">http://www.littlecaesars.com</S>
                      <S N="NodeType">AuthoredLinkPlain</S>
                      <S N="Description"></S>
                      <S N="Audience"></S>
                      <Nil N="Target" />
                      <Ref N="Children" RefId="3" />
                    </MS>
                  </Obj>
                </LST>
              </Obj>
            </MS>
          </Obj>
        </LST>
      </Obj>
    </MS>
  </Obj>
  <Obj RefId="5">
    <TNRef RefId="0" />
    <ToString>System.Object</ToString>
    <MS>
      <S N="IsNode">yes</S>
      <S N="Title">Google</S>
      <S N="Url">http://google.com</S>
      <S N="NodeType">AuthoredLinkPlain</S>
      <S N="Description"></S>
      <S N="Audience"></S>
      <Nil N="Target" />
      <Ref N="Children" RefId="3" />
    </MS>
  </Obj>
</Objs>

We’ve now added an object with NodeType set to Heading since this is required in order to support having children. We’ve also created a Children Obj that is not a Ref. It has a TNRef and a LST. Inside the LST we just add more of those AuthoredLinkPlain nodes like we did before. You can repeat this same trick for infinite levels down. Running NavigationFromXml.ps1 may result in something like this:

TopLinkBarWithPizzaNoSubMenu

What happened? We can see Pizza but it’s not a sub menu like we expected! These nodes are all there but by default SharePoint doesn’t show them. You’ll need to adjust your Master Page using the techniques in this article: Multi-Level Top Link Bar Navigation (Sub Menus). Once you’ve done that you’ll see something like this:

TopLinkBarWithPizzaAndSubMenu

What about Audiences? This one was a little trickier to get right. The easiest thing to do is apply an audience to a node using the built in navigation editor and then export it using NavigationToXml.ps1 to see what the value should be. But what about when you’ve already done that and you want to manually edit it? An actual audience (Not a SharePoint Group but a compiled audience) is just specified as the GUID followed by 4 semi-colons. If you wish to do more than one then just put a comma between the GUIDs and then add on 4 semi-colons on the end. Here’s what that looks like:

Single Audience:

<S N="Audience">45175fed-9cc8-45ad-9cd6-dda031bf7577;;;;</S>

Multiple Audiences:

<S N="Audience">0a6e46d0-8f45-487d-a249-141fe4a8c429,8b722c7b-a1b4-4f4f-8035-2bac6294b713;;;;</S>

Putting it All Together

This has been a 4 part series on how to improve Top Link Bar navigation:

I’ve provided you with 3 PowerShell scripts (NavigationPropagation.ps1, NavigationToXml.ps1 and NavigationFromXml.ps1) and told you how to make necessary changes to your Master Page. So how do we use all of these?

Because we want multiple sub menus we made the change to our Master Page(s) to set the MaximumDynamicDisplayLevels to 2 (2 is all we wanted, but feel free to go higher as needed). Then we setup our top level links and ran the NavigationToXml.ps1 script just to get our starter structure (We haven’t really needed it since). We made all the adjustments to add our sub menus and nodes then ran the NavigationFromXml.ps1 script to get all that populated.

For changes to our navigation we just update the XML file, run NavigationFromXml.ps1 and then run NavigationPropagation.ps1 to synchronize our changes across our site collections. It works really well. Hopefully you’ll find this system or some parts of it to be helpful too!

Top Link Bar Navigation To XML

Applies To: SharePoint

Continuing in my series on SharePoint’s Top Link Bar (sometimes called the Tab Bar) I want to show you how to serialize a site collection’s Global Navigation Nodes to XML using PowerShell. This isn’t quite the same as just using the Export-Clixml command since we are interested in very specific properties and their format.

In my previous post, Multi-Level Top Link Bar Navigation (Sub Menus), I showed you how to enable additional sub menus using the native control in SharePoint by editing a simple attribute in the Master Page. However, it quickly became clear that the native navigation editor (Site Actions > Site Settings > Navigation) won’t allow you to edit anything greater than 2 levels despite the control’s support for it. In this post I’ll show you how to output a site’s navigation to XML. In my next post I’ll show how to edit it and then import it to create multiple levels.

The Script

Copy and paste the code below into notepad and save it as NavigationToXML.ps1

$xmlFile = "d:\scripts\navigation\ExportedNavigation.xml"
$sourceweb = "http://somesite.com"
$keepAudiences = $true

Function ProcessNode($nodeCollection) {
    $parentCollection = @()
    foreach($node in $nodeCollection) {
       if ($node.Properties.NodeType -ne [Microsoft.SharePoint.Publishing.NodeTypes]::Area -and $node.Properties.NodeType -ne [Microsoft.SharePoint.Publishing.NodeTypes]::Page) {
	   $nHash = New-Object System.Object
           $nHash | Add-Member -type NoteProperty -name IsNode -value "yes"
           $nHash | Add-Member -type NoteProperty -name Title -value $node.Title
           $nHash | Add-Member -type NoteProperty -name Url -value $node.Url
           $nHash | Add-Member -type NoteProperty -name NodeType -value $node.Properties.NodeType
           $nHash | Add-Member -type NoteProperty -name Description -value $node.Properties.Description
           if($keepAudiences){
                $nHash | Add-Member -type NoteProperty -name Audience -value $node.Properties.Audience
           } else {
                $nHash | Add-Member -type NoteProperty -name Audience -value ""
           }
           $nHash | Add-Member -type NoteProperty -name Target -value $node.Target
           if($node.Children.Count -gt 0){
                $nHashChildren = ProcessNode($node.Children)
                $nHash | Add-Member -type NoteProperty -name Children -value $nHashChildren
           } else {
                $nHash | Add-Member -type NoteProperty -name Children -value @()
           }
           $parentCollection += $nHash
       }
    }
    $parentCollection
}

$sw = Get-SPWeb $sourceweb
$psw = [Microsoft.SharePoint.Publishing.PublishingWeb]::GetPublishingWeb($sw)

ProcessNode($psw.Navigation.GlobalNavigationNodes) | Export-Clixml $xmlFile

#cleanup
$sw.dispose()

What it Does and How to Use It

There are 3 parameters at the top of the script you will need to change:

  • $xmlFile: The path to use for the XML output
  • $sourceweb: The URL of the site whose navigation you are serializing
  • $keepAudiences: When $true audience values are serialized, when $false they are left blank

Once you set those and save, open the SharePoint Management Shell (You’ll want to run-as a farm administrator) and navigate to the location of the script. You can run it by typing: .\NavigationToXml.ps1

RunNavigationToXMLScript

The script will create an array of custom objects that correspond to the $sourceweb‘s navigation nodes and then use standard PowerShell serialization to create a simplified XML document at the location specified by $xmlFile. For instance, given the navigation shown here:

IMG_0347

The XML output will look similar to this:

<Objs Version="1.1.0.1" xmlns="http://schemas.microsoft.com/powershell/2004/04">
  <Obj RefId="0">
    <TN RefId="0">
      <T>System.Object</T>
    </TN>
    <ToString>System.Object</ToString>
    <MS>
      <S N="IsNode">yes</S>
      <S N="Title">Some Sites</S>
      <S N="Url">/personal/ckent/navtest</S>
      <S N="NodeType">Heading</S>
      <S N="Description"></S>
      <S N="Audience"></S>
      <Nil N="Target" />
      <Obj N="Children" RefId="1">
        <TN RefId="1">
          <T>System.Object[]</T>
          <T>System.Array</T>
          <T>System.Object</T>
        </TN>
        <LST>
          <Obj RefId="2">
            <TNRef RefId="0" />
            <ToString>System.Object</ToString>
            <MS>
              <S N="IsNode">yes</S>
              <S N="Title">theChrisKent</S>
              <S N="Url">http://thechriskent.com</S>
              <S N="NodeType">AuthoredLinkPlain</S>
              <S N="Description"></S>
              <S N="Audience"></S>
              <Nil N="Target" />
              <Obj N="Children" RefId="3">
                <TNRef RefId="1" />
                <LST />
              </Obj>
            </MS>
          </Obj>
          <Obj RefId="4">
            <TNRef RefId="0" />
            <ToString>System.Object</ToString>
            <MS>
              <S N="IsNode">yes</S>
              <S N="Title">Microsoft</S>
              <S N="Url">http://microsoft.com</S>
              <S N="NodeType">AuthoredLinkPlain</S>
              <S N="Description"></S>
              <S N="Audience"></S>
              <Nil N="Target" />
              <Ref N="Children" RefId="3" />
            </MS>
          </Obj>
        </LST>
      </Obj>
    </MS>
  </Obj>
  <Obj RefId="5">
    <TNRef RefId="0" />
    <ToString>System.Object</ToString>
    <MS>
      <S N="IsNode">yes</S>
      <S N="Title">Google</S>
      <S N="Url">http://google.com</S>
      <S N="NodeType">AuthoredLinkPlain</S>
      <S N="Description"></S>
      <S N="Audience"></S>
      <Nil N="Target" />
      <Ref N="Children" RefId="3" />
    </MS>
  </Obj>
</Objs>

For those familiar with the Export-Clixml PowerShell command this shouldn’t look too crazy. For the rest of us, I will go into detail about this in my next post. Regardless of how complicated that may look to you, it is much simpler than if we had just called Export-Clixml on the Global Navigation Nodes object for the site.

How it Works

The main code begins at line 33 where the $sourceweb is retrieved and then the ProcessNode function (Lines 5-31) is called on the GlobalNavigationNodes collection. This generates an array of custom objects that are then serialized to the $xmlFile using Export-Clixml.

The ProcessNode function creates a custom object for every node and captures the Title, Url, NodeType, Description, Target, and when $keepAudiences is $true the audience information. Every custom object is also given a Children property (lines 21-26) and this is set to an array recursively for all child nodes that exist. This has been written to capture any number of levels of children. (This script does, however, skip all Area and Page node types since these are automatic and shouldn’t be edited manually)


So what do we do with this XML document? In my next post I’ll show you how to read, edit and ultimately import these nodes back into the site collection. This can be helpful to copy nodes from one site colleciton to another (although my post on SharePoint Top Link Bar Synchronization provided a much cleaner approach for this). More importantly this will provide you an easy way to have multiple sub menus in the SharePoint Top Link Bar.

SharePoint Top Link Bar Synchronization

Applies To: SharePoint

The Top Link Bar (sometimes called the Tab bar) provides global navigation for a site collection. It’s a great spot to link to subsites, other site collections and more. It’s also relatively easy to use and customize. On a standard team site you can go to Site Actions > Site Settings and then choose the Navigation link under Look and Feel to customize. This all works really well. However, it can be difficult to maintain consistent navigation between multiple site collections. Add in the complication of relative URLs, audiences and attempting to keep those sites in sync with any more than 2 or 3 site collections – suddenly any navigational changes become a full project!

IMG_0347

Fortunately, using the below PowerShell script you can easily setup navigation on a single site collection using the out of the box tools and then propagate those changes to as many additional site collections as needed:

The Script

You can copy the script below and paste it into notepad and save it as NavigationPropagation.ps1

$sourceweb = "http://somesite.com"
$destwebs = "http://somesite.com/sites/humanresources", "http://somesite.com/panda", "http://someothersite.com/pickles"

$keepAudiences = $true #set to false to have it totally ignore audiences (good for testing)

Function CreateNode($node,$dWeb,$destCollection){
    if ($node.Properties.NodeType -ne [Microsoft.SharePoint.Publishing.NodeTypes]::Area -and $node.Properties.NodeType -ne [Microsoft.SharePoint.Publishing.NodeTypes]::Page) {

        Write-Host "    Node: " + $node.Title

        #make URLs relative to destination
    	$hnUrl = $node.Url
    	#Write-Host "O URL: $hnUrl"
        $IsHeading = $false
        if($node.Properties.NodeType -eq [Microsoft.SharePoint.Publishing.NodeTypes]::Heading){
            $IsHeading = $true
        }
    	$hnUrl = SwapUrl $hnUrl $sourceWeb $dWeb $IsHeading
    	#Write-Host "N URL: $hnUrl"

        $hnType = $node.Properties.NodeType
        if($hnType -eq $null){
            $hnType = "None"
        }

        $hNode = [Microsoft.SharePoint.Publishing.Navigation.SPNavigationSiteMapNode]::CreateSPNavigationNode($node.Title,$hnUrl,[Microsoft.SharePoint.Publishing.NodeTypes]$hnType, $destCollection)
    	$hNode.Properties.Description = $node.Properties.Description
        if($keepAudiences){
    	   $hNode.Properties.Audience = $node.Properties.Audience
        }
    	$hNode.Properties.Target = $node.Properties.Target
        $hNode.Update()

        if($node.Children.Count -gt 0) {
    	   foreach($child in $node.Children) {
                CreateNode $child $dWeb $hNode.Children
    	   }
        }
    }
}

Function SwapUrl([string]$currentUrl,[string]$sourceRoot,[string]$destRoot,[boolean]$isHeading) {
	if ($currentUrl -ne "/") {
		if ($currentUrl.StartsWith("/")) {
			$currentUrl = $sourceRoot + $currentUrl
		} elseif ($currentUrl.StartsWith($destRoot)) {
			$currentUrl = $currentUrl.Replace($destRoot, "")
		}
	} else {
		$currentUrl = [System.String]::Empty
        if(!$isHeading){
            Write-Host "        This is a blank non-heading! Using $sourceRoot" -ForegroundColor Yellow
            $currentUrl = $sourceRoot
        }
	}
	$currentUrl
}

$sw = Get-SPWeb $sourceweb
$psw = [Microsoft.SharePoint.Publishing.PublishingWeb]::GetPublishingWeb($sw)

foreach ($destweb in $destwebs) {

	Write-Host "***************************************" -ForegroundColor Cyan
	Write-Host "Propogatin' That There $destweb" -ForegroundColor Cyan
	Write-Host "***************************************" -ForegroundColor Cyan

	$dw = Get-SPWeb $destweb
	$pdw = [Microsoft.SharePoint.Publishing.PublishingWeb]::GetPublishingWeb($dw)

	$nodeCount = $pdw.Navigation.GlobalNavigationNodes.Count
	Write-Host "  Removing Current Nodes ($nodeCount)..." -ForegroundColor DarkYellow
	for ($i=$nodeCount-1; $i -ge 0; $i--) {
		$pdw.Navigation.GlobalNavigationNodes[$i].Delete()
	}

	Write-Host "  Propagating to $destweb..." -ForegroundColor DarkYellow
	foreach($n in $psw.Navigation.GlobalNavigationNodes){
		[void](CreateNode $n $destweb $pdw.Navigation.GlobalNavigationNodes)
	}

	$dw.dispose()
}

$sw.dispose()

What it Does and How to Use it

Since this is a script that you will typically run with the same parameters over and over I just made them variables at the top of the script. There are just 3 of them:

  • $sourceweb: This is the url of the site collection to copy the navigation from
  • $destwebs: This is a comma separated (array) list of urls to copy the navigation to
  • $keepAudiences: When $true audiences are propagated along with the links, when $false then these are totally ignored. Setting this to $false can be really helpful for testing just to make sure everything is being copied correctly before you add in the complication of audience filtering

Once you set those and save, open the SharePoint Management Shell (You’ll want to run-as a farm administrator) and navigate to the location of the script you can simply run it by typing: .\NavigationPropagation.ps1

IMG_0349

The script will cycle through each of the $destwebs and delete all the Global Navigation Nodes from the site. It will then copy all the nodes (excluding Area and Page types since these are automatic depending on your settings) from the $sourceweb. Each URL is made relative or adjusted to be fully qualified as needed. This is done recursively allowing any number of levels of child nodes (more on this in an upcoming post).

Typical use case for us is to save the script with all the parameters set and whenever we make a change on the $sourceweb we simply run the script and everything gets synchronized. If you’re making frequent updates then you could always use Task Scheduler to run the script automatically.

How it Works

There are 2 functions in the script: CreateNode (lines 4-40) and SwapUrl (lines 42-57). CreateNode copies a passed node into the specified collection mapping the necessary properties and calling SwapUrl which ensures relative Urls are fully qualified and Urls that should be relative are made relative. The main thing to note is that CreateNode is recursive and will copy all child nodes as well.

The main execution of the script starts at line 59 and is pretty straightforward. It retrieves the source web and then loops through the destination webs. For each destination web it deletes all the existing navigation nodes and then calls CreateNode passing each of the source web’s nodes and the destinations node collection.


Keeping your navigation consistent across the farm is essential to a good user experience but can be difficult to manage using out of the box tools. Fortunately with the above script this can be relatively simple.

Changing Web Part Properties When the Page is Unavailable

Applies To: SharePoint

The other day we made some changes that caused some issues with how one of our web parts was configured. Unfortunately, I hadn’t wrapped the problem in a try/catch and my error blew up the whole page. I’m sure I’m the only one that’s ever done that. So obviously I’ve got some code changes to make, but what do I do in the meantime? Fortunately, there’s some straight forward Powershell that lets you change web part settings (even custom properties like mine).

I found the solution to this over on Aarebrot.net where he was using the technique to change a web part that automatically redirected the user. I’ve just reproduced his code here and added some explanation and background.

When I first went to solve this problem I tried the ?contents=1 querystring trick to pull up the Web Part Administration page. If you’re looking for a quick solution you can add that query string to the end of your page’s URL and then delete the web part from the page and start over. But a more elegant solution is to just change the offending property using some easy Powershell.

Using the SharePoint 2010 Management Shell, run the following commands:

$web = Get-SPWeb "http://somedomain.com/sites/someweb"
$page = $web.GetFile("default.aspx")
$page.CheckOut()
$wpm = $web.GetLimitedWebPartManager("default.aspx",[System.Web.UI.WebControls.WebParts.PersonalizationScope]::Shared)
$part = $wpm.WebParts[0]
$part.SomeProperty = "The correct setting!"
$wpm.SaveChanges($part)
$page.CheckIn("Fixed that property")
$page.Publish("Fixed that property")
$web.Close()

What Just Happened?

In line 1 we’re just getting a reference to the web site (SPWeb) where your web part lives using Get-SPWeb. Just replace the URL shown with yours.

Lines 2-3 and 8-9 are only required if the page you’re modifying is on a publishing site or check in/out is required. Feel free to skip these (go directly to line 4) if you’re just editing a simple page. If your page does require check out to be edited, line 2 is simply retrieving the file (SPFile) using the GetFile method using the relative location of the page. Then line 3 calls the CheckOut method which, of course, checks out the file.

In line 4, we’re grabbing a reference to the Web Part Manager for the page (SPLimitedWebPartManager) using the GetLimitedWebPartManager method. Just replace the first parameter with the relative location of your page. The second parameter is the PersonalizationScope enumeration and can be User or Shared. You’re going to want to use Shared to affect everybody. The Web Part Manager object is what lets us get access to all the web parts on the page and screw with em.

In line 5, we grab the web part (WebPart) we want by index using the WebParts collection. In the example above I already knew that the web part I wanted was the first one in the collection. You can also pass the uniqueID property of the web part (instead of the index). You can find out both by simply calling the WebParts collection by itself ($web.WebParts) and everything will get listed to the screen.

To see all the available properties of the web part you can just type ($part) and it will list everything out including any custom properties. Then you can just set them like we do in line 6.

Line 7 uses the Web Part Manager’s SaveChanges method to incorporate all your changes. Lines 8-9 are again only required if your pages library requires check in/out and publishing. If it’s a simple page just skip to line 10. Line 8 uses the CheckIn method which takes a string for a check-in comment. Line 9 uses the Publish method which also takes a string for a comment.

Line 11 just calls the Close method and ensures we clean up all our resources.

That’s it! Now you can wrap that up in a script to loop through multiple pages and change properties on all sorts of web parts or just one-off fix those web parts you might have broken.

DevConnections 2012

Applies To: SharePoint, SQL, .NET, HTML5

I just got back from DevConnections 2012 in Las Vegas, Nevada. I learned several things that the made the trip worthwhile and I’m glad I got to be a part of it. I choose DevConnections over SPC because I wanted to take workshops from a variety of tracks including SQL, .NET and HTML5. Choosing DevConnections also meant I didn’t have to go alone.

There were several good speakers and I received plenty of swag (8+ T-Shirts, an RC helicopter, a book and more). Not surprisingly, I enjoyed the SharePoint Connections track the most and Dan Holme was my favorite speaker.

For all those that didn’t get to go I thought I’d share my notes from the sessions I attended and any insights I gained as well. My notes are not a total reflection of what was said, but represent things I found interesting or useful.


Where Does SharePoint Designer 2010 fit in to Your SharePoint Application Development Process?

Asif RehmaniSharePoint-Videos.com

My Notes:

  • Always use browser first when possible
  • Anything Enterprise wide should be VS or buy
  • DVWP also called Data Form WP
  • DVWP multiple sources to XML with XSLT
  • LVWP specific to SP lists
  • Browser limits in views don’t apply in Designer (Grouping, Sorting, etc.)
  • Import Spreadsheet is only through browser – NOT SP Designer
  • Conditional Formatting in views including icons (put all icons in cell and change content conditional formatting on each).Pictures automatically go in SiteAssets
    • Sometimes img uploads retain local path (switch to code and correct src url)
  • Formulas: select parameter and double click the function to have the selection become the 1st parameter
  • DVWP can easily be changed to do updates: switch from text to text box, then add a row and insert a form action button and choose the commit action (save)
  • Parameters for all sorts of stuff (username, query string, etc)can be used all over including in conditional formatting
  • SPD was designed and intended to be used in production – not a lot of support for working in Dev and moving to Production
    • WP can be packaged (DVWP) for import elsewhere
    • Reusable workflows can also be packaged

Key Insights:

  • SharePoint Designer is fine to be used in production (and in fact requires it in certain cases). However, there are things you can do to minimize the amount of work done in production.
  • SP Designer is pretty powerful and can replace a lot of extra VS development

Overall Impression:

Just as in his videos, Asif was a great presenter. He was very personable and knowledgeable. The session ended up being less about when SP Designer should be used in your environment and more a broad demo of what can be done with Designer. This was a little disappointing but I learned enough tips and tricks that I really didn’t mind too much. Interestingly, some people in the audience asked about an intermittent error they’ve been receiving in SP 2010 for some Web Parts they’d applied conditional formatting too. This was almost certainly the XSLT Timeout issue and I was able to provide them a solution.


Data Visualization: WPF, Silverlight & WinRT

Tim HuckabyInterknowlogy

My Notes:

  • WPF is great at 3D, cool demo of scripps molecule viewer (codeplex)
  • Silverlight is dead
  • Winforms is dead
  • HTML 5 hysteria is in full swing
  • HTML 5 has a canvas and SVG support
  • ComponentOne has neat HTML 5 sales dashboard demo

Key Insights:

  • Silverlight has lost to HTML 5 and we shouldn’t expect another version.

Overall Impression:

This was obviously a recycled workshop from several years ago (he actually said so) that he added a couple of slides to. In his defense, he planned to show a WinRT demo but the Bellagio AV guys were unable to get the display working. Regardless it seemed more like a bragging session. He showed pictures of him with top Microsoft people, showed his company being featured in Gray’s Anatomy, and alluded to all the cool things he’s involved with that he couldn’t mention.

This was pretty disappointing. I am already aware that .NET can do some pretty awesome things including some neat visualizations. I was hoping to get some actual guidance on getting started. Instead I got Microsoft propaganda from 3 years ago about why .NET (specifically WPF) is awesome. Tim Huckaby is obviously a very smart guy and has a lot of insight to share. Hopefully I’ll be able to attend a workshop from him in the future on a topic he cares a little more about.


Building Custom Applications (mashups) on the SharePoint Platform

Todd Baginski – http://toddbaginski.com/blog/

My Notes:

  • Used Silverlight but recommends HTML 5
  • Suggests that all mashups should be Sandbox compatible
  • Bing Maps has great examples requiring little work
  • SL to SL: localmessagesender use SendAsync method. In receiver setup allowedSenderDomains list of strings. Use localmessagereceiver and messagereceived event. Be sure to call the listen() method!!
  • Assets Library great for videos
  • Silverlight video player included in SP 2010/2013. 2013 has an additional fallback HTML 5 player.
  • External Data Column: Works as lookup for BCS
  • OOTB \14\TEMPLATE\LAYOUT\MediaPlayer.js: _spBodyOnLoadFunctionNames.push(‘mediaPlayer.createOverlayPlayer’); after you’ve made links hook ‘em up: mediaPlayer.attachToMediaLinks((document.getElementById(‘idofdivholdinglinks’)), [‘wmv’,’mp3′]);
  • OOTB \14\TEMPLATE\LAYOUT\Ratings.js: ExecuteDelayUntilScriptLoaded(RatingsManagerLoader, ‘ratings.js’); RatingsManagerLoader is huge, see slides. Then loop through everything you want to attach a rating to.
  • SL JS call: HtmlPage.Window.Invoke(“Jsfunctionname”, new string[] { parameter1, parameter2})
  • JQuery twitter plugin
  • SP 2013 has geolocation fields. Requires some setup & code. He has app to add GL column & map view to existing lists.
  • Even in SP 2013 the supported video formats are really limited
  • AppParts are really just iframes.  Connections work different. Not designed to communicate outside of app.

Key Insights:

  • Silverlight to Silverlight communication is pretty simple but will be pretty irrelevant in SharePoint 2013
  • Getting the Video Player to show your videos when using custom XSLT takes some work
  • Adding a working Ratings Control when using custom XSLT is even more complicated and convoluted
  • New GeoLocation columns in SP 2013 will be really cool, but adding them to existing lists is going to be a pain.

Overall Impression:

Todd had a lot of good information and you could tell he knew his stuff. Unfortunately he has a very dry style. Regardless, I enjoy demos that show actual architecture and code and there was plenty of that.

I do wish he’d updated his demos to use HTML 5 as he recommends. It’s very frustrating to hear a presenter recommend something different and then to spend an hour diving into the non-recommended solution. Additionally, although I prefer specific examples (and his were very good) I prefer to have more general best practices/recommendations presented as well. But despite all that he gave a few key tips that I will be using immediately and that is the primary thing I’m looking for in a technical workshop.


Creating Mobile-Enabled SharePoint Web Sites and Mobile Applications that Integrate with SharePoint

Todd Baginski – http://toddbaginski.com/blog/

My Notes:

  • AirServer $14.99 shows iPad on computer
  • Mobile is much better in SP 2013
  • Device channel panel allows content to target specific devices

Key Insights:

  • Mobile is important. You can struggle with SP 2010, but you should probably just upgrade to SP 2013

Overall Impression:

I enjoyed Todd’s other session (see above), but this one was too focused on SP 2013 to have any real practical value for me.


Getting Smarter about .NET

Kathleen Dollard – http://msmvps.com/blogs/kathleen/

My Notes:

  • Lambdas create pointers to a function
  • LINQ creates expressions that can be evaluated everywhere
  • int + int will still be an int even if larger than an int can be. No errors, but addition will be wrong. (default in C#, VB.NET will break for default)
  • There is no performance gain by using int16 over int32, some memory is saved but is only significant when processing multimillion values at the same time
  • VisualStudio 2012 will be going to quarterly updates
  • Static values are shared with all instances – Even among derived classes!
  • LINQ queries Count() does full query
  • Func last parameter is what is returned
  • Closure is the actual variable in a lambda (not copy) so multiple lambdas can be changing the same variable
  • Projects can be opened in both VS 2010 and VS 2012 at the same time

Key Insights:

  • Despite all the new and exciting things that keep getting added to .NET, a firm grip of the basics is what will really make a difference in your code and ability to make great applications
  • Static sharing even among derived classes makes for some potential mistakes, but also for some very powerful architecture
  • LINQ and Lambdas are some crazy cool stuff that I should stop ignoring
  • .NET is very consistent and following it’s logic rather than our own assumptions is key for truly understanding what your code is doing

Overall Impression:

I really enjoyed this session. It was the most challenging workshop I attended despite it’s focus of dealing with things at the most basic level. Kathleen kept it fun (although she could be a little intimidating) and continued to surprise everyone in the room both with the power of .NET and the dangers of our own misconceptions. She pointed out several gotcha areas and provided the reasoning behind them. This was a last minute session, but it was also one of the best.


Wish I’d Have Known That Sooner! SharePoint Insanity Demystified

Dan Holme – Intelliem

My Notes:

  • SQL alias: use a fake name for SQL server to account for server changes/moves. Use CLICONFIG.exe on each SP server in the farm. Do NOT use DNS for this (CNAMEs). Consider using tiers of aliases for future splitting of DBs: content, search, services – all start with the same target and changed as needed
  • ContentDB sizing: change initial size and growth. Defaults are 50mb and 1mb growth. Makes a BIG difference in performance.
  • ContentDBs can be up to 4 TB. Over 200 GB is not recommended.
  • SiteCollections can be same as ContentDBs but 100 GB is as high with OOTB tools
  • Limit of 60 million items per ContentDBs (each version counts)
  • Remote BLOB storage: SP is unaware. Common performance measurements are mostly inaccurate because they are based on single files. Externalizing all BLOBs is significant performance boost. 25-40%! Storage can be cheaper too but complexity increases. Using a SAN allows you to take advantage of SAN features (ie deduplication – which really reduces storage footprint). RBS OOTB is fine, but you can’t set business rules.
  • Office Web Apps no longer run on SP servers in 2013. These are great, test on SkyDrive consumer.
  • Get office365 preview account
  • Nintex highly recommended over InfoPath. InfoPath is supported but unenhanced in 2013, likely indicator of unannounced strategy.
  • AD RMS allows the cloud to be more secure than on-premise. Allows exported documents to have rights management that restricts actions regardless of location. Very difficult to setup infrastructure. Office365 has this which is compelling reason to migrate.
  • User Profile DB is extremely important and becomes much more so in SP 2013
  • Claims Authentication is apparently a dude pees on a server and then gets shot with lasers:
Pee on a server LASERS!
  • Upgrade to 2013 should be done as quickly as possible. Much easier than 7-10. Fully backward compatible. Both 14 & 15 hives.
  • Governance is very important!

Key Insights:

  • Preparing for growth up front with SQL aliases is a great idea
  • Nintex and Office 365 both need more investigation by me
  • Remote Blob Storage is a good idea for nearly everyone – very different perspective than what I’ve previously been told!

Overall Impression:

This session was full of great tips and best practice suggestions tempered with practical applications. This was exactly the kind of information I came to hear. Dan did a great job of presenting a lot of information (despite a massive drive failure just previous to the convention) while keeping it interesting. The only thing that was probably a little much was his in-depth explanation of Claims Authentication. His drawings were pretty rough and his enthusiasm for the topic didn’t really transfer to the audience. Regardless, this was a great session.


SharePoint Data Access Shootout

Scot Hillier – http://www.shillier.com

My Notes:

  • LINQ cannot query across multiple lists (unless there is a lookup connection)
  • SPSiteDataQuery can query all lists of a certain template using CAML within a Site or Site Collection
  • SPMetal.exe generates Object Relational Map needed for LINQ  (in hive bin)
  • LINQ isn’t going to have much support in SP 2013
  • SP 2013 has continuous crawl
  • Keyword Queries are very helpful
  • KQL: ContentClass determines the kind of results you get. (ie STS_Web, STS_Site, STS_ListItem_Events)
  • Search in 2013 provides a rest interface to use KQL in JavaScript
  • CSOM is very similar to Serverside OM
  • CSOM is JS or .NET

Key Insights:

  • Keyword Query Language (KQL) needs more consideration as an effective query language for SharePoint.
  • LINQ isn’t actually a great way to access SP data despite Microsoft’s big push over the past couple of years.

Overall Impression:

This was a strange session. He didn’t go into enough depth about any one data access method to provide any real insight to those of us familiar with them and he moved so quick that anyone new to them would just have been overwhelmed. This session would have been better if he’d given clear and practical advise on when to use these methods rather than just demoing them. My guess is that he was trying to cover way too much information in too little time. However, I did enjoy hearing more about the Keyword Query Language since this is something I haven’t done much of and is rarely mentioned. Those tips alone made the whole session worthwhile.


HTML5 JavaScript APIs: The Good, The Bad, The Ugly

Christian Wenz – http://www.hauser-wenz.de/s9y/

My Notes:

  • HTML5 is a large umbrella of technologies
  • Suggests Microsoft WebMatrix is a good Editor
  • Semantics for HTML elements is a powerful new feature: input type = email, number, range, date, time, month, week, etc. These customize the type of editor and adds validation
  • Suggests Opera Mobile Emulator is a good testing tool
  • Additional elements: aside, footer
  • Requesting location: navigator.geolocation.getCurrentPosition(function(result){console.log(result)});
  • to debug local cache use Google Chrome by going to: Chrome://app cache-internals
  • Worker() web worker allows messaging for functions
  • CORS allows cross domain requests
  • Web sockets do not have full support yet but will be very cool

Key Insights:

  • HTML 5 is going to dramatically change how we think of website capabilities – eventually.
  • Although exciting, HTML 5 has a long way to go and several of it’s most compelling features have little to no support in main stream browsers.

Overall Impression:

Christian did a good job of keeping the energy up about HTML 5 and showing off some of the cool features. Unfortunately he seemed to lose site of the big picture in favor of really detailed samples. I enjoyed the presentation but would like to have had more guidance about how to get started and what to focus on with this new style of web development.


Roadmap: From HTML to HTML 5

Paul D. Sheriff – http://weblogs.asp.net/psheriff/

My Notes:

  • Lots of new elements – but they don’t do anything. They make applying CSS easier and allow search engines to parse through a page easier.
  • Browsers that don’t understand new elements will treat them as divs – but styles won’t be applied.
  • Lots of new input types (color, tel, search, URL, email, number, range, date, date-time, time, week, month)
  • New attributes (autofocus, required, placeholder, form validate, min, max, step, pattern, title, disabled)
  • CSS3 has huge style upgrades but there are still a lot of browser incompatibilities
  • JqueryUI, Modernizr = good tools, use VS 2012 with IE10 or Opera
  • Modernizr allows you to use HTML 5 with automatic replacements in incompatible browsers. Uses JQuery and is included automatically with VS 2012.
  • This stuff is not ready for the prime time except for mobile browsers. Modernizr fills in those gaps.
  • Box-sizing can be either border-box or content-box, which helps with the div width interpretation problem
  • Dude appears to hate JavaScript and HTML 5, sure love hearing a presenter complain about what we all came to learn about!

Key Insights:

  • Use Visual Studio 2012 with Modernizr to make HTML 5 websites

Overall Impression:

This session really annoyed me. Paul was very knowledgeable and had a lot of information to share. Unfortunately, he was so busy bashing the technology we all came to see that it was hard to know why we were even there.


Scaling Document Management in the Enterprise: Document Libraries and Beyond

Dan Holme – Intelliem

My Notes:

  • Can store up to 50 million documents in a single document library
  • SP 2013 allows documents to be dragged onto the doc library in the browser to upload – no ActiveX required
  • When a User is a member of the default group for a site they get the links in office and on their mysite. Site Members is the default group by default, but this can be switched in the group settings. Suggests creating an additional group that contains everyone on the site and has no permissions, then this can be the default group.
  • Email enabled document libraries can be very helpful for receiving documents outside of your network
  • Pingar is a recommended product he briefly mentioned
  • Big improvements in navigation using managed metadata service in SP 2013
  • Content type templates can use the columns as quick parts in Word

Key Insights:

  • Separating Site Membership from Site Permissions by creating an additional group just for managing memberships is a great idea.
  • A lot can be done with SP 2010 but SP 2013 will add a few key features to make things easier (drag and drop on the browser will be awesome).

Overall Impression:

The tip about site membership was worth the whole session. Additionally he reviewed a lot of the basics of content types and the content type hub. While this wasn’t particularly helpful to me, I can’t wait to get ahold of his slides for both this and his other sessions. He had way too many slides for the amount of time he was given.

This session reminded me of how powerful SharePoint is at so many things. Document management is not a particularly exciting topic to me but it is one of the key reasons we are using the SharePoint platform. A review of the features available to maintain the integrity of our data and to simply the classification of that data was very helpful.


SharePoint in Action: What We Did at NBC Olympics

Dan Holme – Intelliem

My Notes:

  • Keep SharePoint simple. Use OOTB features as much as possible
  • 300 hours of content broadcasted per day
  • NBCOlympics.com streamed every competition live
  • Most watched event in TV history
  • 3,700 NBC Olympics team members
    • 1 SP admin/support
  • PDF viewing was turned on despite security concerns
  • Set as default IE page – very difficult to do, they used a script to set a registry entry to account for multiple OSs and browser versions
  • All additional web applications were exposed through SP using a PageViewer WP
    • Phone Directory, Calendar application
  • WebDAV was used to allow other apps to publish documents
  • Global Navigation on top site using tabs (drop down menus)
    • Quick launch had contextual items to site
    • Navigation centric homepage, kept navigation as simple as possible. Only homepage had global navigation.
  • No real branding (put picture on right and used a custom icon). They set the site icon to go to the main web page because it’s what users expected.
  • Did not use lists or libraries as terms instead used Content (libraries, other lists) and Apps (Calendar, Tasks, etc.)
  • Suggests hiding “I like it” and notes since they are not helpful and deprecated in SP 2013
  • Site mailboxes for teams using OWA
  • Embedded documentation: Put basic instructions right on the homepage of team sites as needed. Also above some document libraries – basic upload and open instructions.
  • Focus on usability since there was no time for training
  • Took out All Site Content link and all other navigation was on homepage of site. Sub sites had tab links to parent site.
  • Used InfoPath to customize List Forms mostly to add instructions (placed below field title on left)
  • Lots of calendars. Conference room calendars were very popular. Didn’t use exchange for this in order to accommodate outside users.
  • Used InfoPath lists and workflows to replace paper processes. Kept them simple but effective. Although not used in this case, he recommends Nintex for more advanced needs.
  • Self-service help desk: printer/app installs, FAQs. Showed faces of team.
    • PageViewer web part and point it to \\servername to show all printers and put instructions on right to get those installed directly out of SP
    • Kept running FAQ to show common solutions
  • IT Administration site: ticket system used issue tracking list highly customized with InfoPath list forms.
    • Inventory lists in IT admin, also DHCP lease reports using powershell to dump that information.
    • List for user requests. WF for approvals, then Powershell took care of approved memberships directly in AD.
    • Used a list for password resets. Powershell would set password to generic password as requested (scheduled task every 5 min)
    • Powershell script to create team sites through list requests
  • SP will never be used to broadcast the Olympics but very effective to manage those teams
  • You must understand your users and build to what users really want/need
    • Don’t overwork, don’t over brand – It just clutters.
    • Don’t over deliver or over train.

Key Insights:

  • Keeping global navigation centralized in a single location (without including everything) and providing contextual navigation as needed can keep things simple from a management perspective while still allowing things to be intuitive.
    • Ensuring all navigation needed is exposed through the Quick Launch eliminates the need for All Site Content (except for Admin) and ensures your sites are laid out well
    • As long as you allow users to easily return to the global navigation from any sub site (Using the site icon is very intuitive) there is no need to clutter every site with complicated menu trees.
  • Request lists and Scheduled Tasks running Powershell Scripts can be used to create easy to manage but very powerful automation.
  • Removal of “I like it” and notes icons is a good idea
  • Embedding instructions directly on a given site/list using OOTB editing tools can increase usability dramatically
  • InfoPath List forms can go a long way towards improving list usability by making things appear more intuitive and providing in line instructions.
  • There are so many cool things in SP it can be easy to forget all the amazing things you can do using simple OOTB functionality. It is far too tempting to over deliver and over share when end users really only want to get their job done in the simplest way possible.

Overall Impression:

This was the best session I attended and made the entire conference worthwhile. It is unfortunately rare that you can see SP solutions in the context of an entire site. Seeing how SP was used to help manage one of the largest and most daring projects I can imagine was both inspiring and reassuring.

Besides the several tips of things they did (many of which will soon be showing up in our environment), he was able to confirm several things we were already doing that we were a little unsure about. Even better was his focus on simplifying things. I get so excited about SP features that sometimes I overuse them or forget the real power of simple lists. It was a fantastic reminder that we are often over delivering and therefore complicating things that just make SP scary and hard to use for end users.


Convention Summary

DevConnections 2012 was great. I had a great time in Vegas and I brought home several insights that have immediate practical value. Really, there’s not much more you can ask for in a technical convention.

Remove Drop Off Libraries from Every Site

Applies To: SharePoint 2010

The other day I came across a problem with some missing features on a few of our sites. Some quick searching told me I needed to enable all my sites to use the SharePoint Server Enterprise Features. This is a good thing to do, especially if you’ve just upgraded from 2007 to 2010 or you were using Foundation or Standard Server.

So, I went to Central Administration and clicked on Upgrade and Migration and chose Enable Features on Existing Sites. I was presented with this screen:

So, I checked the box and pressed OK. It took a few hours, but then everything was good to go! Almost…

Turns out I had people asking me what this new Drop Off Library link was on their sites. A quick check showed that EVERY SITE in EVERY SITE COLLECTION in EVERY WEB APPLICATION now had the Content Organizer feature enabled and a Drop Off Library added.

So, I go to Manage Site Features I deactivate the Content Organizer and go to delete the Drop Off Library. No delete option in Library settings. Turns out you need to use something like SharePoint Manager or Powershell to allow the library to be deleted before that link will show up. Regardless, we have hundreds of sites and my sites – All of which now have an unremovable library and unnecessary feature activated.

So, time for some Powershell! I wrote a script (below) that will cycle through all the sites in all the site collections for a given Web Application and disable the DocumentRouting feature (Content Organizer) and delete the Drop Off Library. I was inspired by this forum thread and this blog post.

Additionally, I was also faced with the complication that I had actually activated this feature previously for a few sites and wanted to make sure they weren’t stripped along with everybody else. So I added an ExclusionURLs parameter. I’ll explain more about that and how the rest of the script works in a minute.

The Script

Param(
	[parameter(position=0)]
	[String]
		$WebApplicationURL,
    [parameter(position=1)]
    [Boolean]
        $AnalysisOnly = $true,
	[parameter(position=2)]
	[String[]]
		$ExclusionURLs
)

#Display Exclusion URL information
if($ExclusionURLs -and $ExclusionURLs.Count -gt 0) {
    Write-Host "Excluded URLs:" -foregroundcolor green
    $ExclusionURLs | ForEach-Object {
        Write-Host "     $_" -foregroundcolor green
    }
} else {
    Write-Host "No URL Exclusions" -foreground cyan
}

#Display Feature Information
$feature = Get-SPFeature “DocumentRouting”
Write-Host “Feature ID for Content Organizer is called $($feature.DisplayName)" -foregroundcolor cyan

if($AnalysisOnly) {
    Write-Host "ANALYSIS ONLY" -foregroundcolor red
}

#Go Through Every Site
Get-SPWebApplication $WebApplicationURL | Get-SPSite -Limit ALL | Get-SPWeb -Limit ALL | ForEach-Object {

    #Check for Exclusion
    if(!($ExclusionURLs -contains $_.URL)) {
        Write-Host "$_ | $($_.URL)" -foregroundcolor DarkCyan

        #Disable Feature if found
        if ($_.Features[$feature.ID]) {
            Write-Host “  Feature $($feature.DisplayName) Found" -foreground green
            if(!$AnalysisOnly){
                Disable-SPFeature $feature -Url $_.Url -Force -Confirm:$false
                Write-Host “  Feature $($feature.DisplayName) Disabled” -foreground magenta
            }
        } else {
            Write-Host "  Feature $($feature.DisplayName) NOT Found" -foreground yellow
        }

        #Delete Drop Off Library if found
        $list = $_.Lists["DROP OFF LIBRARY"]
        if ($list) {
            Write-Host “  List $list Found” -foregroundcolor green
            if(!$AnalysisOnly){
                $list.AllowDeletion = $true;
                $list.Update()
                $list.Delete()
                Write-Host “  List $list Deleted” -foreground magenta
            }
        } else {
            Write-Host “  Drop Off Library NOT found” -foregroundcolor yellow
        }
    }

}
Write-Host " "
Write-Host "All Done!" -foregroundcolor yellow

You can copy the above script, save it in a text file with a ps1 extension and run it from the console. Assuming you’ve named the file RemoveDropOffLibraries.ps1 you can run it in a couple of different ways:

Analysis Only:

Since I’m the cautious type, I want to know which sites are going to be affected before I actually pull the trigger. So running it with just the Web Application URL will provide you with a list of all sites. Additionally, you’ll be told if a given site has the DocumentRouting feature enabled and if a Drop Off Library was found.

Perform Actions:

If you’re comfortable with the results above, just pass the Web Application URL and $false for the AnalysisOnly parameter. This will do the same list of sites and indicate if the DocumentRouting feature is enabled and if a Drop Off Library was found. Each time the feature is found activated, it gets disabled and you’ll see a message. Additionally, each time a Drop Off Library is found, it gets deleted and you’ll see a message.

Analysis Only with Exclusions:

Exclusions allow you to pass site URLs in a comma separated list. Doing the above command ensures your exclusions are working. Just specify the Web Application URL, $true for AnalysisOnly and then 1 or more exclusion URLs separated only by a comma.

Perform Actions with Exclusions:

This uses the same rules for exclusions as above, but instead of just analyzing, it actually does the work.

Quick Tip:

If you have a lot of sites and want to be able to see the output easily, use the start-transcript and stop-transcript cmdlets like so:

start-transcript -path SomeFile.rtf
...Commands and Output...
stop-transcript

Just replace line 2 with one of the command examples from above.


Surely no one else will ever end up in this situation, but just in case – there ya go!