Applies to SharePoint 2013, 2016, O365
Are you using SharePoint PnP PowerShell yet? Why not!?! Developers, IT Pros, and Power Users can all benefit from the SharePoint PnP PowerShell modules. The cmdlets wrap up a bunch of complex CSOM and REST calls into 280+ awesome commands. If you’re not using SharePoint PnP PowerShell you’re doing things on hard mode.
Installing SharePoint PnP PowerShell is super easy. You just choose your target version (2013, 2016, or Online) and install. If you’re on Windows 10 you can literally type Install-Module SharePointPnPPowerShellOnline into an administrator shell and you’re done.
But what if you’re like me and have multiple versions you need to target? I find myself needing to switch between SharePoint on premises and online all the time. Unfortunately the modules are often not cross-version compatible due to the different CSOM versions supported between the products. Something as simple as Get-PnPFolder against a 2013 site using the Online module won’t work and the errors aren’t always super obvious:

For a while I’ve just used the Uninstall-Module command and just switched between them that way. This has struck me as dumb for a while now so I finally reached out to The Father himself, Erwin van Hunen, and he responded right away:
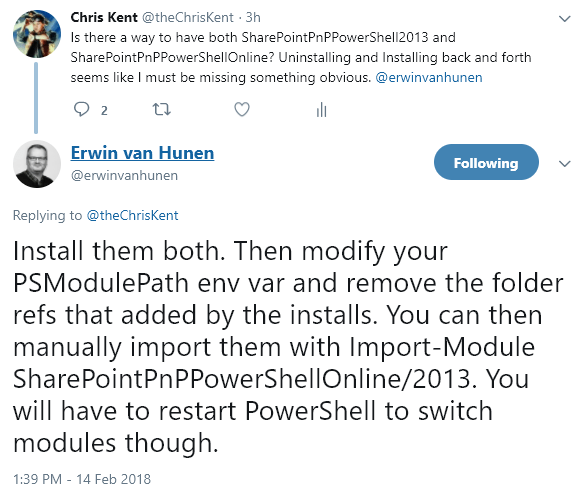
Awesome! Here’s how to do that (with screenshots!):
Install All the Modules
Although you can install all the modules, you can only have 1 active within any given session. So if you want to switch modules (once you’ve already loaded one) you’ll need to close and reopen PowerShell.
Option 1 – SharePoint On-Premises as Default
If you install the modules using the PowerShell Gallery they will be installed into the default modules path. As a result, when you use a PnP PowerShell Command the first module will be auto loaded (but the other 2 won’t because of conflicts). This appears to be alphabetical. So if you installed all 3 then the default module will be 2013. If you want to use the Online module instead, you would simply run Import-Module SharePointPnPPowerShellOnline before running any PnP PowerShell Commands.
You can’t just run the simple install command for each module. You’ll end up with some version of this error on your second module:

You’ll need to use the -AllowClobber parameter:

You can then check what versions you have installed using this command:
Get-Module SharePointPnPPowerShell* -ListAvailable | Select-Object Name,Version | Sort-Object Version -Descending
Now you can use any of the modules without having to uninstall/install first! By default you’ll be using 2013 (or 2016 if you skipped 2013) which may match your use case perfectly! You can always use the Import-Module command to target one of the other versions.
Option 2 – SharePoint Online as Default
To have the Online module be the one that is auto loaded when you use a PnP PowerShell Command but still have the option to load one of the on premises modules, you should only install the Online module through the PowerShell Gallery:

You can then check what versions you have installed using this command to ensure you only have the Online module installed here:
Get-Module SharePointPnPPowerShell* -ListAvailable | Select-Object Name,Version | Sort-Object Version -Descending
To install the other module(s) you’ll use the Releases page to download the corresponding msi installers:

Just run these as normal to get these installed. Once the module(s) are installed, open System Properties from your control panel. Under the Advanced tab, click the Environment Variables… button. Under User variables, find the PSMODULEPATH variable. If the path(s) to the PnP PowerShell modules are the only values you can just delete it. Otherwise, you can edit it to remove those paths:

Now when you run a PnP PowerShell Command the Online module will be auto loaded (default). If you want to use one of the on premises modules instead, you have to run Import-Module PATHTOMODULE before running any PnP PowerShell Commands.
Unfortunately, the module path can be pretty long. For instance, here’s mine:
Import-Module C:\Users\ckent\AppData\Local\Apps\SharePointPnPPowerShell2013\Modules\SharePointPnPPowerShell2013
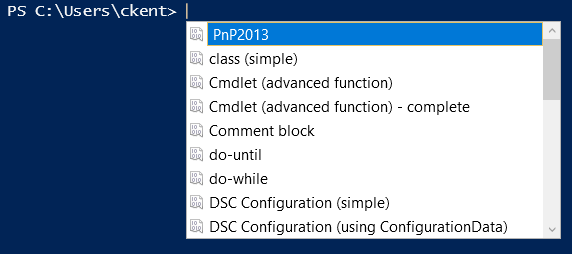
That’s not very convenient! Fortunately, the Windows PowerShell ISE provides snippets that can make it much simpler. You can create snippets using the New-IseSnippet command:
New-IseSnippet -Title " PnP2013" -Description "Imports the SharePointPnPPowerShell2013 Module" -Text "Import-Module $env:LOCALAPPDATA\Apps\SharePointPnPPowerShell2013\Modules\SharePointPnPPowerShell2013"
I put a space before the name so it would be at the top of the snippets. You can then access the snippet from either the script editor or the ISE prompt by pressing Ctrl-J:
Now you can use the Online module by default but quickly load the on premises module as needed without having to uninstall/install all the time!

[…] is by no means new news, as Chris Kent and Erwin van Hunen have already covered how to do this, but I wanted to add my personal notes as […]
Clean solution and neatly explained.
Instead of always Importing the right powershell module, I though creating a shortcut (one for each sharepoint version) for powershell with an inline command to load a specific module. This way when we open powershell the required module is loaded and ready for us –
Blogged about it here – http://blog.meenavalli.in/post/powershell-import-a-specific-module-from-the-installed-sharepoint-pnp-powershell-modules-2013-2016-2019-and-online