Make Microsoft PowerToys Color Picker Even More Useful!

Add a Hash to your Hex Color Value

I love Microsoft PowerToys. There are a ton of awesome tools included (and it’s FREE!) but my favorite is the Color Picker. Just hit WIN + Shift + C to get a quick dropper to pick a color from anywhere on your screen!

By default, the Color Picker returns the Hex value of the code and copies it to your clipboard. If that’s what you’re looking for, awesome!

I, however, wanted it to include the hash in front so that I could immediately use the value in my List Formats (instead of FFFFFF for white, I want #FFFFFF).

So, I opened the PowerToys settings and navigated to the Color Picker section.

  1. In the Color formats group you can see lots of standard formats and you can use the toggles to add/remove them or even reorder them in the results dialog.
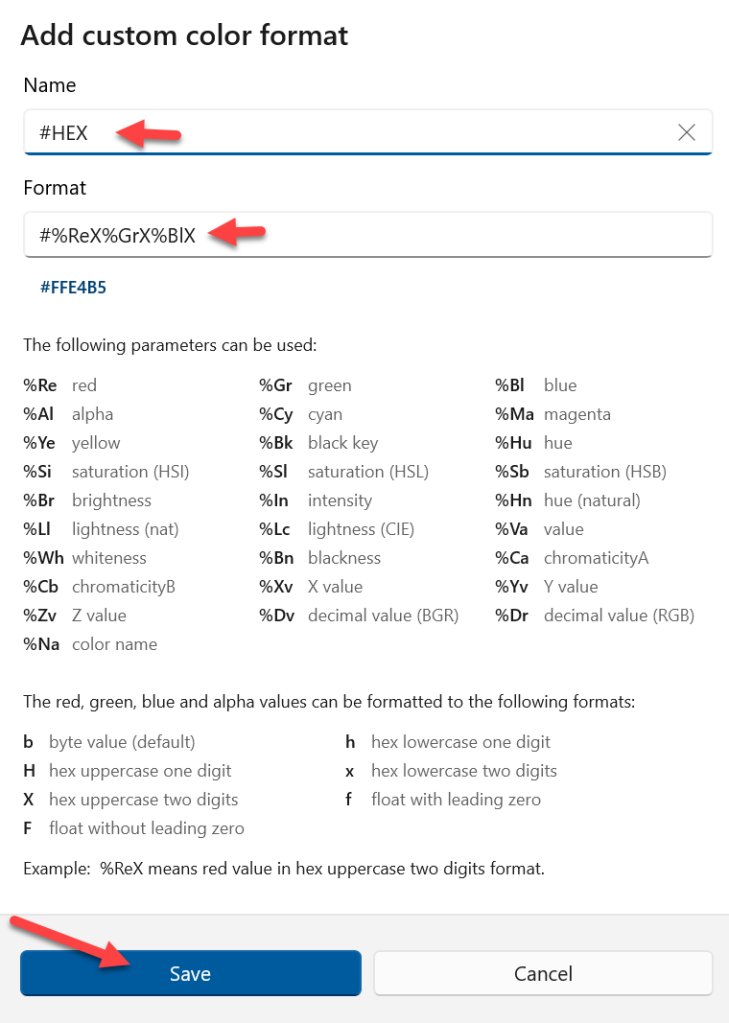
  1. Awesome! However, there still isn’t an option for the HEX value preceeded by the hash symbol. Fortunately, there’s an Add new format button! Click that to open a fancy dialog.
  2. As you can see from all the parameters and options, this thing is super flexible. Our format is “relatively” straight-forward. Name the format #HEX and paste #%ReX%GrX%BlX for the Format value then click Save:
  1. Your new format is now active and at the top of the list! To have it be the default format copied to your clipboard, choose it in the dropdown under Picker behavior:

That’s it! Now you’re color picker is even better. Oh yeah!!!

Customizing the Flow Panel with List Formatting actionParams

I’ve covered launching a flow for a list item using List Formatting a number of times, along with conditionally launching a flow, and recently I even showed how to take advantage of background list updates with automatic format updates using Flow.

In this post I’ll demonstrate some new tweaks the team has made that lets you customize the flow panel itself using list formatting!

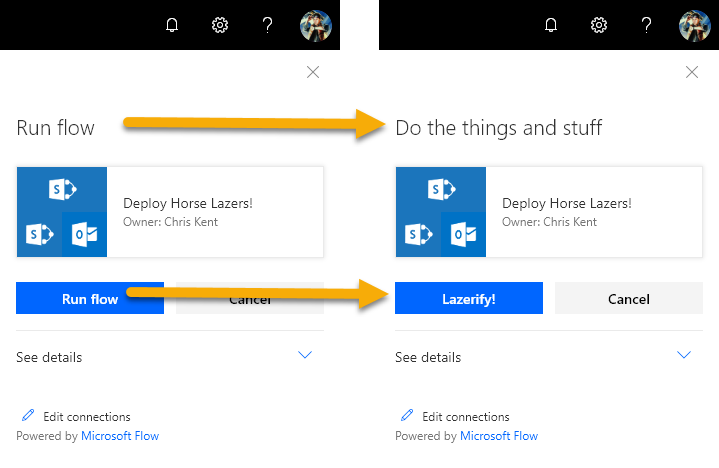
Specifically, you can now provide custom text for the panel header and/or the run flow button:

This goes a long way to making the flow panel less scary. The words “Run flow” don’t mean a whole lot to users. Even if you’ve named your flow well, it can still be confusing. Now you can make things even easier by providing context and meaning directly in the panel. You could even customize these values based on values of the list item!

Customizing the Flow Panel

Here is a very basic flow button Column Format from the generic-rowactions sample:

{
  "$schema": "https://developer.microsoft.com/json-schemas/sp/column-formatting.schema.json",
  "elmType": "button",
  "customRowAction": {
    "action": "executeFlow",
    "actionParams": "{\"id\":\"f7ecec0b-15c5-419f-8211-302a5d4e94f1\"}"
  },
  "attributes": {
    "class": "ms-fontColor-themePrimary ms-fontColor-themeDark--hover",
    "title": "Launch Flow"
  },
  "style": {
    "border": "none",
    "background-color": "transparent",
    "cursor": "pointer"
  },
  "children": [
    {
      "elmType": "span",
      "attributes": {
        "iconName": "Flow",
        "class": "ms-font-xxl"
      }
    }
  ]
}

The part we’re interested in is line 6, the actionParams. The actionParams property is currently only used for the executeFlow action. It is an escaped JSON string (the double quotes have a slash in front of them). And thus far, it’s been used to specify the ID of the flow.

Now you can specify the headerText and the runFlowButtonText properties inside of actionParams as well! Here’s what that looks like using the above format:

{
  "$schema": "https://developer.microsoft.com/json-schemas/sp/column-formatting.schema.json",
  "elmType": "button",
  "customRowAction": {
    "action": "executeFlow",
    "actionParams": "{\"id\":\"f7ecec0b-15c5-419f-8211-302a5d4e94f1\", \"headerText\":\"Do the things and stuff\",\"runFlowButtonText\":\"Lazerify!\"}"
  },
  "attributes": {
    "class": "ms-fontColor-themePrimary ms-fontColor-themeDark--hover",
    "title": "Launch Flow"
  },
  "style": {
    "border": "none",
    "background-color": "transparent",
    "cursor": "pointer"
  },
  "children": [
    {
      "elmType": "span",
      "attributes": {
        "iconName": "Flow",
        "class": "ms-font-xxl"
      }
    }
  ]
}

The ID is always required but you can specify either or both of the headerText and runFlowButtonText to provide that customization:

Escaped PropertyWhat it does
IDThe ID of the flow to run. This is required.
headerTextReplaces the big text at the top of the panel with whatever you specify.
runFlowButtonTextSets the text of the primary button with whatever you specify.

Some things to keep in mind:

  • headerText will wrap if you get especially wordy:
  • But just because you can, doesn’t mean you should. It’s best to keep the header as short and concise as possible. (for anyone who wants to ignore me, I’ve found I had no problem displaying 5000+ characters)
  • runFlowButtonText will also allow you to put a large amount of text in the button, but it looks terrible because the cancel button wraps below it somewhere around 14-16 characters:
  • Unlike the headerText, runFlowButtonText will eventually just run off the screen as it never wraps to a new line.
  • Changing these properties does nothing to obscure connection details or the name of the Flow (yay!)
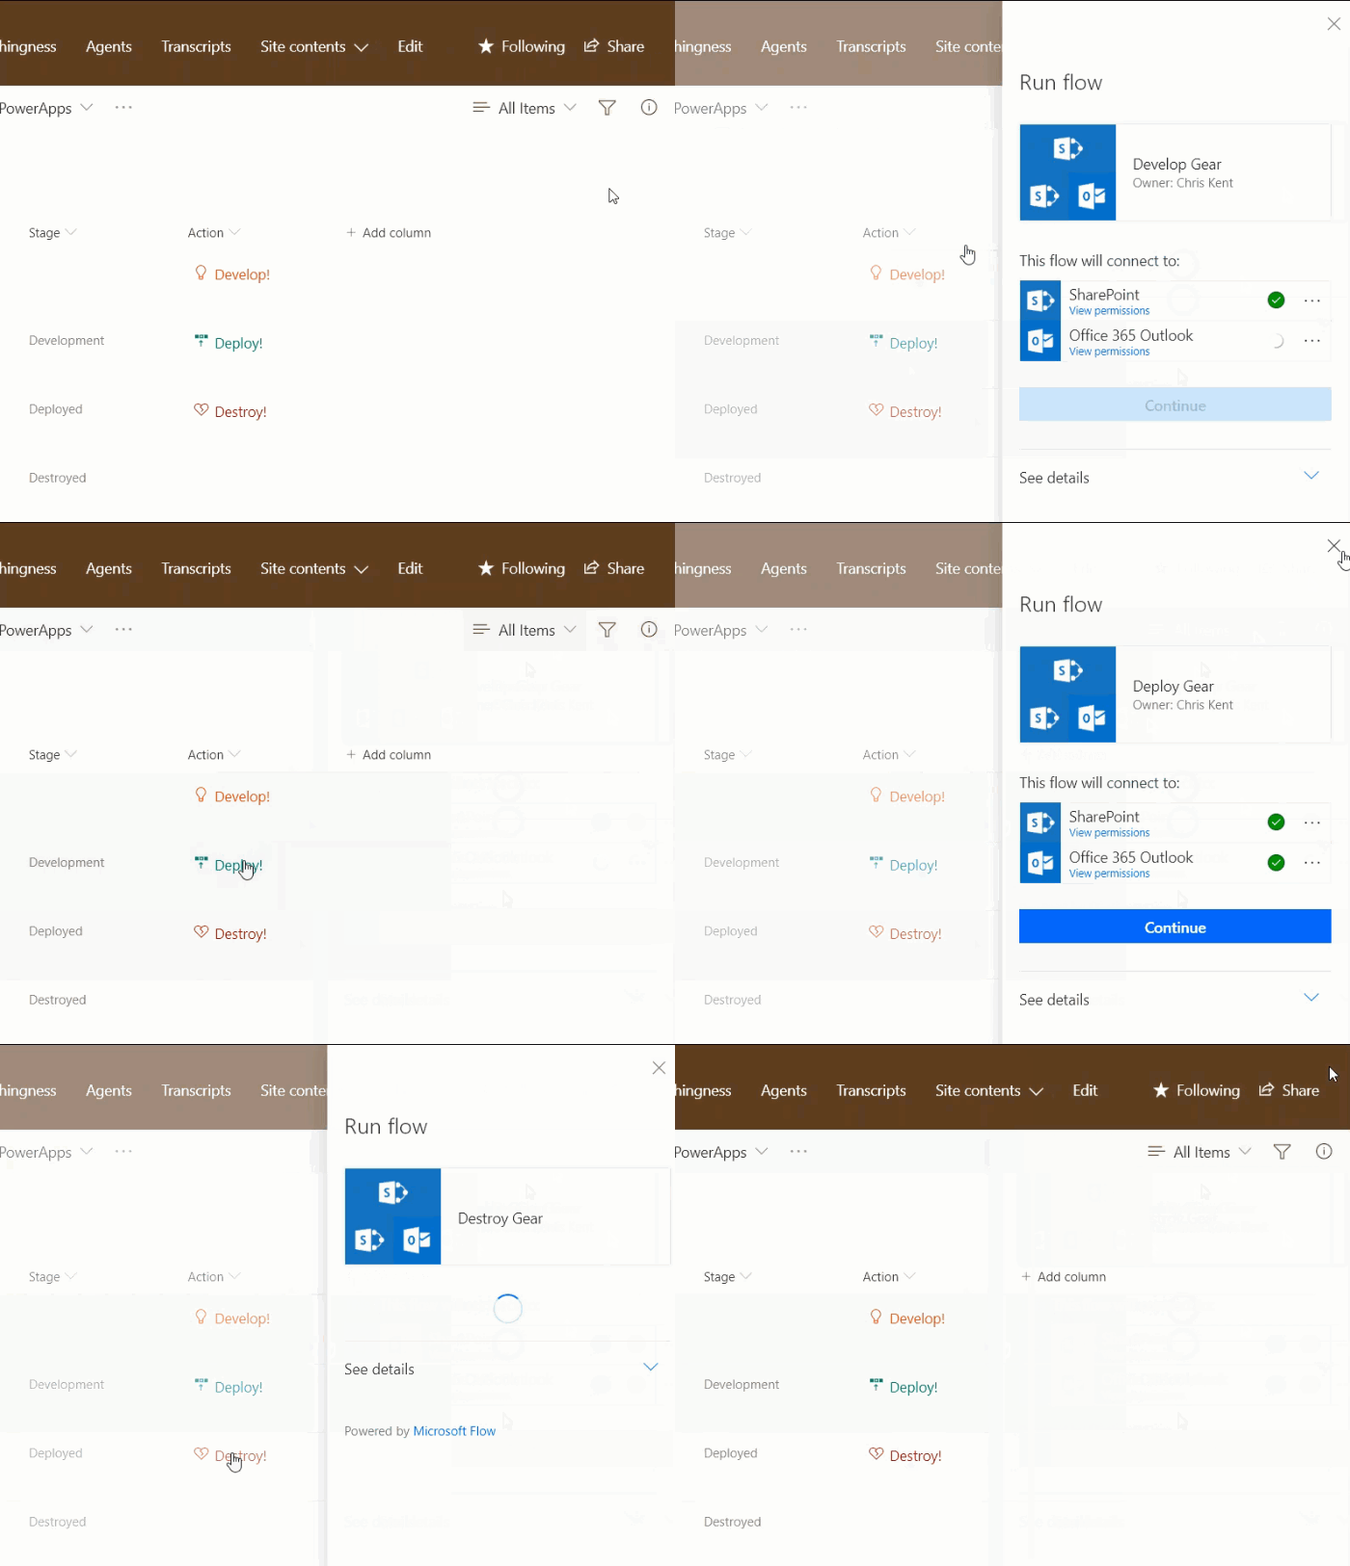
  • The headerText is shown even the first time a flow is executed (when the user is asked about the connections used), but as you might expect, the runFlowbuttonText is not:

This is a fantastic addition by the team! Making a flow button that simplifies launching a flow for an item is a great way to increase adoption, decrease confusion, and impress your boss! Special thanks to Cyrus Balsara (Microsoft) for letting me know about these awesome changes!

Generate List Formatting Elements in a Loop Using forEach

A few weeks back I demonstrated how to work with multi-select person or choice fields using indexOf to perform startsWith or contains checks to make some pretty cool formats.

While these are still valid techniques, they have some limitations that the new forEach property and the related operator, loopIndex, can solve. Specifically, applying formatted elements for each value of a multi-select field!

The Problem

I previously created a sample, multi-person-currentuser, that allows you to highlight a multi-person field when one of the users is the current user. The results end up looking something like this:

This sample takes advantage of the contains logic previously discussed by looking for the indexOf the @me (current user’s email address) within a flat string generated using the join operator:

multi-person-currentuser

{
  "$schema": "https://developer.microsoft.com/json-schemas/sp/column-formatting.schema.json",
  "elmType": "div",
  "txtContent": "=join(@currentField.title, ', ')",
  "attributes": {
    "class": "=if(indexOf(join(@currentField.email,';'), @me) != -1, 'ms-fontColor-themePrimary ms-fontWeight-semibold', '')"
  }
}

Works pretty well and if that’s all you need, go grab that sample!

But what if we could take it further than just displaying the fields as a string? What if we could apply elements for each item? Well… good news, that’s exactly what the new forEach property allows us to do!

The forEach Property

The forEach property is not yet part of the schema (so don’t be surprised if it gets highlighted as invalid in something like VS Code). You can use it within column formatting or inside of your rowFormatter for view formatting.

The forEach property allows you to create virtual fields that you can access within an element. The element where you add the property (along with all of it children) are rendered once for each item within the array (array refers to the collection of selected people or choices).

Because the element is rendered multiple times, you must have a containing element. This is why if you attempt to use the forEach property in the root element, you’ll get an error.

The forEach property’s value is a simple sentence in the form virtualFieldName in ArrayField. Let’s look at an example.

For this first example we’ll use a simple multi-select choice field. In this case we’ve just made the choices some letters. Here it is with no formatting applied:

Now let’s apply a format using the forEach property:

multi-choice-foreach:

{
  "$schema": "https://developer.microsoft.com/json-schemas/sp/column-formatting.schema.json",
  "elmType": "div",
  "children": [
    {
      "forEach": "choiceIterator in @currentField",
      "elmType": "div",
      "txtContent": "[$choiceIterator]",
      "attributes": {
        "class": "ms-bgColor-themePrimary ms-fontColor-white",
        "title": "='I am the letter ' + [$choiceIterator]"
      },
      "style": {
        "width": "16px",
        "height": "16px",
        "text-align": "center",
        "margin": "1px"
      }
    }
  ]
}

Here’s what that looks like:

So what did we do? As mentioned above, you can’t apply forEach to the root element. So we created a div and then gave it a single child. However, by using forEach within the child we’re using this element as a template that will be repeated within the root container once per selected choice.

The forEach value requires you to provide the virtual field name followed by the word in and concluding with the name of the array to loop over. In this case, as seen on line 6, we are using choiceIterator as the virtual field name and our array is the @currentField (this could have just as easily been another array field in your view using the [$FieldName] syntax).

Note that the virtual field name should be unique. It is possible to clobber your other fields if you use the same name as one of the internal names of your fields! This means that if you use Title then you’ll no longer have access to the actual Title field’s value! This will be true even after the loop completes. So choose carefully. I find it best practice to use either the field name or type followed by the word Iterator. This has the added benefit of making it obvious that you are retrieving a loop value within your element – but that’s up to you.

Now that we’ve added the forEach property, we can access the virtual field anywhere within our template object (and its children) just like it was any other field! You can see this in the txtContent property on line 8 and we even use it in an expression within the title property to create a nice tooltip on line 11.

Taking it further with loopIndex

Back to our person example from above, wouldn’t it be great to do more than simply show their names? There’s another sample called person-roundimage-format that applies the standard circle image for users. Using the techniques above we can quickly convert it to support multi-select person fields (add a forEach and change our field accessors):

{
  "$schema": "https://developer.microsoft.com/json-schemas/sp/column-formatting.schema.json",
  "elmType": "div",
  "children": [
    {
      "forEach": "personIterator in @currentField",
      "elmType": "div",
      "style": {
        "width": "32px",
        "height": "32px",
        "overflow": "hidden",
        "border-radius": "50%",
        "margin":"2px"
      },
      "children": [
        {
          "elmType": "img",
          "attributes": {
            "src": "='/_layouts/15/userphoto.aspx?size=S&accountname=' + [$personIterator.email]",
            "title": "[$personIterator.title]"
          },
          "style": {
            "position": "relative",
            "top": "50%",
            "left": "50%",
            "width": "100%",
            "height": "auto",
            "margin-left": "-50%",
            "margin-top": "-50%"
          }
        }
      ]
    }
  ]
}

Here’s what that looks like:

Now the images are showing up and we even get multiple when more than one person is selected! But what happens when we have lots of selections? The results aren’t great and give us all a sad:

You can see that up to 3 people looks just fine, but 4+ starts to have some weird squishing (and nobody likes weird squishing). So we need some way of knowing how many people we have for an item and which one we are on in the template.

Fortunately, you can use the length and loopIndex operators to accomplish this!

The length operator will provide the total number of items in an array (it does NOT provide string length). We can use this value to determine when we shouldn’t show an element (to remove face 4, 5, 6, etc.).

The loopIndex operator provides us with the zero-based index of where we are in the forEach loop. To use it, simply provide it the virtual property name you want to get the index of (since you can nest multiple forEach loops) as a string. So, in our case we can use "=loopIndex('choiceIterator')".

We’re going to base our solution on the UI Fabric Facepile with descriptive overflow. In order to do that, we want to accomplish the following:

  • Show 1 to 3 faces without change (that seems to work great)
  • Never show more than 3 circles
  • Replace the third circle with a descriptive overflow circle when there are 4 or more people selected

The first case we’ve got handled. The second can be done by using "display":"none" as mentioned in my last post. The third requires an alternate element that only shows when there are 4 or more people and we are on the 3rd person.

multi-person-facepile:

{
  "$schema": "https://developer.microsoft.com/json-schemas/sp/column-formatting.schema.json",
  "elmType": "div",
  "children": [
    {
      "forEach": "personIterator in @currentField",
      "elmType": "div",
      "style": {
        "width": "32px",
        "height": "32px",
        "overflow": "hidden",
        "border-radius": "50%",
        "margin": "2px",
        "display": "=if(loopIndex('personIterator') >= 3, 'none', '')"
      },
      "children": [
        {
          "elmType": "img",
          "attributes": {
            "src": "='/_layouts/15/userphoto.aspx?size=S&accountname=' + [$personIterator.email]",
            "title": "[$personIterator.title]"
          },
          "style": {
            "position": "relative",
            "top": "50%",
            "left": "50%",
            "width": "100%",
            "height": "auto",
            "margin-left": "-50%",
            "margin-top": "-50%",
            "display": "=if(length(@currentField) > 3 && loopIndex('personIterator') >= 2, 'none', '')"
          }
        },
        {
          "elmType": "div",
          "attributes": {
            "title": "=join(@currentField.title, ', ')",
            "class": "ms-bgColor-neutralLight ms-fontColor-neutralSecondary"
          },
          "style": {
            "width": "100%",
            "height": "100%",
            "text-align": "center",
            "line-height": "30px",
            "font-size": "14px",
            "display": "=if(length(@currentField) > 3 && loopIndex('personIterator') == 2, '', 'none')"
          },
          "children": [
            {
              "elmType": "span",
              "txtContent": "='+' + toString(length(@currentField) - (2))"
            }
          ]
        }
      ]
    }
  ]
}

Here’s what that looks like:

Here’s what we did:

  • On line 14, we added a display property to our template element to set the value to none if the loopIndex is greater than or equal to 3 (keep in mind that the index starts at zero so we’re basically saying never show items 4 and up)
  • On line 31, we added a similar display property to our img element to set the value to none if the number of items is greater than 3 and the loopIndex >= 2. This allows us to show it as normal if there are 3 or less people selected but when there are 4 or more, we don’t want to show that 3rd person.
  • On lines 34-54 we add our descriptive overflow element. This is a gray circle that says how many more people were selected than are shown.
  • On line 46, we once again take advantage of the display property to ensure that the overflow element is only shown when there are more than 3 people selected and we are on the 3rd element (loopIndex = 2).
  • We use the join operator to create a tooltip with everybody’s name in it on line 37.
  • We determine the number of additional people by simply subtracting 2 (since we know how many we are showing) from the length of the array. Notice that the 2 is wrapped in parenthesis. This is to combat an issue with the subtraction operator.

While that certainly isn’t the simplest sample in the world, it demonstrates common list formatting patterns such as conditional display, element loops, and customization based on loop position.

This opens up even more possibilities in the already awesome List Formatting world! Whoo!!

Conditionally Launch Flows using List Formatting

Creating a button with Column Formatting to launch a flow is a fantastic way to make actions obvious (not hidden in the Flow menu). If you have a list item flow, I strongly recommend doing this (just copy, paste, and tweak the sample). But what if you want to go further? What if you have multiple flows for list items and you want to help guide your users through this more complex (but relatively common) scenario?

Good news! List formatting expressions make it possible to only show the flow launch button(s) that make sense based on the values of the item! Here’s what we’re building:

In the list above, we have 3 separate flows (Develop, Deploy, and Destroy). We want to only prompt the user to launch one of these based on the value of the Status column in the list item. You could argue that it might make more sense to launch a single flow that handles the conditional logic directly. Sure, but customizing the text, icon, and color to make it obvious to the user what action they are taking is still an awesome thing to do.

Conditional Logic Across Properties

In our sample, we want to conditionally change the color, icon, text, visibility, as well as the flow launched. This brings us to a very common scenario in List Formatting: applying the same logic to multiple properties.

It would be awesome to apply your logic to entire elements, but in List Formatting it is only possible to conditionally apply the value of a property. This means you can’t conditionally include/exclude a property or element. These properties/elements have to be included with their individual values conditionally set.

So, if you want to set a style property based on a condition, like the text color, you have to include the property and set its value regardless. Generally, you handle this by setting up an expression like this: “color”:”=if(@currentField>2,’red’,”)”

You cannot, however, apply that same logic to the inclusion of the color property itself.

Conditional Logic for Elements

Although you must include all the elements and properties whose values you want to set (even if only in some conditions), you can use the style display attribute to remove entire elements by simply setting the value to none. This is how we remove the entire button when the status is ‘Destroyed’ in our sample (line 15 below). We don’t want to prompt the user to launch any flow, so we simply remove the button altogether.

You can extend this pattern further by creating a placeholder top element of a div with children. The individual child elements can be turned on or off by conditionally setting the display property. That’s not what we’re doing here, but it’s something to keep in mind.

Conditional Flows

generic-start-flow-conditionally:

{
  "$schema": "https://developer.microsoft.com/json-schemas/sp/column-formatting.schema.json",
  "elmType": "button",
  "customRowAction": {
    "action": "executeFlow",
    "actionParams": "='{\"id\": \"' + if([$Stage]=='','b60a26d3-fd87-4947-9d1d-344cb31d953a',if([$Stage]=='Development','3a27a39c-0ec9-4342-8fe3-bfb37fefc3da','3091d383-f8ed-48da-9962-bd7c24e70688')) + '\"}'"
  },
  "attributes": {
    "class": "='ms-fontColor-' +if([$Stage]=='','orangeLight',if([$Stage]=='Development','teal','redDark'))"
  },
  "style": {
    "border": "none",
    "background-color": "transparent",
    "cursor": "pointer",
    "display": "=if([$Stage]=='Destroyed','none','inherit')"
  },
  "children": [
    {
      "elmType": "span",
      "attributes": {
        "iconName": "=if([$Stage]=='','Lightbulb',if([$Stage]=='Development','Deploy','HeartBroken'))"
      },
      "style": {
        "padding-right": "6px"
      }
    },
    {
      "elmType": "span",
      "txtContent": "=if([$Stage]=='','Develop!',if([$Stage]=='Development','Deploy!','Destroy!'))"
    }
  ]
}

You can see that we are applying each of our elements conditionally by comparing the value of the Stage column (also present in the view). For the flow, we build the actionParams conditionally by building the escaped JSON value and swapping the ID value in and out based on the stage (line 6).

You can customize this sample by adding additional conditions, changing the comparison column (use the internal name), and the ID(s) of the flows themselves.

Getting a Flow’s ID

To use the code, you must substitute the ID of the Flow(s) you want to run. The IDs are contained within the expression inside the customRowAction attribute inside the button element.

To obtain a Flow’s ID:

  1. Click Flow > See your flows in the SharePoint list where the Flow is configured
  2. Click on the Flow you want to run
  3. Copy the ID from the end of the URL (between flows/ and /details)

Update

See this demoed on the PnP Call (Live from MVP Summit):

Love List Formatting?

Join the Bi-weekly (every other Thursday) SharePoint Patterns and Practices special interest group for general development call where I will be presenting a new List Formatting Quick Tip on each call!

Also, come get the full picture in my sessions about List Formatting at the SharePoint Conference in Las Vegas in May, or the European Collaboration Summit in Germany in May:

Setting the Accent Color of Your Modern Site’s Custom Theme

Modern pages in Office 365 let you “Change the Look” by providing a number of themes (sets of colors) that can be applied to your site (available from the gear menu in the top-right of the screen). The interface is pretty slick, it takes immediate effect, and the default options are so much better than those weird sets of themes from the classic days.

You can even do minor customization by clicking the customize link under your chosen theme. You can choose from one of the preselected primary colors and an accent color (designed to match your primary). Generally, these colors are great and have been selected to look good in most scenarios.

CustomizeColorsInUI

But I can’t pick the exact shade of red marketing has decreed that all things must be! Fortunately, you can create your own theme with the exact colors you want. You can even generate these using the UI Fabric Theme Generator. This is pretty easy, and Mikael Svenson wrote up a nice guide on doing this using PnP PowerShell.

If you follow his guide, and the official documentation, you can easily get a nice custom theme. However, one annoying and not obvious part is setting the accent color. If you use the generated theme you might end up with something like this:

SoPrettyDefault

For this theme, I used the Theme Generator. By default, you specify the primary color (the big rectangle on the left in the theme) and then all the other colors are variations of it. However, you can click on any of the generated colors to override them. I did this as you can see above by overriding themeSecondary (2nd box in the theme) and themeTertiary (3rd box in the theme):

SoPrettyFabricPalette

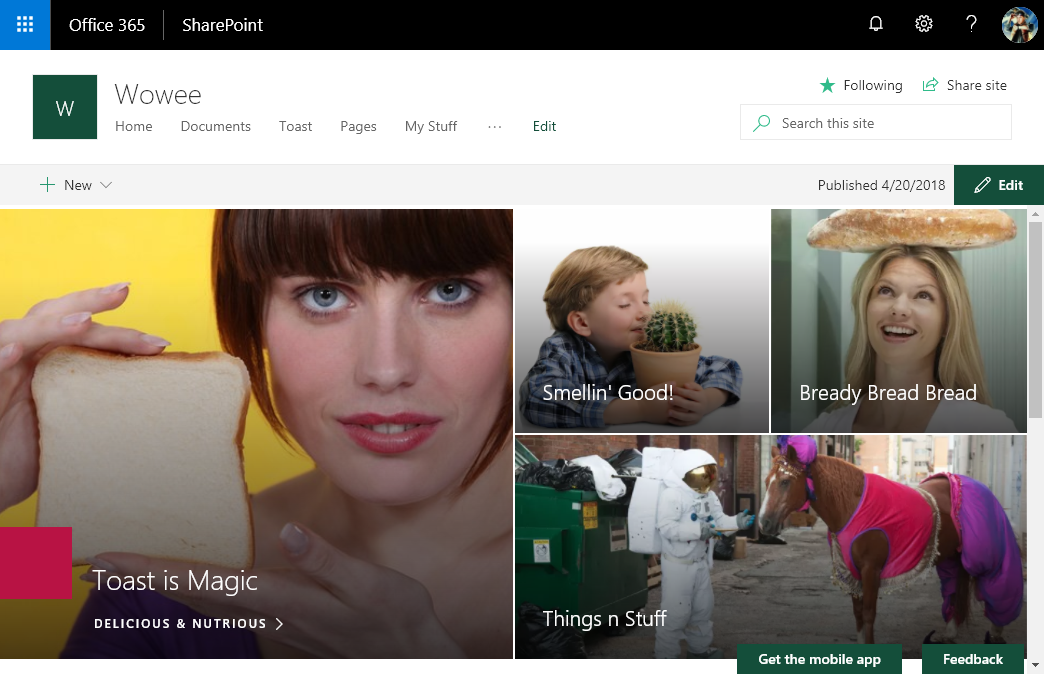
But what about that 4th box, the accent color? This wasn’t part of the generator and I couldn’t find it documented anywhere. You also don’t get the nice Customize link to let you set it. Instead, the accent color is set to the same as the primary color. This results in things like that weird square in the hero part being the exact color as your buttons, etc.:

StupidAccentFailure

Turns out setting this isn’t hard, it’s just not obvious. All you do is add an “accent” value to your generated list of colors like so:

@{
"themePrimary" = "#144e3a";
"themeLighterAlt" = "#d8f5eb";
"themeLighter" = "#b4ecd8";
"themeLight" = "#90e2c6";
"themeTertiary" = "#edd249";
"themeSecondary" = "#6b4130";
"themeDarkAlt" = "#30bb8a";
"themeDark" = "#279770";
"themeDarker" = "#1e7355";
"neutralLighterAlt" = "#f8f8f8";
"neutralLighter" = "#f4f4f4";
"neutralLight" = "#eaeaea";
"neutralQuaternaryAlt" = "#dadada";
"neutralQuaternary" = "#d0d0d0";
"neutralTertiaryAlt" = "#c8c8c8";
"neutralTertiary" = "#a6a6a6";
"neutralSecondary" = "#666666";
"neutralPrimaryAlt" = "#3c3c3c";
"neutralPrimary" = "#333333";
"neutralDark" = "#212121";
"black" = "#1c1c1c";
"white" = "#ffffff";
"primaryBackground" = "#ffffff";
"primaryText" = "#333333";
"bodyBackground" = "#ffffff";
"bodyText" = "#333333";
"disabledBackground" = "#f4f4f4";
"disabledText" = "#c8c8c8";
"accent" = "#B81344";
}

Adding that last line results in this:

SoPrettyWithAccent

WithAccent

Looks like there are a couple of other values you can add (and possibly more) such as “neutralSecondaryAlt”, “blackTranslucent40”, and “error”. Just like most of the entries, however, it’s not totally obvious when they’re used.

Now you no longer have an excuse not to set that sweet accent color to the boring shade dictated by your corporate style guide!

A Verbose Schema for SharePoint Column Formatting (Proposal)

Declarative customization through Column Formatting in SharePoint Online is a really cool new way to customize how fields in lists and libraries are displayed. It’s all done through JSON and it’s pretty awesome.

I think there are a few minor areas it’s currently falling short, however. Such as:

Unfortunately, although there is an open source repo of great samples, Column Formatting itself is not something we can directly contribute to (outside of issues and user voice like the above). But, I had another issue that I really wanted solved so I solved it (at least for me) and thought I’d share and suggest it (or some version of it) should be adopted officially.

While a UI for generating the JSON would be awesome, the alternative suggestion of writing your column formatter in VS Code using the schema.json is a good one. However, I really wanted better intellisense to help me track down what I can and can’t do. So, I added a bunch of stuff to the schema.json file to do exactly that.

A Verbose Schema

Using my version of the columnFormattingSchema.json (currently available as a gist), you get fancy stuff like this:

VerboseColumnFormatting

Here’s what’s in here compared to the original:

  • Valid operations toLocalString(), toLocaleDateString(), and toLocaleTimeString() are no longer marked as invalid (added them to the operator enum)
  • The style property now only allows values corresponding to supported style attributes
    • Additionally, each style property has enum values corresponding to possible values
  • Valid attributes iconName, rel, and title are no longer marked as invalid
  • class attribute provides enum values (using the predefined classes)
  • target attribute provides enum values
  • role attribute provides enum values
  • rel attribute provides enum values
  • iconName attribute provides enum values
  • Most properties (like txtContent and operators) provide special string enums (@currentField, @me, @now, etc.)

It’s important to note that every value can still be an expression and even where enums are provided for convenience (like class or txtContent), you can still supply a string not in the list.

Using the Schema

When you apply column formatting the JSON is validated, but the actual schema isn’t really restricted like you might expect (this is why you could previously specify an iconName property without issue even though it was technically invalid). This also means that using the Verbose schema won’t cause any problems for you (I’ve actually tested it against every sample available to me) and is actually much more likely to prevent you from getting multiple console error messages about unsupported style attributes, etc.

For now, you can just save the file to your machine and use a local reference (as shown in the image above) or, even better, you can reference it directly from the gist (raw) like this:

{
    "$schema": "https://gist.githubusercontent.com/thechriskent/2e09be14a4b491cfae256220cfca6310/raw/eb9f675bf523208eb840c462d4f716fa92ce14c2/columnFormattingSchema.json"
}

Now, as long as you save that file with a .json extension, VS Code will automatically add the intellisense and extra validation!

You don’t even need to remove the $schema property (you can even leave it out, it is not currently used by SharePoint at all).

Also, for anyone that is wondering what the column formatter shown in the animation above looks like, here it is for a Person field:

Final
My name is red since I’m the logged in user

Top Link Bar Navigation From XML

Applies To: SharePoint

In my last post, Top Link Bar Navigation To XML, I provided you with a script to serialize a site collection’s Global Navigation Nodes to XML. In the post before that, Multi-Level Top Link Bar Navigation (Sub Menus), I showed you how to enable additional sub menus using the native control in SharePoint by editing a simple attribute in the Master Page. However, it quickly became clear that the native navigation editor (Site Actions > Site Settings > Navigation) won’t allow you to edit anything greater than 2 levels despite the control’s support for it. In this final post I’ll show you how to edit the exported XML to add multiple levels and then to import it.

The Script

Copy and paste the code below into notepad and save it as NavigationFromXml.ps1

$xmlFile = "d:\scripts\navigation\ExportedNavigation.xml"
$sourcewebApp = "http://somesite.com"
$destweb = "http://somesite.com"
$keepAudiences = $true #set to false to have it totally ignore audiences (good for testing)

Function CreateNode($xNode,$destCollection){
    Write-Host $xNode.Title

    #make URLs relative to destination
    $hnUrl = $xNode.Url
    #Write-Host "O URL: $hnUrl"
    $hnUrl = SwapUrl $hnUrl $sourceWebApp $destWeb
    #Write-Host "N URL: $hnUrl"

    $hnType = $xNode.NodeType
    if($hnType -eq $null){
        $hnType = "None"
    }

    $hNode = [Microsoft.SharePoint.Publishing.Navigation.SPNavigationSiteMapNode]::CreateSPNavigationNode($xNode.Title,$hnUrl,[Microsoft.SharePoint.Publishing.NodeTypes]$hnType, $destCollection)
    $hNode.Properties.Description = $xNode.Description
    if($keepAudiences){
        $hNode.Properties.Audience = $xNode.Audience
    }
    $hNode.Properties.Target = $xNode.Target
    $hNode.Update()

    if($xNode.Children.Count -gt 0) {
        foreach($child in $xNode.Children) {
            CreateNode $child $hNode.Children
        }
    } elseif($xNode.Children.IsNode -eq "yes") {
        #single child
        CreateNode $xNode.Children $hNode.Children
    }
}

Function SwapUrl([string]$currentUrl,[string]$sourceRoot,[string]$destRoot) {
	if ($currentUrl -ne "/") {
		if ($currentUrl.StartsWith("/")) {
            #Relative URL
			$currentUrl = $sourceRoot + $currentUrl
		} elseif ($currentUrl.StartsWith($destRoot)) {
            #May be a problem for non root sites
			$currentUrl = $currentUrl.Replace($destRoot,"")
		}
	} else {
		$currentUrl = [System.String]::Empty
	}
	$currentUrl
}

$dw = Get-SPWeb $destweb
$pdw = [Microsoft.SharePoint.Publishing.PublishingWeb]::GetPublishingWeb($dw)

$gnn = Import-Clixml $xmlFile

$nodeCount = $pdw.Navigation.GlobalNavigationNodes.Count
Write-Host "  Removing Current Nodes ($nodeCount)..." -ForegroundColor DarkYellow
for ($i=$nodeCount-1; $i -ge 0; $i--) {
    $pdw.Navigation.GlobalNavigationNodes[$i].Delete()
}

if($gnn.IsNode -Eq "yes"){
    #not an array (just 1 top level nav item)
    #Write-Host "1 Only!"
    [void](CreateNode $gnn $pdw.Navigation.GlobalNavigationNodes)
} else {
    #array of nodes, so add each one
    foreach($n in $gnn){
        [void](CreateNode $n $pdw.Navigation.GlobalNavigationNodes)
    }
}

#cleanup
$dw.dispose()

What it Does and How to Use It

There are 4 parameters at the top of the script for you to adjust:

  • $xmlFile: The path to use for the XML input
  • $sourcewebApp: The URL of the web application (Needed to ensure relative links are imported correctly)
  • $destweb: The URL of the site collection you are importing the navigation nodes to
  • $keepAudiences: When $true audience values are used, when $false they are ignored (helpful for testing)

Once you set those and save, open the SharePoint Management Shell (You’ll want to run-as a farm administrator) and navigate to the location of the script. You can run it by typing: .\NavigationToXml.ps1

RunNavigationFromXMLScript

The script will delete all global navigation nodes from the $destweb. It will then use the Import-Clixml command to hydrate a series of custom objects that it will use to build the new navigation nodes. It will build the nodes recursively allowing any number of levels of child nodes (You will have to adjust your Master Page as outlined in my post, Multi-Level Top Link Bar Navigation (Sub Menus), to see any more than the default 2 levels).

How it Works

The main code begins at line 53 where we retrieve the $destweb and then hydrate the $gnn object from the $xmlFile. One of the custom properties used in our NavigationToXml.ps1 script we output was IsNode. In PowerShell an array of one object does not serialize to an array. Rather, it serializes directly to the single object. Using IsNode allows us to know if the object we are working with is an actual node or an array of nodes so that we can avoid exceptions when accessing other properties.

For every node we hydrated we call the function CreateNode (lines 6-36) which creates a node using the custom properties in the passed collection. URLs are made relative to the web application using the function SwapUrl (lines 38-51). This will process every node in the collection along with all of their children.

Editing the XML

So why go through this at all? If you just want to copy global navigation from one site collection to another then just use the simpler NavigationPropagation.ps1 script provided in this article: SharePoint Top Link Bar Synchronization.

However, doing it this way allows you a chance to tweak the XML using notepad (I recommend notepad++). This is the easiest way to add Multiple Levels. For now I’ll explain the basics of the XML document and how to edit it. We’ll go over more of the whys in the Putting it All Together section below.

Structure

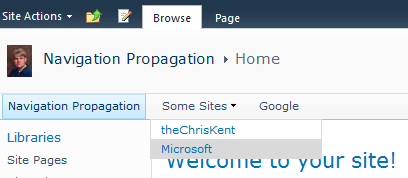
To get your base structure it’s best to use the native navigation editor (Site Actions > Site SettingsNavigation) and setup as many of your nodes as you can. Then you can use the NavigationToXml.ps1 script provided in the previous article, Top Link Bar Navigation To XML, as your base document. Trust me, trying to write it all from scratch is dumb. Here’s a quick summary of the results of running that script against navigation that looks like this:

IMG_0347

Skipping the automatic link for the site (Navigation Propagation) here is the current structure of those nodes:

  • Some Sites (Heading)
    • theChrisKent (AuthoredLinkPlain)
    • Microsoft (AuthoredLinkPlain)
  • Google (AuthoredLinkPlain)

Here’s what the exported XML looks like for that same set of nodes:

<Objs Version="1.1.0.1" xmlns="http://schemas.microsoft.com/powershell/2004/04">
  <Obj RefId="0">
    <TN RefId="0">
      <T>System.Object</T>
    </TN>
    <ToString>System.Object</ToString>
    <MS>
      <S N="IsNode">yes</S>
      <S N="Title">Some Sites</S>
      <S N="Url">/personal/ckent/navtest</S>
      <S N="NodeType">Heading</S>
      <S N="Description"></S>
      <S N="Audience"></S>
      <Nil N="Target" />
      <Obj N="Children" RefId="1">
        <TN RefId="1">
          <T>System.Object[]</T>
          <T>System.Array</T>
          <T>System.Object</T>
        </TN>
        <LST>
          <Obj RefId="2">
            <TNRef RefId="0" />
            <ToString>System.Object</ToString>
            <MS>
              <S N="IsNode">yes</S>
              <S N="Title">theChrisKent</S>
              <S N="Url">http://thechriskent.com</S>
              <S N="NodeType">AuthoredLinkPlain</S>
              <S N="Description"></S>
              <S N="Audience"></S>
              <Nil N="Target" />
              <Obj N="Children" RefId="3">
                <TNRef RefId="1" />
                <LST />
              </Obj>
            </MS>
          </Obj>
          <Obj RefId="4">
            <TNRef RefId="0" />
            <ToString>System.Object</ToString>
            <MS>
              <S N="IsNode">yes</S>
              <S N="Title">Microsoft</S>
              <S N="Url">http://microsoft.com</S>
              <S N="NodeType">AuthoredLinkPlain</S>
              <S N="Description"></S>
              <S N="Audience"></S>
              <Nil N="Target" />
              <Ref N="Children" RefId="3" />
            </MS>
          </Obj>
        </LST>
      </Obj>
    </MS>
  </Obj>
  <Obj RefId="5">
    <TNRef RefId="0" />
    <ToString>System.Object</ToString>
    <MS>
      <S N="IsNode">yes</S>
      <S N="Title">Google</S>
      <S N="Url">http://google.com</S>
      <S N="NodeType">AuthoredLinkPlain</S>
      <S N="Description"></S>
      <S N="Audience"></S>
      <Nil N="Target" />
      <Ref N="Children" RefId="3" />
    </MS>
  </Obj>
</Objs>

Each node can be found in an Obj element where you can easily find the list of custom properties in the MS section (IsNode, Title, Url, NodeType, Description, Audience, Target and Children). Each of these are simple strings. The only one that can be a little tricky is Audience which we’ll cover in depth in the Adding Nodes section below.

Each Obj element has a unique (to this document) value for it’s RefId. This is just an integer. The only thing to really note here is that each one needs to be unique. They will be the case in any export since this is part of the Export-Clixml command, but you’ll need to pay close attention to this when adding additional nodes. These are also used in Ref elements which you’ll see in various spots. If an object is the exact same as an object previously defined in the document it won’t be defined. Rather it will just get a Ref element instead of an Obj element. The Ref element will have a RefId that is equal to the previously defined Obj‘s RefId.

This mostly comes up with blank children. A good example is the first node with no children above is the node for theChrisKent (lines 22-38). You can see that the Children Obj is defined in lines 33-36. Whereas, the very next node without children (Microsoft lines 39-52) doesn’t have an Obj for Children but rather a Ref (line 50) with a RefId of 3 which you’ll recognize as the RefId specified in line 33. This can seem very confusing at first but it will get easier using the examples below.

Adding Nodes

Adding a single node with no children is pretty easy. Just cut and paste a similar node (Obj) and switch up the RefId to something unique for the document. For instance if I wanted to create another link under Some Sites right after the Microsoft one, I could just copy the Microsoft node (lines 39-52) and paste it directly below its closing tag (</Obj>). It would look something like this:

<Objs Version="1.1.0.1" xmlns="http://schemas.microsoft.com/powershell/2004/04">
  <Obj RefId="0">
    <TN RefId="0">
      <T>System.Object</T>
    </TN>
    <ToString>System.Object</ToString>
    <MS>
      <S N="IsNode">yes</S>
      <S N="Title">Some Sites</S>
      <S N="Url">/personal/ckent/navtest</S>
      <S N="NodeType">Heading</S>
      <S N="Description"></S>
      <S N="Audience"></S>
      <Nil N="Target" />
      <Obj N="Children" RefId="1">
        <TN RefId="1">
          <T>System.Object[]</T>
          <T>System.Array</T>
          <T>System.Object</T>
        </TN>
        <LST>
          <Obj RefId="2">
            <TNRef RefId="0" />
            <ToString>System.Object</ToString>
            <MS>
              <S N="IsNode">yes</S>
              <S N="Title">theChrisKent</S>
              <S N="Url">http://thechriskent.com</S>
              <S N="NodeType">AuthoredLinkPlain</S>
              <S N="Description"></S>
              <S N="Audience"></S>
              <Nil N="Target" />
              <Obj N="Children" RefId="3">
                <TNRef RefId="1" />
                <LST />
              </Obj>
            </MS>
          </Obj>
          <Obj RefId="4">
            <TNRef RefId="0" />
            <ToString>System.Object</ToString>
            <MS>
              <S N="IsNode">yes</S>
              <S N="Title">Microsoft</S>
              <S N="Url">http://microsoft.com</S>
              <S N="NodeType">AuthoredLinkPlain</S>
              <S N="Description"></S>
              <S N="Audience"></S>
              <Nil N="Target" />
              <Ref N="Children" RefId="3" />
            </MS>
          </Obj>
          <Obj RefId="10">
            <TNRef RefId="0" />
            <ToString>System.Object</ToString>
            <MS>
              <S N="IsNode">yes</S>
              <S N="Title">Apple</S>
              <S N="Url">http://apple.com</S>
              <S N="NodeType">AuthoredLinkPlain</S>
              <S N="Description"></S>
              <S N="Audience"></S>
              <Nil N="Target" />
              <Ref N="Children" RefId="3" />
            </MS>
          </Obj>
        </LST>
      </Obj>
    </MS>
  </Obj>
  <Obj RefId="5">
    <TNRef RefId="0" />
    <ToString>System.Object</ToString>
    <MS>
      <S N="IsNode">yes</S>
      <S N="Title">Google</S>
      <S N="Url">http://google.com</S>
      <S N="NodeType">AuthoredLinkPlain</S>
      <S N="Description"></S>
      <S N="Audience"></S>
      <Nil N="Target" />
      <Ref N="Children" RefId="3" />
    </MS>
  </Obj>
</Objs>

Pretty straightforward overall. Notice that in line 53 I’ve set the RefId to 10. This is because the only requirement is for it to be unique – It does not have to be in sequence. If you run the NavigationFromXml.ps1 script on the above the site now looks like this:

TopLinkBarWithAppleLink

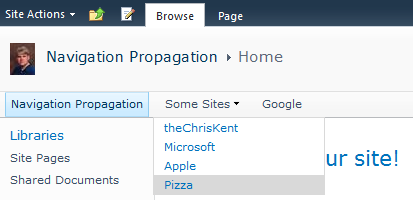
What about an additional level? For this example we’ll be adding a new sub menu under Some Sites called Pizza with 2 links. Our structure should look like this:

  • Some Sites (Heading)
    • theChrisKent (AuthoredLinkPlain)
    • Microsoft (AuthoredLinkPlain)
    • Apple (AuthoredLinkPlain)
    • Pizza (Heading)
      • Pizza Hut (AuthoredLinkPlain)
      • Little Caesars (AuthoredLinkPlain)
  • Google (AuthoredLinkPlain)

Here’s what our modified XML looks like now:

<Objs Version="1.1.0.1" xmlns="http://schemas.microsoft.com/powershell/2004/04">
  <Obj RefId="0">
    <TN RefId="0">
      <T>System.Object</T>
    </TN>
    <ToString>System.Object</ToString>
    <MS>
      <S N="IsNode">yes</S>
      <S N="Title">Some Sites</S>
      <S N="Url">/personal/ckent/navtest</S>
      <S N="NodeType">Heading</S>
      <S N="Description"></S>
      <S N="Audience"></S>
      <Nil N="Target" />
      <Obj N="Children" RefId="1">
        <TN RefId="1">
          <T>System.Object[]</T>
          <T>System.Array</T>
          <T>System.Object</T>
        </TN>
        <LST>
          <Obj RefId="2">
            <TNRef RefId="0" />
            <ToString>System.Object</ToString>
            <MS>
              <S N="IsNode">yes</S>
              <S N="Title">theChrisKent</S>
              <S N="Url">http://thechriskent.com</S>
              <S N="NodeType">AuthoredLinkPlain</S>
              <S N="Description"></S>
              <S N="Audience"></S>
              <Nil N="Target" />
              <Obj N="Children" RefId="3">
                <TNRef RefId="1" />
                <LST />
              </Obj>
            </MS>
          </Obj>
          <Obj RefId="4">
            <TNRef RefId="0" />
            <ToString>System.Object</ToString>
            <MS>
              <S N="IsNode">yes</S>
              <S N="Title">Microsoft</S>
              <S N="Url">http://microsoft.com</S>
              <S N="NodeType">AuthoredLinkPlain</S>
              <S N="Description"></S>
              <S N="Audience"></S>
              <Nil N="Target" />
              <Ref N="Children" RefId="3" />
            </MS>
          </Obj>
          <Obj RefId="10">
            <TNRef RefId="0" />
            <ToString>System.Object</ToString>
            <MS>
              <S N="IsNode">yes</S>
              <S N="Title">Apple</S>
              <S N="Url">http://apple.com</S>
              <S N="NodeType">AuthoredLinkPlain</S>
              <S N="Description"></S>
              <S N="Audience"></S>
              <Nil N="Target" />
              <Ref N="Children" RefId="3" />
            </MS>
          </Obj>
          <Obj RefId="11">
            <TNRef RefId="0" />
            <ToString>System.Object</ToString>
            <MS>
              <S N="IsNode">yes</S>
              <S N="Title">Pizza</S>
              <S N="Url">http://apple.com</S>
              <S N="NodeType">Heading</S>
              <S N="Description"></S>
              <S N="Audience"></S>
              <Nil N="Target" />
              <Obj N="Children" RefId="12">
                <TNRef RefId="1" />
                <LST>
                  <Obj RefId="13">
                    <TNRef RefId="0" />
                    <ToString>System.Object</ToString>
                    <MS>
                      <S N="IsNode">yes</S>
                      <S N="Title">Pizza Hut</S>
                      <S N="Url">http://www.pizzahut.com</S>
                      <S N="NodeType">AuthoredLinkPlain</S>
                      <S N="Description"></S>
                      <S N="Audience"></S>
                      <Nil N="Target" />
                      <Ref N="Children" RefId="3" />
                    </MS>
                  </Obj>
                  <Obj RefId="14">
                    <TNRef RefId="0" />
                    <ToString>System.Object</ToString>
                    <MS>
                      <S N="IsNode">yes</S>
                      <S N="Title">Little Caesars</S>
                      <S N="Url">http://www.littlecaesars.com</S>
                      <S N="NodeType">AuthoredLinkPlain</S>
                      <S N="Description"></S>
                      <S N="Audience"></S>
                      <Nil N="Target" />
                      <Ref N="Children" RefId="3" />
                    </MS>
                  </Obj>
                </LST>
              </Obj>
            </MS>
          </Obj>
        </LST>
      </Obj>
    </MS>
  </Obj>
  <Obj RefId="5">
    <TNRef RefId="0" />
    <ToString>System.Object</ToString>
    <MS>
      <S N="IsNode">yes</S>
      <S N="Title">Google</S>
      <S N="Url">http://google.com</S>
      <S N="NodeType">AuthoredLinkPlain</S>
      <S N="Description"></S>
      <S N="Audience"></S>
      <Nil N="Target" />
      <Ref N="Children" RefId="3" />
    </MS>
  </Obj>
</Objs>

We’ve now added an object with NodeType set to Heading since this is required in order to support having children. We’ve also created a Children Obj that is not a Ref. It has a TNRef and a LST. Inside the LST we just add more of those AuthoredLinkPlain nodes like we did before. You can repeat this same trick for infinite levels down. Running NavigationFromXml.ps1 may result in something like this:

TopLinkBarWithPizzaNoSubMenu

What happened? We can see Pizza but it’s not a sub menu like we expected! These nodes are all there but by default SharePoint doesn’t show them. You’ll need to adjust your Master Page using the techniques in this article: Multi-Level Top Link Bar Navigation (Sub Menus). Once you’ve done that you’ll see something like this:

TopLinkBarWithPizzaAndSubMenu

What about Audiences? This one was a little trickier to get right. The easiest thing to do is apply an audience to a node using the built in navigation editor and then export it using NavigationToXml.ps1 to see what the value should be. But what about when you’ve already done that and you want to manually edit it? An actual audience (Not a SharePoint Group but a compiled audience) is just specified as the GUID followed by 4 semi-colons. If you wish to do more than one then just put a comma between the GUIDs and then add on 4 semi-colons on the end. Here’s what that looks like:

Single Audience:

<S N="Audience">45175fed-9cc8-45ad-9cd6-dda031bf7577;;;;</S>

Multiple Audiences:

<S N="Audience">0a6e46d0-8f45-487d-a249-141fe4a8c429,8b722c7b-a1b4-4f4f-8035-2bac6294b713;;;;</S>

Putting it All Together

This has been a 4 part series on how to improve Top Link Bar navigation:

I’ve provided you with 3 PowerShell scripts (NavigationPropagation.ps1, NavigationToXml.ps1 and NavigationFromXml.ps1) and told you how to make necessary changes to your Master Page. So how do we use all of these?

Because we want multiple sub menus we made the change to our Master Page(s) to set the MaximumDynamicDisplayLevels to 2 (2 is all we wanted, but feel free to go higher as needed). Then we setup our top level links and ran the NavigationToXml.ps1 script just to get our starter structure (We haven’t really needed it since). We made all the adjustments to add our sub menus and nodes then ran the NavigationFromXml.ps1 script to get all that populated.

For changes to our navigation we just update the XML file, run NavigationFromXml.ps1 and then run NavigationPropagation.ps1 to synchronize our changes across our site collections. It works really well. Hopefully you’ll find this system or some parts of it to be helpful too!

Top Link Bar Navigation To XML

Applies To: SharePoint

Continuing in my series on SharePoint’s Top Link Bar (sometimes called the Tab Bar) I want to show you how to serialize a site collection’s Global Navigation Nodes to XML using PowerShell. This isn’t quite the same as just using the Export-Clixml command since we are interested in very specific properties and their format.

In my previous post, Multi-Level Top Link Bar Navigation (Sub Menus), I showed you how to enable additional sub menus using the native control in SharePoint by editing a simple attribute in the Master Page. However, it quickly became clear that the native navigation editor (Site Actions > Site Settings > Navigation) won’t allow you to edit anything greater than 2 levels despite the control’s support for it. In this post I’ll show you how to output a site’s navigation to XML. In my next post I’ll show how to edit it and then import it to create multiple levels.

The Script

Copy and paste the code below into notepad and save it as NavigationToXML.ps1

$xmlFile = "d:\scripts\navigation\ExportedNavigation.xml"
$sourceweb = "http://somesite.com"
$keepAudiences = $true

Function ProcessNode($nodeCollection) {
    $parentCollection = @()
    foreach($node in $nodeCollection) {
       if ($node.Properties.NodeType -ne [Microsoft.SharePoint.Publishing.NodeTypes]::Area -and $node.Properties.NodeType -ne [Microsoft.SharePoint.Publishing.NodeTypes]::Page) {
	   $nHash = New-Object System.Object
           $nHash | Add-Member -type NoteProperty -name IsNode -value "yes"
           $nHash | Add-Member -type NoteProperty -name Title -value $node.Title
           $nHash | Add-Member -type NoteProperty -name Url -value $node.Url
           $nHash | Add-Member -type NoteProperty -name NodeType -value $node.Properties.NodeType
           $nHash | Add-Member -type NoteProperty -name Description -value $node.Properties.Description
           if($keepAudiences){
                $nHash | Add-Member -type NoteProperty -name Audience -value $node.Properties.Audience
           } else {
                $nHash | Add-Member -type NoteProperty -name Audience -value ""
           }
           $nHash | Add-Member -type NoteProperty -name Target -value $node.Target
           if($node.Children.Count -gt 0){
                $nHashChildren = ProcessNode($node.Children)
                $nHash | Add-Member -type NoteProperty -name Children -value $nHashChildren
           } else {
                $nHash | Add-Member -type NoteProperty -name Children -value @()
           }
           $parentCollection += $nHash
       }
    }
    $parentCollection
}

$sw = Get-SPWeb $sourceweb
$psw = [Microsoft.SharePoint.Publishing.PublishingWeb]::GetPublishingWeb($sw)

ProcessNode($psw.Navigation.GlobalNavigationNodes) | Export-Clixml $xmlFile

#cleanup
$sw.dispose()

What it Does and How to Use It

There are 3 parameters at the top of the script you will need to change:

  • $xmlFile: The path to use for the XML output
  • $sourceweb: The URL of the site whose navigation you are serializing
  • $keepAudiences: When $true audience values are serialized, when $false they are left blank

Once you set those and save, open the SharePoint Management Shell (You’ll want to run-as a farm administrator) and navigate to the location of the script. You can run it by typing: .\NavigationToXml.ps1

RunNavigationToXMLScript

The script will create an array of custom objects that correspond to the $sourceweb‘s navigation nodes and then use standard PowerShell serialization to create a simplified XML document at the location specified by $xmlFile. For instance, given the navigation shown here:

IMG_0347

The XML output will look similar to this:

<Objs Version="1.1.0.1" xmlns="http://schemas.microsoft.com/powershell/2004/04">
  <Obj RefId="0">
    <TN RefId="0">
      <T>System.Object</T>
    </TN>
    <ToString>System.Object</ToString>
    <MS>
      <S N="IsNode">yes</S>
      <S N="Title">Some Sites</S>
      <S N="Url">/personal/ckent/navtest</S>
      <S N="NodeType">Heading</S>
      <S N="Description"></S>
      <S N="Audience"></S>
      <Nil N="Target" />
      <Obj N="Children" RefId="1">
        <TN RefId="1">
          <T>System.Object[]</T>
          <T>System.Array</T>
          <T>System.Object</T>
        </TN>
        <LST>
          <Obj RefId="2">
            <TNRef RefId="0" />
            <ToString>System.Object</ToString>
            <MS>
              <S N="IsNode">yes</S>
              <S N="Title">theChrisKent</S>
              <S N="Url">http://thechriskent.com</S>
              <S N="NodeType">AuthoredLinkPlain</S>
              <S N="Description"></S>
              <S N="Audience"></S>
              <Nil N="Target" />
              <Obj N="Children" RefId="3">
                <TNRef RefId="1" />
                <LST />
              </Obj>
            </MS>
          </Obj>
          <Obj RefId="4">
            <TNRef RefId="0" />
            <ToString>System.Object</ToString>
            <MS>
              <S N="IsNode">yes</S>
              <S N="Title">Microsoft</S>
              <S N="Url">http://microsoft.com</S>
              <S N="NodeType">AuthoredLinkPlain</S>
              <S N="Description"></S>
              <S N="Audience"></S>
              <Nil N="Target" />
              <Ref N="Children" RefId="3" />
            </MS>
          </Obj>
        </LST>
      </Obj>
    </MS>
  </Obj>
  <Obj RefId="5">
    <TNRef RefId="0" />
    <ToString>System.Object</ToString>
    <MS>
      <S N="IsNode">yes</S>
      <S N="Title">Google</S>
      <S N="Url">http://google.com</S>
      <S N="NodeType">AuthoredLinkPlain</S>
      <S N="Description"></S>
      <S N="Audience"></S>
      <Nil N="Target" />
      <Ref N="Children" RefId="3" />
    </MS>
  </Obj>
</Objs>

For those familiar with the Export-Clixml PowerShell command this shouldn’t look too crazy. For the rest of us, I will go into detail about this in my next post. Regardless of how complicated that may look to you, it is much simpler than if we had just called Export-Clixml on the Global Navigation Nodes object for the site.

How it Works

The main code begins at line 33 where the $sourceweb is retrieved and then the ProcessNode function (Lines 5-31) is called on the GlobalNavigationNodes collection. This generates an array of custom objects that are then serialized to the $xmlFile using Export-Clixml.

The ProcessNode function creates a custom object for every node and captures the Title, Url, NodeType, Description, Target, and when $keepAudiences is $true the audience information. Every custom object is also given a Children property (lines 21-26) and this is set to an array recursively for all child nodes that exist. This has been written to capture any number of levels of children. (This script does, however, skip all Area and Page node types since these are automatic and shouldn’t be edited manually)


So what do we do with this XML document? In my next post I’ll show you how to read, edit and ultimately import these nodes back into the site collection. This can be helpful to copy nodes from one site colleciton to another (although my post on SharePoint Top Link Bar Synchronization provided a much cleaner approach for this). More importantly this will provide you an easy way to have multiple sub menus in the SharePoint Top Link Bar.

Multi-Level Top Link Bar Navigation (Sub Menus)

Applies To: SharePoint 2010

The Top Link Bar (sometimes called the Tab Bar) allows you to include a mix of links and headers (with child links). By default, this results in a single sub menu and handles most situations well.

IMG_0347

However, the need to have multiple levels (additional sub menus) often comes up. There are several solutions out there that suggest replacing the Top Navigation Menu control altogether using javascript or CSS menus. These work but are also totally unnecessary. The Top Link Bar uses a standard ASP.NET menu control and comes with several attributes that can be customized.

In the v4.master (SharePoint 2010) the section we’re interested in can be found inside the PlaceHolderTopNavBar ContentPlaceHolder (Specifically the SharePoint:AspMenu control TopNavigationMenuV4):

					<asp:ContentPlaceHolder id="PlaceHolderTopNavBar" runat="server">
					<h2 class="ms-hidden">
					<SharePoint:EncodedLiteral runat="server" text="<%$Resources:wss,topnav_pagetitle%>" EncodeMethod="HtmlEncode"/></h2>
							<asp:ContentPlaceHolder id="PlaceHolderHorizontalNav" runat="server">
<SharePoint:AspMenu
  ID="TopNavigationMenuV4"
  Runat="server"
  EnableViewState="false"
  DataSourceID="topSiteMap"
  AccessKey="<%$Resources:wss,navigation_accesskey%>"
  UseSimpleRendering="true"
  UseSeparateCss="false"
  Orientation="Horizontal"
  StaticDisplayLevels="2"
  MaximumDynamicDisplayLevels="1"
  SkipLinkText=""
  CssClass="s4-tn"/>
<SharePoint:DelegateControl runat="server" ControlId="TopNavigationDataSource" Id="topNavigationDelegate">
	<Template_Controls>
		<asp:SiteMapDataSource
		  ShowStartingNode="False"
		  SiteMapProvider="SPNavigationProvider"
		  id="topSiteMap"
		  runat="server"
		  StartingNodeUrl="sid:1002"/>
	</Template_Controls>
</SharePoint:DelegateControl>
							</asp:ContentPlaceHolder>
					</asp:ContentPlaceHolder>

The key attribute can be found on line 355 above. The MaximumDynamicDisplayLevels defaults to 1. Setting this to 2 or higher will control how many levels of sub menus you want to allow. Once you’ve made this change to your Master Page (saved, checked-in, and approved), SharePoint will be able to display multiple sub menus!

Unfortunately, the navigation settings found in Site Actions > Site Settings > Navigation (under Look and Feel) only allow top level Header entries and won’t display or allow you to edit navigation nodes at levels greater than 2:

NavigationSettingsArrgg

So even though we made the correct change to the control we have no native way to edit these sub menus. Fortunately this can be done with PowerShell (Or just plain .NET) which will be the subject of the next post. However, this is a necessary first step towards Multi-Level Top Bar Links.

Refinement Panel Customization Saving Woes

Applies To: SharePoint 2010

Editing the Filter Category Definition of a Refinement Panel web part can make your search result pages so much better. This is one of the first things we customize and every time we do, I get tripped up by a really annoying setting in the web part.

Problem Scenario

I replace the XML in the Filter Category Definition property in the Refinement properties section of the web part. I hit Apply and everything validates. I save the page and run the results – No custom refinements! In fact, when I open the web part back up for editing, my custom Filter Category Definition is totally wiped out! Why isn’t it saving!?!?!?! Why am I weeping ever so softly?!?!! Why would I confess that on the internets?!?!?!?!

Solution

There’s a checkbox at the bottom of the Refinement properties section labeled, Use Default Configuration. This is checked by default. Unless you uncheck this when you place your custom XML in the property, it is going to completely ignore you and replace it with the default XML.

RefinementSettings

I can see why things work this way, but it is extremely unintuitive. It would seem that the web part should recognize there is custom XML in the Filter Category Definition and understand that’s what it should use. Then a button (NOT a checkbox) that says something along the lines of “Revert to Default Configuration” would be used to reset that XML when needed.

Oh well, nobody is asking my opinion anyway. So do yourself a favor and remember to uncheck that box whenever customizing the Filter Category Definition.