Top Link Bar Navigation From XML

Applies To: SharePoint

In my last post, Top Link Bar Navigation To XML, I provided you with a script to serialize a site collection’s Global Navigation Nodes to XML. In the post before that, Multi-Level Top Link Bar Navigation (Sub Menus), I showed you how to enable additional sub menus using the native control in SharePoint by editing a simple attribute in the Master Page. However, it quickly became clear that the native navigation editor (Site Actions > Site Settings > Navigation) won’t allow you to edit anything greater than 2 levels despite the control’s support for it. In this final post I’ll show you how to edit the exported XML to add multiple levels and then to import it.

The Script

Copy and paste the code below into notepad and save it as NavigationFromXml.ps1

$xmlFile = "d:\scripts\navigation\ExportedNavigation.xml"
$sourcewebApp = "http://somesite.com"
$destweb = "http://somesite.com"
$keepAudiences = $true #set to false to have it totally ignore audiences (good for testing)

Function CreateNode($xNode,$destCollection){
    Write-Host $xNode.Title

    #make URLs relative to destination
    $hnUrl = $xNode.Url
    #Write-Host "O URL: $hnUrl"
    $hnUrl = SwapUrl $hnUrl $sourceWebApp $destWeb
    #Write-Host "N URL: $hnUrl"

    $hnType = $xNode.NodeType
    if($hnType -eq $null){
        $hnType = "None"
    }

    $hNode = [Microsoft.SharePoint.Publishing.Navigation.SPNavigationSiteMapNode]::CreateSPNavigationNode($xNode.Title,$hnUrl,[Microsoft.SharePoint.Publishing.NodeTypes]$hnType, $destCollection)
    $hNode.Properties.Description = $xNode.Description
    if($keepAudiences){
        $hNode.Properties.Audience = $xNode.Audience
    }
    $hNode.Properties.Target = $xNode.Target
    $hNode.Update()

    if($xNode.Children.Count -gt 0) {
        foreach($child in $xNode.Children) {
            CreateNode $child $hNode.Children
        }
    } elseif($xNode.Children.IsNode -eq "yes") {
        #single child
        CreateNode $xNode.Children $hNode.Children
    }
}

Function SwapUrl([string]$currentUrl,[string]$sourceRoot,[string]$destRoot) {
	if ($currentUrl -ne "/") {
		if ($currentUrl.StartsWith("/")) {
            #Relative URL
			$currentUrl = $sourceRoot + $currentUrl
		} elseif ($currentUrl.StartsWith($destRoot)) {
            #May be a problem for non root sites
			$currentUrl = $currentUrl.Replace($destRoot,"")
		}
	} else {
		$currentUrl = [System.String]::Empty
	}
	$currentUrl
}

$dw = Get-SPWeb $destweb
$pdw = [Microsoft.SharePoint.Publishing.PublishingWeb]::GetPublishingWeb($dw)

$gnn = Import-Clixml $xmlFile

$nodeCount = $pdw.Navigation.GlobalNavigationNodes.Count
Write-Host "  Removing Current Nodes ($nodeCount)..." -ForegroundColor DarkYellow
for ($i=$nodeCount-1; $i -ge 0; $i--) {
    $pdw.Navigation.GlobalNavigationNodes[$i].Delete()
}

if($gnn.IsNode -Eq "yes"){
    #not an array (just 1 top level nav item)
    #Write-Host "1 Only!"
    [void](CreateNode $gnn $pdw.Navigation.GlobalNavigationNodes)
} else {
    #array of nodes, so add each one
    foreach($n in $gnn){
        [void](CreateNode $n $pdw.Navigation.GlobalNavigationNodes)
    }
}

#cleanup
$dw.dispose()

What it Does and How to Use It

There are 4 parameters at the top of the script for you to adjust:

  • $xmlFile: The path to use for the XML input
  • $sourcewebApp: The URL of the web application (Needed to ensure relative links are imported correctly)
  • $destweb: The URL of the site collection you are importing the navigation nodes to
  • $keepAudiences: When $true audience values are used, when $false they are ignored (helpful for testing)

Once you set those and save, open the SharePoint Management Shell (You’ll want to run-as a farm administrator) and navigate to the location of the script. You can run it by typing: .\NavigationToXml.ps1

RunNavigationFromXMLScript

The script will delete all global navigation nodes from the $destweb. It will then use the Import-Clixml command to hydrate a series of custom objects that it will use to build the new navigation nodes. It will build the nodes recursively allowing any number of levels of child nodes (You will have to adjust your Master Page as outlined in my post, Multi-Level Top Link Bar Navigation (Sub Menus), to see any more than the default 2 levels).

How it Works

The main code begins at line 53 where we retrieve the $destweb and then hydrate the $gnn object from the $xmlFile. One of the custom properties used in our NavigationToXml.ps1 script we output was IsNode. In PowerShell an array of one object does not serialize to an array. Rather, it serializes directly to the single object. Using IsNode allows us to know if the object we are working with is an actual node or an array of nodes so that we can avoid exceptions when accessing other properties.

For every node we hydrated we call the function CreateNode (lines 6-36) which creates a node using the custom properties in the passed collection. URLs are made relative to the web application using the function SwapUrl (lines 38-51). This will process every node in the collection along with all of their children.

Editing the XML

So why go through this at all? If you just want to copy global navigation from one site collection to another then just use the simpler NavigationPropagation.ps1 script provided in this article: SharePoint Top Link Bar Synchronization.

However, doing it this way allows you a chance to tweak the XML using notepad (I recommend notepad++). This is the easiest way to add Multiple Levels. For now I’ll explain the basics of the XML document and how to edit it. We’ll go over more of the whys in the Putting it All Together section below.

Structure

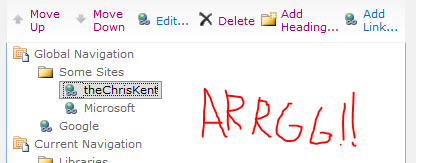
To get your base structure it’s best to use the native navigation editor (Site Actions > Site SettingsNavigation) and setup as many of your nodes as you can. Then you can use the NavigationToXml.ps1 script provided in the previous article, Top Link Bar Navigation To XML, as your base document. Trust me, trying to write it all from scratch is dumb. Here’s a quick summary of the results of running that script against navigation that looks like this:

IMG_0347

Skipping the automatic link for the site (Navigation Propagation) here is the current structure of those nodes:

  • Some Sites (Heading)
    • theChrisKent (AuthoredLinkPlain)
    • Microsoft (AuthoredLinkPlain)
  • Google (AuthoredLinkPlain)

Here’s what the exported XML looks like for that same set of nodes:

<Objs Version="1.1.0.1" xmlns="http://schemas.microsoft.com/powershell/2004/04">
  <Obj RefId="0">
    <TN RefId="0">
      <T>System.Object</T>
    </TN>
    <ToString>System.Object</ToString>
    <MS>
      <S N="IsNode">yes</S>
      <S N="Title">Some Sites</S>
      <S N="Url">/personal/ckent/navtest</S>
      <S N="NodeType">Heading</S>
      <S N="Description"></S>
      <S N="Audience"></S>
      <Nil N="Target" />
      <Obj N="Children" RefId="1">
        <TN RefId="1">
          <T>System.Object[]</T>
          <T>System.Array</T>
          <T>System.Object</T>
        </TN>
        <LST>
          <Obj RefId="2">
            <TNRef RefId="0" />
            <ToString>System.Object</ToString>
            <MS>
              <S N="IsNode">yes</S>
              <S N="Title">theChrisKent</S>
              <S N="Url">http://thechriskent.com</S>
              <S N="NodeType">AuthoredLinkPlain</S>
              <S N="Description"></S>
              <S N="Audience"></S>
              <Nil N="Target" />
              <Obj N="Children" RefId="3">
                <TNRef RefId="1" />
                <LST />
              </Obj>
            </MS>
          </Obj>
          <Obj RefId="4">
            <TNRef RefId="0" />
            <ToString>System.Object</ToString>
            <MS>
              <S N="IsNode">yes</S>
              <S N="Title">Microsoft</S>
              <S N="Url">http://microsoft.com</S>
              <S N="NodeType">AuthoredLinkPlain</S>
              <S N="Description"></S>
              <S N="Audience"></S>
              <Nil N="Target" />
              <Ref N="Children" RefId="3" />
            </MS>
          </Obj>
        </LST>
      </Obj>
    </MS>
  </Obj>
  <Obj RefId="5">
    <TNRef RefId="0" />
    <ToString>System.Object</ToString>
    <MS>
      <S N="IsNode">yes</S>
      <S N="Title">Google</S>
      <S N="Url">http://google.com</S>
      <S N="NodeType">AuthoredLinkPlain</S>
      <S N="Description"></S>
      <S N="Audience"></S>
      <Nil N="Target" />
      <Ref N="Children" RefId="3" />
    </MS>
  </Obj>
</Objs>

Each node can be found in an Obj element where you can easily find the list of custom properties in the MS section (IsNode, Title, Url, NodeType, Description, Audience, Target and Children). Each of these are simple strings. The only one that can be a little tricky is Audience which we’ll cover in depth in the Adding Nodes section below.

Each Obj element has a unique (to this document) value for it’s RefId. This is just an integer. The only thing to really note here is that each one needs to be unique. They will be the case in any export since this is part of the Export-Clixml command, but you’ll need to pay close attention to this when adding additional nodes. These are also used in Ref elements which you’ll see in various spots. If an object is the exact same as an object previously defined in the document it won’t be defined. Rather it will just get a Ref element instead of an Obj element. The Ref element will have a RefId that is equal to the previously defined Obj‘s RefId.

This mostly comes up with blank children. A good example is the first node with no children above is the node for theChrisKent (lines 22-38). You can see that the Children Obj is defined in lines 33-36. Whereas, the very next node without children (Microsoft lines 39-52) doesn’t have an Obj for Children but rather a Ref (line 50) with a RefId of 3 which you’ll recognize as the RefId specified in line 33. This can seem very confusing at first but it will get easier using the examples below.

Adding Nodes

Adding a single node with no children is pretty easy. Just cut and paste a similar node (Obj) and switch up the RefId to something unique for the document. For instance if I wanted to create another link under Some Sites right after the Microsoft one, I could just copy the Microsoft node (lines 39-52) and paste it directly below its closing tag (</Obj>). It would look something like this:

<Objs Version="1.1.0.1" xmlns="http://schemas.microsoft.com/powershell/2004/04">
  <Obj RefId="0">
    <TN RefId="0">
      <T>System.Object</T>
    </TN>
    <ToString>System.Object</ToString>
    <MS>
      <S N="IsNode">yes</S>
      <S N="Title">Some Sites</S>
      <S N="Url">/personal/ckent/navtest</S>
      <S N="NodeType">Heading</S>
      <S N="Description"></S>
      <S N="Audience"></S>
      <Nil N="Target" />
      <Obj N="Children" RefId="1">
        <TN RefId="1">
          <T>System.Object[]</T>
          <T>System.Array</T>
          <T>System.Object</T>
        </TN>
        <LST>
          <Obj RefId="2">
            <TNRef RefId="0" />
            <ToString>System.Object</ToString>
            <MS>
              <S N="IsNode">yes</S>
              <S N="Title">theChrisKent</S>
              <S N="Url">http://thechriskent.com</S>
              <S N="NodeType">AuthoredLinkPlain</S>
              <S N="Description"></S>
              <S N="Audience"></S>
              <Nil N="Target" />
              <Obj N="Children" RefId="3">
                <TNRef RefId="1" />
                <LST />
              </Obj>
            </MS>
          </Obj>
          <Obj RefId="4">
            <TNRef RefId="0" />
            <ToString>System.Object</ToString>
            <MS>
              <S N="IsNode">yes</S>
              <S N="Title">Microsoft</S>
              <S N="Url">http://microsoft.com</S>
              <S N="NodeType">AuthoredLinkPlain</S>
              <S N="Description"></S>
              <S N="Audience"></S>
              <Nil N="Target" />
              <Ref N="Children" RefId="3" />
            </MS>
          </Obj>
          <Obj RefId="10">
            <TNRef RefId="0" />
            <ToString>System.Object</ToString>
            <MS>
              <S N="IsNode">yes</S>
              <S N="Title">Apple</S>
              <S N="Url">http://apple.com</S>
              <S N="NodeType">AuthoredLinkPlain</S>
              <S N="Description"></S>
              <S N="Audience"></S>
              <Nil N="Target" />
              <Ref N="Children" RefId="3" />
            </MS>
          </Obj>
        </LST>
      </Obj>
    </MS>
  </Obj>
  <Obj RefId="5">
    <TNRef RefId="0" />
    <ToString>System.Object</ToString>
    <MS>
      <S N="IsNode">yes</S>
      <S N="Title">Google</S>
      <S N="Url">http://google.com</S>
      <S N="NodeType">AuthoredLinkPlain</S>
      <S N="Description"></S>
      <S N="Audience"></S>
      <Nil N="Target" />
      <Ref N="Children" RefId="3" />
    </MS>
  </Obj>
</Objs>

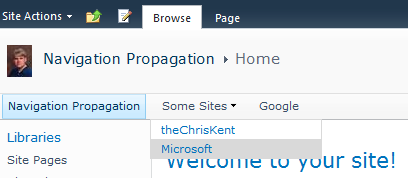
Pretty straightforward overall. Notice that in line 53 I’ve set the RefId to 10. This is because the only requirement is for it to be unique – It does not have to be in sequence. If you run the NavigationFromXml.ps1 script on the above the site now looks like this:

TopLinkBarWithAppleLink

What about an additional level? For this example we’ll be adding a new sub menu under Some Sites called Pizza with 2 links. Our structure should look like this:

  • Some Sites (Heading)
    • theChrisKent (AuthoredLinkPlain)
    • Microsoft (AuthoredLinkPlain)
    • Apple (AuthoredLinkPlain)
    • Pizza (Heading)
      • Pizza Hut (AuthoredLinkPlain)
      • Little Caesars (AuthoredLinkPlain)
  • Google (AuthoredLinkPlain)

Here’s what our modified XML looks like now:

<Objs Version="1.1.0.1" xmlns="http://schemas.microsoft.com/powershell/2004/04">
  <Obj RefId="0">
    <TN RefId="0">
      <T>System.Object</T>
    </TN>
    <ToString>System.Object</ToString>
    <MS>
      <S N="IsNode">yes</S>
      <S N="Title">Some Sites</S>
      <S N="Url">/personal/ckent/navtest</S>
      <S N="NodeType">Heading</S>
      <S N="Description"></S>
      <S N="Audience"></S>
      <Nil N="Target" />
      <Obj N="Children" RefId="1">
        <TN RefId="1">
          <T>System.Object[]</T>
          <T>System.Array</T>
          <T>System.Object</T>
        </TN>
        <LST>
          <Obj RefId="2">
            <TNRef RefId="0" />
            <ToString>System.Object</ToString>
            <MS>
              <S N="IsNode">yes</S>
              <S N="Title">theChrisKent</S>
              <S N="Url">http://thechriskent.com</S>
              <S N="NodeType">AuthoredLinkPlain</S>
              <S N="Description"></S>
              <S N="Audience"></S>
              <Nil N="Target" />
              <Obj N="Children" RefId="3">
                <TNRef RefId="1" />
                <LST />
              </Obj>
            </MS>
          </Obj>
          <Obj RefId="4">
            <TNRef RefId="0" />
            <ToString>System.Object</ToString>
            <MS>
              <S N="IsNode">yes</S>
              <S N="Title">Microsoft</S>
              <S N="Url">http://microsoft.com</S>
              <S N="NodeType">AuthoredLinkPlain</S>
              <S N="Description"></S>
              <S N="Audience"></S>
              <Nil N="Target" />
              <Ref N="Children" RefId="3" />
            </MS>
          </Obj>
          <Obj RefId="10">
            <TNRef RefId="0" />
            <ToString>System.Object</ToString>
            <MS>
              <S N="IsNode">yes</S>
              <S N="Title">Apple</S>
              <S N="Url">http://apple.com</S>
              <S N="NodeType">AuthoredLinkPlain</S>
              <S N="Description"></S>
              <S N="Audience"></S>
              <Nil N="Target" />
              <Ref N="Children" RefId="3" />
            </MS>
          </Obj>
          <Obj RefId="11">
            <TNRef RefId="0" />
            <ToString>System.Object</ToString>
            <MS>
              <S N="IsNode">yes</S>
              <S N="Title">Pizza</S>
              <S N="Url">http://apple.com</S>
              <S N="NodeType">Heading</S>
              <S N="Description"></S>
              <S N="Audience"></S>
              <Nil N="Target" />
              <Obj N="Children" RefId="12">
                <TNRef RefId="1" />
                <LST>
                  <Obj RefId="13">
                    <TNRef RefId="0" />
                    <ToString>System.Object</ToString>
                    <MS>
                      <S N="IsNode">yes</S>
                      <S N="Title">Pizza Hut</S>
                      <S N="Url">http://www.pizzahut.com</S>
                      <S N="NodeType">AuthoredLinkPlain</S>
                      <S N="Description"></S>
                      <S N="Audience"></S>
                      <Nil N="Target" />
                      <Ref N="Children" RefId="3" />
                    </MS>
                  </Obj>
                  <Obj RefId="14">
                    <TNRef RefId="0" />
                    <ToString>System.Object</ToString>
                    <MS>
                      <S N="IsNode">yes</S>
                      <S N="Title">Little Caesars</S>
                      <S N="Url">http://www.littlecaesars.com</S>
                      <S N="NodeType">AuthoredLinkPlain</S>
                      <S N="Description"></S>
                      <S N="Audience"></S>
                      <Nil N="Target" />
                      <Ref N="Children" RefId="3" />
                    </MS>
                  </Obj>
                </LST>
              </Obj>
            </MS>
          </Obj>
        </LST>
      </Obj>
    </MS>
  </Obj>
  <Obj RefId="5">
    <TNRef RefId="0" />
    <ToString>System.Object</ToString>
    <MS>
      <S N="IsNode">yes</S>
      <S N="Title">Google</S>
      <S N="Url">http://google.com</S>
      <S N="NodeType">AuthoredLinkPlain</S>
      <S N="Description"></S>
      <S N="Audience"></S>
      <Nil N="Target" />
      <Ref N="Children" RefId="3" />
    </MS>
  </Obj>
</Objs>

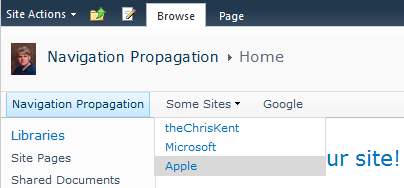
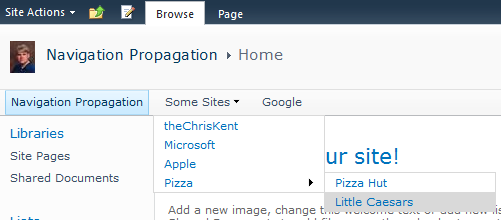
We’ve now added an object with NodeType set to Heading since this is required in order to support having children. We’ve also created a Children Obj that is not a Ref. It has a TNRef and a LST. Inside the LST we just add more of those AuthoredLinkPlain nodes like we did before. You can repeat this same trick for infinite levels down. Running NavigationFromXml.ps1 may result in something like this:

TopLinkBarWithPizzaNoSubMenu

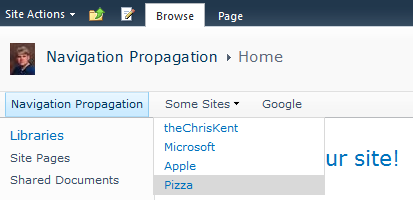
What happened? We can see Pizza but it’s not a sub menu like we expected! These nodes are all there but by default SharePoint doesn’t show them. You’ll need to adjust your Master Page using the techniques in this article: Multi-Level Top Link Bar Navigation (Sub Menus). Once you’ve done that you’ll see something like this:

TopLinkBarWithPizzaAndSubMenu

What about Audiences? This one was a little trickier to get right. The easiest thing to do is apply an audience to a node using the built in navigation editor and then export it using NavigationToXml.ps1 to see what the value should be. But what about when you’ve already done that and you want to manually edit it? An actual audience (Not a SharePoint Group but a compiled audience) is just specified as the GUID followed by 4 semi-colons. If you wish to do more than one then just put a comma between the GUIDs and then add on 4 semi-colons on the end. Here’s what that looks like:

Single Audience:

<S N="Audience">45175fed-9cc8-45ad-9cd6-dda031bf7577;;;;</S>

Multiple Audiences:

<S N="Audience">0a6e46d0-8f45-487d-a249-141fe4a8c429,8b722c7b-a1b4-4f4f-8035-2bac6294b713;;;;</S>

Putting it All Together

This has been a 4 part series on how to improve Top Link Bar navigation:

I’ve provided you with 3 PowerShell scripts (NavigationPropagation.ps1, NavigationToXml.ps1 and NavigationFromXml.ps1) and told you how to make necessary changes to your Master Page. So how do we use all of these?

Because we want multiple sub menus we made the change to our Master Page(s) to set the MaximumDynamicDisplayLevels to 2 (2 is all we wanted, but feel free to go higher as needed). Then we setup our top level links and ran the NavigationToXml.ps1 script just to get our starter structure (We haven’t really needed it since). We made all the adjustments to add our sub menus and nodes then ran the NavigationFromXml.ps1 script to get all that populated.

For changes to our navigation we just update the XML file, run NavigationFromXml.ps1 and then run NavigationPropagation.ps1 to synchronize our changes across our site collections. It works really well. Hopefully you’ll find this system or some parts of it to be helpful too!

Top Link Bar Navigation To XML

Applies To: SharePoint

Continuing in my series on SharePoint’s Top Link Bar (sometimes called the Tab Bar) I want to show you how to serialize a site collection’s Global Navigation Nodes to XML using PowerShell. This isn’t quite the same as just using the Export-Clixml command since we are interested in very specific properties and their format.

In my previous post, Multi-Level Top Link Bar Navigation (Sub Menus), I showed you how to enable additional sub menus using the native control in SharePoint by editing a simple attribute in the Master Page. However, it quickly became clear that the native navigation editor (Site Actions > Site Settings > Navigation) won’t allow you to edit anything greater than 2 levels despite the control’s support for it. In this post I’ll show you how to output a site’s navigation to XML. In my next post I’ll show how to edit it and then import it to create multiple levels.

The Script

Copy and paste the code below into notepad and save it as NavigationToXML.ps1

$xmlFile = "d:\scripts\navigation\ExportedNavigation.xml"
$sourceweb = "http://somesite.com"
$keepAudiences = $true

Function ProcessNode($nodeCollection) {
    $parentCollection = @()
    foreach($node in $nodeCollection) {
       if ($node.Properties.NodeType -ne [Microsoft.SharePoint.Publishing.NodeTypes]::Area -and $node.Properties.NodeType -ne [Microsoft.SharePoint.Publishing.NodeTypes]::Page) {
	   $nHash = New-Object System.Object
           $nHash | Add-Member -type NoteProperty -name IsNode -value "yes"
           $nHash | Add-Member -type NoteProperty -name Title -value $node.Title
           $nHash | Add-Member -type NoteProperty -name Url -value $node.Url
           $nHash | Add-Member -type NoteProperty -name NodeType -value $node.Properties.NodeType
           $nHash | Add-Member -type NoteProperty -name Description -value $node.Properties.Description
           if($keepAudiences){
                $nHash | Add-Member -type NoteProperty -name Audience -value $node.Properties.Audience
           } else {
                $nHash | Add-Member -type NoteProperty -name Audience -value ""
           }
           $nHash | Add-Member -type NoteProperty -name Target -value $node.Target
           if($node.Children.Count -gt 0){
                $nHashChildren = ProcessNode($node.Children)
                $nHash | Add-Member -type NoteProperty -name Children -value $nHashChildren
           } else {
                $nHash | Add-Member -type NoteProperty -name Children -value @()
           }
           $parentCollection += $nHash
       }
    }
    $parentCollection
}

$sw = Get-SPWeb $sourceweb
$psw = [Microsoft.SharePoint.Publishing.PublishingWeb]::GetPublishingWeb($sw)

ProcessNode($psw.Navigation.GlobalNavigationNodes) | Export-Clixml $xmlFile

#cleanup
$sw.dispose()

What it Does and How to Use It

There are 3 parameters at the top of the script you will need to change:

  • $xmlFile: The path to use for the XML output
  • $sourceweb: The URL of the site whose navigation you are serializing
  • $keepAudiences: When $true audience values are serialized, when $false they are left blank

Once you set those and save, open the SharePoint Management Shell (You’ll want to run-as a farm administrator) and navigate to the location of the script. You can run it by typing: .\NavigationToXml.ps1

RunNavigationToXMLScript

The script will create an array of custom objects that correspond to the $sourceweb‘s navigation nodes and then use standard PowerShell serialization to create a simplified XML document at the location specified by $xmlFile. For instance, given the navigation shown here:

IMG_0347

The XML output will look similar to this:

<Objs Version="1.1.0.1" xmlns="http://schemas.microsoft.com/powershell/2004/04">
  <Obj RefId="0">
    <TN RefId="0">
      <T>System.Object</T>
    </TN>
    <ToString>System.Object</ToString>
    <MS>
      <S N="IsNode">yes</S>
      <S N="Title">Some Sites</S>
      <S N="Url">/personal/ckent/navtest</S>
      <S N="NodeType">Heading</S>
      <S N="Description"></S>
      <S N="Audience"></S>
      <Nil N="Target" />
      <Obj N="Children" RefId="1">
        <TN RefId="1">
          <T>System.Object[]</T>
          <T>System.Array</T>
          <T>System.Object</T>
        </TN>
        <LST>
          <Obj RefId="2">
            <TNRef RefId="0" />
            <ToString>System.Object</ToString>
            <MS>
              <S N="IsNode">yes</S>
              <S N="Title">theChrisKent</S>
              <S N="Url">http://thechriskent.com</S>
              <S N="NodeType">AuthoredLinkPlain</S>
              <S N="Description"></S>
              <S N="Audience"></S>
              <Nil N="Target" />
              <Obj N="Children" RefId="3">
                <TNRef RefId="1" />
                <LST />
              </Obj>
            </MS>
          </Obj>
          <Obj RefId="4">
            <TNRef RefId="0" />
            <ToString>System.Object</ToString>
            <MS>
              <S N="IsNode">yes</S>
              <S N="Title">Microsoft</S>
              <S N="Url">http://microsoft.com</S>
              <S N="NodeType">AuthoredLinkPlain</S>
              <S N="Description"></S>
              <S N="Audience"></S>
              <Nil N="Target" />
              <Ref N="Children" RefId="3" />
            </MS>
          </Obj>
        </LST>
      </Obj>
    </MS>
  </Obj>
  <Obj RefId="5">
    <TNRef RefId="0" />
    <ToString>System.Object</ToString>
    <MS>
      <S N="IsNode">yes</S>
      <S N="Title">Google</S>
      <S N="Url">http://google.com</S>
      <S N="NodeType">AuthoredLinkPlain</S>
      <S N="Description"></S>
      <S N="Audience"></S>
      <Nil N="Target" />
      <Ref N="Children" RefId="3" />
    </MS>
  </Obj>
</Objs>

For those familiar with the Export-Clixml PowerShell command this shouldn’t look too crazy. For the rest of us, I will go into detail about this in my next post. Regardless of how complicated that may look to you, it is much simpler than if we had just called Export-Clixml on the Global Navigation Nodes object for the site.

How it Works

The main code begins at line 33 where the $sourceweb is retrieved and then the ProcessNode function (Lines 5-31) is called on the GlobalNavigationNodes collection. This generates an array of custom objects that are then serialized to the $xmlFile using Export-Clixml.

The ProcessNode function creates a custom object for every node and captures the Title, Url, NodeType, Description, Target, and when $keepAudiences is $true the audience information. Every custom object is also given a Children property (lines 21-26) and this is set to an array recursively for all child nodes that exist. This has been written to capture any number of levels of children. (This script does, however, skip all Area and Page node types since these are automatic and shouldn’t be edited manually)


So what do we do with this XML document? In my next post I’ll show you how to read, edit and ultimately import these nodes back into the site collection. This can be helpful to copy nodes from one site colleciton to another (although my post on SharePoint Top Link Bar Synchronization provided a much cleaner approach for this). More importantly this will provide you an easy way to have multiple sub menus in the SharePoint Top Link Bar.

Multi-Level Top Link Bar Navigation (Sub Menus)

Applies To: SharePoint 2010

The Top Link Bar (sometimes called the Tab Bar) allows you to include a mix of links and headers (with child links). By default, this results in a single sub menu and handles most situations well.

IMG_0347

However, the need to have multiple levels (additional sub menus) often comes up. There are several solutions out there that suggest replacing the Top Navigation Menu control altogether using javascript or CSS menus. These work but are also totally unnecessary. The Top Link Bar uses a standard ASP.NET menu control and comes with several attributes that can be customized.

In the v4.master (SharePoint 2010) the section we’re interested in can be found inside the PlaceHolderTopNavBar ContentPlaceHolder (Specifically the SharePoint:AspMenu control TopNavigationMenuV4):

					<asp:ContentPlaceHolder id="PlaceHolderTopNavBar" runat="server">
					<h2 class="ms-hidden">
					<SharePoint:EncodedLiteral runat="server" text="<%$Resources:wss,topnav_pagetitle%>" EncodeMethod="HtmlEncode"/></h2>
							<asp:ContentPlaceHolder id="PlaceHolderHorizontalNav" runat="server">
<SharePoint:AspMenu
  ID="TopNavigationMenuV4"
  Runat="server"
  EnableViewState="false"
  DataSourceID="topSiteMap"
  AccessKey="<%$Resources:wss,navigation_accesskey%>"
  UseSimpleRendering="true"
  UseSeparateCss="false"
  Orientation="Horizontal"
  StaticDisplayLevels="2"
  MaximumDynamicDisplayLevels="1"
  SkipLinkText=""
  CssClass="s4-tn"/>
<SharePoint:DelegateControl runat="server" ControlId="TopNavigationDataSource" Id="topNavigationDelegate">
	<Template_Controls>
		<asp:SiteMapDataSource
		  ShowStartingNode="False"
		  SiteMapProvider="SPNavigationProvider"
		  id="topSiteMap"
		  runat="server"
		  StartingNodeUrl="sid:1002"/>
	</Template_Controls>
</SharePoint:DelegateControl>
							</asp:ContentPlaceHolder>
					</asp:ContentPlaceHolder>

The key attribute can be found on line 355 above. The MaximumDynamicDisplayLevels defaults to 1. Setting this to 2 or higher will control how many levels of sub menus you want to allow. Once you’ve made this change to your Master Page (saved, checked-in, and approved), SharePoint will be able to display multiple sub menus!

Unfortunately, the navigation settings found in Site Actions > Site Settings > Navigation (under Look and Feel) only allow top level Header entries and won’t display or allow you to edit navigation nodes at levels greater than 2:

NavigationSettingsArrgg

So even though we made the correct change to the control we have no native way to edit these sub menus. Fortunately this can be done with PowerShell (Or just plain .NET) which will be the subject of the next post. However, this is a necessary first step towards Multi-Level Top Bar Links.

SharePoint Top Link Bar Synchronization

Applies To: SharePoint

The Top Link Bar (sometimes called the Tab bar) provides global navigation for a site collection. It’s a great spot to link to subsites, other site collections and more. It’s also relatively easy to use and customize. On a standard team site you can go to Site Actions > Site Settings and then choose the Navigation link under Look and Feel to customize. This all works really well. However, it can be difficult to maintain consistent navigation between multiple site collections. Add in the complication of relative URLs, audiences and attempting to keep those sites in sync with any more than 2 or 3 site collections – suddenly any navigational changes become a full project!

IMG_0347

Fortunately, using the below PowerShell script you can easily setup navigation on a single site collection using the out of the box tools and then propagate those changes to as many additional site collections as needed:

The Script

You can copy the script below and paste it into notepad and save it as NavigationPropagation.ps1

$sourceweb = "http://somesite.com"
$destwebs = "http://somesite.com/sites/humanresources", "http://somesite.com/panda", "http://someothersite.com/pickles"

$keepAudiences = $true #set to false to have it totally ignore audiences (good for testing)

Function CreateNode($node,$dWeb,$destCollection){
    if ($node.Properties.NodeType -ne [Microsoft.SharePoint.Publishing.NodeTypes]::Area -and $node.Properties.NodeType -ne [Microsoft.SharePoint.Publishing.NodeTypes]::Page) {

        Write-Host "    Node: " + $node.Title

        #make URLs relative to destination
    	$hnUrl = $node.Url
    	#Write-Host "O URL: $hnUrl"
        $IsHeading = $false
        if($node.Properties.NodeType -eq [Microsoft.SharePoint.Publishing.NodeTypes]::Heading){
            $IsHeading = $true
        }
    	$hnUrl = SwapUrl $hnUrl $sourceWeb $dWeb $IsHeading
    	#Write-Host "N URL: $hnUrl"

        $hnType = $node.Properties.NodeType
        if($hnType -eq $null){
            $hnType = "None"
        }

        $hNode = [Microsoft.SharePoint.Publishing.Navigation.SPNavigationSiteMapNode]::CreateSPNavigationNode($node.Title,$hnUrl,[Microsoft.SharePoint.Publishing.NodeTypes]$hnType, $destCollection)
    	$hNode.Properties.Description = $node.Properties.Description
        if($keepAudiences){
    	   $hNode.Properties.Audience = $node.Properties.Audience
        }
    	$hNode.Properties.Target = $node.Properties.Target
        $hNode.Update()

        if($node.Children.Count -gt 0) {
    	   foreach($child in $node.Children) {
                CreateNode $child $dWeb $hNode.Children
    	   }
        }
    }
}

Function SwapUrl([string]$currentUrl,[string]$sourceRoot,[string]$destRoot,[boolean]$isHeading) {
	if ($currentUrl -ne "/") {
		if ($currentUrl.StartsWith("/")) {
			$currentUrl = $sourceRoot + $currentUrl
		} elseif ($currentUrl.StartsWith($destRoot)) {
			$currentUrl = $currentUrl.Replace($destRoot, "")
		}
	} else {
		$currentUrl = [System.String]::Empty
        if(!$isHeading){
            Write-Host "        This is a blank non-heading! Using $sourceRoot" -ForegroundColor Yellow
            $currentUrl = $sourceRoot
        }
	}
	$currentUrl
}

$sw = Get-SPWeb $sourceweb
$psw = [Microsoft.SharePoint.Publishing.PublishingWeb]::GetPublishingWeb($sw)

foreach ($destweb in $destwebs) {

	Write-Host "***************************************" -ForegroundColor Cyan
	Write-Host "Propogatin' That There $destweb" -ForegroundColor Cyan
	Write-Host "***************************************" -ForegroundColor Cyan

	$dw = Get-SPWeb $destweb
	$pdw = [Microsoft.SharePoint.Publishing.PublishingWeb]::GetPublishingWeb($dw)

	$nodeCount = $pdw.Navigation.GlobalNavigationNodes.Count
	Write-Host "  Removing Current Nodes ($nodeCount)..." -ForegroundColor DarkYellow
	for ($i=$nodeCount-1; $i -ge 0; $i--) {
		$pdw.Navigation.GlobalNavigationNodes[$i].Delete()
	}

	Write-Host "  Propagating to $destweb..." -ForegroundColor DarkYellow
	foreach($n in $psw.Navigation.GlobalNavigationNodes){
		[void](CreateNode $n $destweb $pdw.Navigation.GlobalNavigationNodes)
	}

	$dw.dispose()
}

$sw.dispose()

What it Does and How to Use it

Since this is a script that you will typically run with the same parameters over and over I just made them variables at the top of the script. There are just 3 of them:

  • $sourceweb: This is the url of the site collection to copy the navigation from
  • $destwebs: This is a comma separated (array) list of urls to copy the navigation to
  • $keepAudiences: When $true audiences are propagated along with the links, when $false then these are totally ignored. Setting this to $false can be really helpful for testing just to make sure everything is being copied correctly before you add in the complication of audience filtering

Once you set those and save, open the SharePoint Management Shell (You’ll want to run-as a farm administrator) and navigate to the location of the script you can simply run it by typing: .\NavigationPropagation.ps1

IMG_0349

The script will cycle through each of the $destwebs and delete all the Global Navigation Nodes from the site. It will then copy all the nodes (excluding Area and Page types since these are automatic depending on your settings) from the $sourceweb. Each URL is made relative or adjusted to be fully qualified as needed. This is done recursively allowing any number of levels of child nodes (more on this in an upcoming post).

Typical use case for us is to save the script with all the parameters set and whenever we make a change on the $sourceweb we simply run the script and everything gets synchronized. If you’re making frequent updates then you could always use Task Scheduler to run the script automatically.

How it Works

There are 2 functions in the script: CreateNode (lines 4-40) and SwapUrl (lines 42-57). CreateNode copies a passed node into the specified collection mapping the necessary properties and calling SwapUrl which ensures relative Urls are fully qualified and Urls that should be relative are made relative. The main thing to note is that CreateNode is recursive and will copy all child nodes as well.

The main execution of the script starts at line 59 and is pretty straightforward. It retrieves the source web and then loops through the destination webs. For each destination web it deletes all the existing navigation nodes and then calls CreateNode passing each of the source web’s nodes and the destinations node collection.


Keeping your navigation consistent across the farm is essential to a good user experience but can be difficult to manage using out of the box tools. Fortunately with the above script this can be relatively simple.