Say what?!
This is the 2nd part of a series that should probably be called “Silly Challenges in Power Apps for Nerds”. You can find the first part here: Converting Binary to Integers in Power Apps.
Once again I will vaguely allude to the fact that there are good reasons to do this and all shall be revealed in the fullness of time. In the meantime, if you need it – here ya go!

Let’s do it!
Converting numeric values to their binary equivalent (as text) is a little more challenging than the reverse. This isn’t really because the concept is much harder, it’s more that Power Apps makes us work a little harder. But speaking of concepts, here’s Chris’ 2 minute summary of binary to integer math:
Some Background
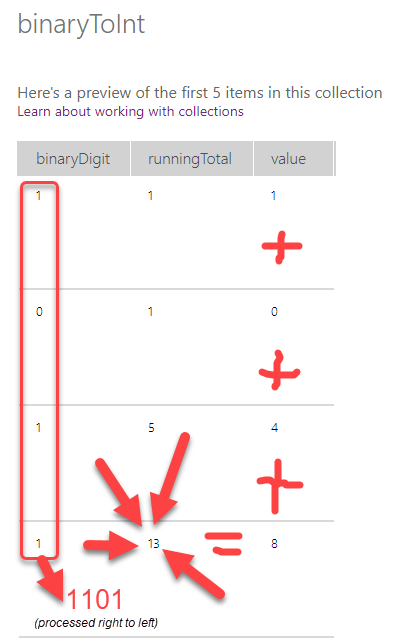
The main thing we need to know is that binary digits (1 or 0) indicate if the value they represent are “on” or “off”. In our case, when the digit is “on” (1) then the value it represents will be added with all the other “on” values and this total will be the number we’re looking for.
Something to keep in mind that we didn’t have to directly worry about when we were going from binary to number is the “size” of the numeric data type. This just means the number of digits (bits). The bigger the number, the more bits required. For instance, 255 in binary is 11111111. 8 digits = 8 bits. More on this in a moment.
The Code
Once again, a beautiful screen was created in my Canvas Power App:
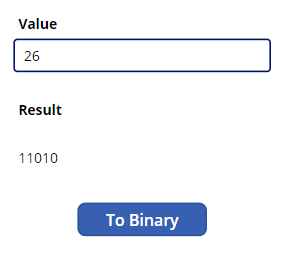
Here’s what is in the OnSelect for the button:
Let’s look at what’s happening line by line:
- Line 1 – In order to run through our conversion, we need all the positional values figured out ahead of time (so we can loop through them). This is a quick check to make this all a single chunk of code.
- Basically, we are saying only initialize this collection if it’s empty (checked using the CountRows function). If you are only doing binary to numbers calculations infrequently then this is fine. More likely, however, you could just remove this condition and put lines 2-8 in your
App.OnStart.
- Basically, we are saying only initialize this collection if it’s empty (checked using the CountRows function). If you are only doing binary to numbers calculations infrequently then this is fine. More likely, however, you could just remove this condition and put lines 2-8 in your
- Line 2 – Clearing/Initializing our
binaryDigitscollection - Line 3 – We start a ForAll loop against an arbitrary collection we generate with Sequence.
- As mentioned previously, this combination acts as a backwoods for loop. This is even more obvious here because of the parameters. The first number (31) is the total number of rows we want. The second number (30) is what the first number should be. The final number (-1) is the steps between the row values.
- We are saying give us a collection of numbers from 30 to 0.
- You might be surprised to see 31 instead of 32. The reason for this is that normal integers are 32-bits but only 31 of those are bits that represent the numeric value and the other is the sign (+ or -). This allows you to calculate the binary equivalent of numbers up to 2,147,483,647.
- Line 4 – We store a record in our
binaryDigitscollection for every time we loop through our temporary collection from Sequence - Line 5 – The
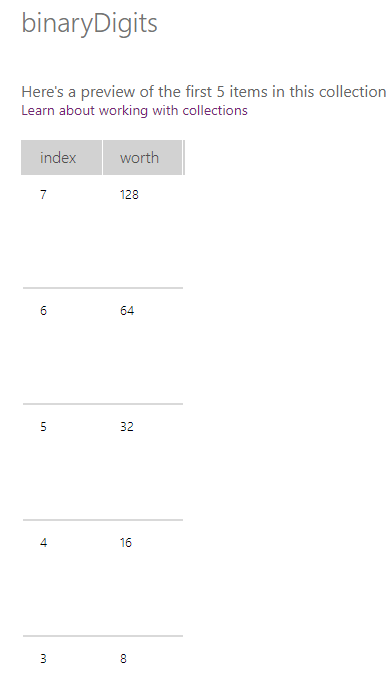
indexvalue is set to the number we get from Sequence. Later we’ll use this value to determine if we’re on the first digit or not (this allows us to change the “size” of our temporary collection without having to update our conversion code). - Line 6 – We store the positional value (worth) as a Power of 2 of the Sequence number. This is because of this handy chart:

- The resulting collection will look something like this:
- Line 11 – We are using a temporary collection (
intToBinary) to store results as we process thebinaryDigitscollections. So, we clear it out before starting. - Lines 12-15 – Using a With function we setup a couple of local variables
firstDigitis set to the total number of rows in thebinaryDigitscollection minus one. This allows us to know what the “size” of the number will be without having to hardcode it.inputis set to the Text Input’s Value so that we don’t have to reference it directly each time making our code more portable.
- Line 16 – We start a ForAll loop against every row in our
binaryDigitscollection we just generated above. - Lines 17-19 – We use another With function to setup the
remainder. We get this by using the Last function to pull in our most recently added item in the collection (the last iteration of the loop) unless this is the first iteration (index = firstDigit) in which case we use the full value of the input. - Lines 20-23 – We are calculating which positional values to add together position by position. This requires us to remember what the value of the input is as it changes (subtracting the “on” values), but there is no way to set results from within a ForAll. Fortunately, you can call Collect within a ForAll so we’re doing exactly that and storing our results and our progress as we go.
- Line 21 – This is the actual binary digit and we are determining if it should be “on” (1) or “off” (0). We do this by looking to see if the positional value (worth) is greater than or equal to the remaining value. If it is, then we turn it “on” (set it to “1”) otherwise we turn it “off” (set it to “0”).
- Line 22 – To calculate the additional bits, we need to know what’s left (remaining) of the original input. So if we just stored a 1, we subtract the positional value (worth) and store that for calculating the next digit. If it was a 0, then we just pass the value on unchanged.
- Line 28 – We’ve been calculating as we went but our values are spread across our temporary collection. So we need to extract that value out and save it. In this case we are setting it to a global variable that is referenced by our result label.
- Lines 29-31 – We use another With function to make it easier to reference our full binary value. If we just want the raw value then this could be skipped and you could just set the
binaryResultto this directly. But, we want to trim all the leading zeros to make it easier to read.- We use the Concat function to slap all the
binarycolumns of our temporary collection into a single line of text. This works because we evaluated from left to right meaning our calculated digits are already in order.
- We use the Concat function to slap all the
- Line 32 – We use a combination of the Right, Len, and Find functions to calculate where the first “1” is in our result and cut off all the extra zeros before that.
Perhaps looking inside the intToBinary collection will help make sense of what we built:

There you have it! Now you can FINALLY convert numbers to binary strings. Wowee!
Looking for more exciting low level looping in Power Apps? Come back for Part 3: Getting the Binary Value of an ASCII Character in Power Apps!