Applies To: SharePoint 2013, 2016, Office 365
List View Client Side Rendering Primer: 4 of 5
About This Series
This series provides a brief overview of Client Side Rendering for List Views (often referred to as JSLink). Basic extension points and examples are included. The goal of this series is to get developers unfamiliar with this programming model quickly up to speed.
- An Introduction to Client Side Rendering
- Benefits of Client Side Rendering
- Getting Started
- List View Extension Points ⇐You Are Here
- Client Side Rendering Best Practices
How to Get the Code
The example created using the steps in this series can be found in full as part of the csrShim repository:
https://github.com/thechriskent/csrShim/tree/master/Examples/CSR%20Primer
The full project can be found on GitHub:
https://github.com/thechriskent/csrShim
You can download or clone the repository directly from that site. You can also view the code directly on the site. csrShim is not used in this example and is not required.
In the following examples, we will be targeting on premise SharePoint 2013 using SharePoint Designer 2013.
List View Extension Points
You can override one or more parts of the rendering of your list view. You do not need to specify all the following, but be aware that specifying a single template will use the default render for the other templates (this is different from the OOTB view).
CTX
The CTX object contains all the information about your list view – including all the returned data. This object is provided to the event callback functions and to any template functions.
Although there are many properties (especially when using standard CSR vs csrShim), here are the key properties to pay attention to:
- CurrentItem
- This property is only set when passed to the Item template
- Provides quick access to all properties for the current item
- Properties match the internal name of the field
- Properties can sometimes contain periods and therefore these properties cannot be accessed using the standard dot notation
//Standard Access
var created = ctx.CurrentItem.Created;

//Access Properties with Periods
var createdF = ctx.CurrentItem["Created.FriendlyDisplay"];
- firstRow
- When true, the item is the first item returned
- lastRow
- Only available with csrShim!
- When true, the item is the last item returned
- Row
- The array of returned items with their properties
- These are equivalent to CurrentItem objects
- This allows access to ALL rows from any template including the Item template
- FirstRow
- Available with standard CSR and csrShim with Lists (not feeds/XML)
- The item ID of the first item returned
- LastRow
- Available with standard CSR and csrShim with Lists (not feeds/XML)
- The item ID of the last item returned
- ListSchema
- In standard CSR, contains several properties about the underlying list structure and the view configuration
- Field
- Array of the fields returned with the view
- In standard CSR, several properties (like DisplayName) can be very helpful for dynamic displays. csrShim only provides the Name (internal name).
Event Callbacks
There are 2 events (OnPreRender and OnPostRender) where you can provide callback functions.
OnPreRender
To have a callback function executed BEFORE your templates are applied to the list data, you can specify an anonymous or named function to the OnPreRender property of your CSR object.
The PreRender event can be helpful to declare any necessary SOD dependencies, verify existence of elements, contact additional web service, etc.
(function(){

    var myCSR = {
        BaseViewID: 1,
        ListTemplateType: 100,
        OnPreRender: myFunction
    };

    function myFunction(ctx){
        //Do Stuff
    }
})();
Example
In our HallOfFame.js example from earlier we will add a console message so we know when our rendering is about to start:
    var HallOfFame = {
        BaseViewID: 1,
        ListTemplateType: 100,
        OnPreRender: hofPreRender
    };

    function hofPreRender(ctx){
        if(window.console && window.console.log){
            console.log('Begin Hall Of Fame!');
        }
    }
Here’s what we just did:
- Line 5 we added a comma to ensure we could add another property
- Line 6 we added the OnPreRender property and gave it a reference to our function hofPreRender
- Line 9 this is our callback function
- Line 10-12 safely logs a message to the console (the checks prevent IE from throwing errors when the console is not visible)
Refreshing the page with the developer tools visible (F12) should show our message. If you don’t see a console message, verify the JS Link property is pointing to the correct page. Also note that console messages logged before the developer tools were open (in IE) will not show and you may need to refresh.
OnPostRender
To have a callback function executed AFTER your templates are applied to the list data, you can specify an anonymous or named function to the OnPostRender property of your CSR object.
The PostRender event can be helpful to attach events or run any other code dependent on your HTML being in place.
(function(){

    var myCSR = {
        BaseViewID: 1,
        ListTemplateType: 100,
        OnPostRender: myFunction
    };

    function myFunction(ctx){
        //Do Stuff
    }
})();
Example
In our HallOfFame.js example from earlier we will add another console message so we know when our rendering is all done:
var HallOfFame = {
        BaseViewID: 1,
        ListTemplateType: 100,
        OnPreRender: hofPreRender,
        OnPostRender: hofPostRender
    };

    function hofPreRender(ctx){
        if(window.console && window.console.log){
            console.log('Begin Hall Of Fame!');
        }
    }

    function hofPostRender(ctx){
        if(window.console && window.console.log){
            console.log('Finished Hall Of Fame!');
        }
    }
Here’s what we just did:
- Line 6 we added a comma to ensure we could add another property
- Line 7 we added the OnPostRender property and gave it a reference to our function hofPostRender
- Line 16 this is our callback function
- Line 17-19 safely logs a message to the console (the checks prevent IE from throwing errors when the console is not visible)
Refreshing the page with the developer tools visible (F12) should show both our PreRender and PostRender messages in the proper order.
Templates
There are several templates that can be specified using the Templates property of your CSR object. You can specify simple strings, “magic” strings, and full functions that return a string.
(function(){

    var myCSR = {
        BaseViewID: 1,
        ListTemplateType: 100,
        Templates: {
            Header: "
<div>I'm the Header!</div>
",
            Item:   "
<div>I'm an Item!</div>
",
            Footer: "
<div>I'm the Footer!</div>
"
        }
    };

})();
Available Templates
- Header
- Item
- Fields
- Footer
Note – The Footer template is often misused to close any open tags from the header or item templates. This will result in invalid HTML. Although most modern browsers will auto close these open items for you, this may cause hard to track down display issues! The Footer template is rendered inside a div element outside the hierarchy of the Header and Item templates and is designed for standalone paging. It can be used for other things, but it is separate from anything generated in the other templates.
Magic Strings
In the most basic forms, templates can be specified as simple strings (as in the example above). Additionally, when specified as strings you can use special notation to have “magic strings” resolved automatically.
(function(){

    var myCSR = {
        BaseViewID: 1,
        ListTemplateType: 100,
        Templates: {
            Header: "
<div>My BaseViewID is <#=ctx.BaseViewID#></div>
"
        }
    };

})();
The format is to include <#=ctx. Before the name of the property and followed by #>
In nearly every case you will be better supplying a function to the template properties (even for simple strings) since this will give you more flexibility, better readability, and easier extensibility.
Functions
You can specify anonymous or named functions (named functions are best practice coding) to each of the template properties. These functions will be provided with the CTX object as the parameter.
(function(){

    var myCSR = {
        BaseViewID: 1,
        ListTemplateType: 100,
        Templates: {
            Header: myFunction
        }
    };

    function myFunction(ctx){
        //Do Stuff
    }
})();
Example Header
Although it would be better to use an external stylesheet, for this simple example we will be declaring an inline style block to set our CSS for the rest of the list view. We will do this in the header. Additionally, we’d like to show a title box.
    var HallOfFame = {
        BaseViewID: 1,
        ListTemplateType: 100,
        OnPreRender: hofPreRender,
        Templates: {
            Header: hofHeader
        },
        OnPostRender: hofPostRender
    };
…
    function hofHeader(ctx){
        var styles = '
<style type="text/css">' +
                     '.halloffame{' +
                     ' text-align:center;' +
                     ' width:504px;}' +
                     '.halloffame div{'+
                     ' box-sizing:border-box;}' +
                     '.hof-header{' +
                     ' font-size:18px;' +
                     ' font-weight:bold;' +
                     ' border:solid black 4px;' +
                     ' padding:6px;}' +
                     '.hof-items{' +
                     ' border-right:solid black 4px;}' +
                     '.hof-items:after{' +
                     ' clear:both;' +
                     ' content:"";' +
                     ' display:block;}' +
                     '.hof-item{' +
                     ' float:left;' +
                     ' width:125px;' +
                     ' border-left:solid black 4px;' +
                     ' border-bottom:solid black 4px;' +
                     ' height:100px;}' +
                     '.hof-item div{' +
                     ' color:black;' +
                     ' font-weight:bold;' +
                     ' font-size:15px;}' +
                     '.hof-item:hover{' +
                     ' filter:brightness(75%);}' +
                     '.hof-footer{' +
                     ' border:solid black 4px;' +
                     ' border-top:none;' +
                     ' padding:3px;' +
                     ' font-size:10px;}' +
                     '</style>

';
        var header = '
<div class="halloffame">
<div class="hof-header">- Hall of Fame -</div>
<div class="hof-items">';
        return styles + header;
    }
Here’s what we just did:
- Line 7 we added a Templates property
- Line 8 we added a Header property to our Templates object and gave it a reference to our hofHeader function
- Line 19 this is our template function
- Lines 20-54 is a massive string to define our style block
- Line 55 this is our actual HTML. We begin with a wrapper div (that we don’t close in this template) with a class of halloffame since this allows us to target our CSS classes very specifically. We also provide a div to hold our title text
- Line 56 we return the combined styles and header strings
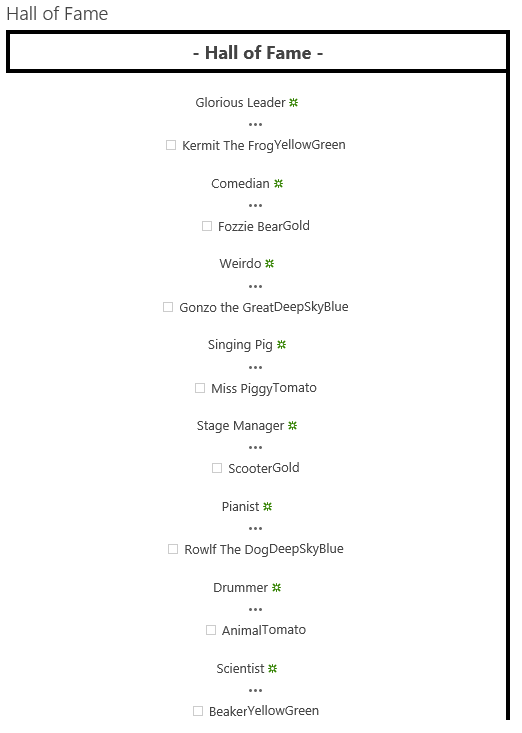
When you refresh the page now you will get this monstrosity:
Example Item
We’d like to show each of the items as a box showing the Title and the picture of the Person field. Additionally, we’d like to color the box based on the value of the Color field. When someone clicks on a box, they should be taken to the user’s profile page.
    var HallOfFame = {
        BaseViewID: 1,
        ListTemplateType: 100,
        OnPreRender: hofPreRender,
        Templates: {
            Header: hofHeader,
            Item: hofItem
        },
        OnPostRender: hofPostRender
    };
…
    function hofItem(ctx){
        var sip = ctx.CurrentItem.Person[0].sip;
        var photoUrl = '/_layouts/15/images/PersonPlaceholder.96x96x32.png';
        if(ctx.CurrentItem.Person[0].picture){
            photoUrl = ctx.CurrentItem.Person[0].picture;
        }
        var photo = '/_layouts/15/userphoto.aspx?accountname=' + sip + '&size=L&url=' + photoUrl;
        var userUrl = _spPageContextInfo.siteServerRelativeUrl + '/_layouts/15/userdisp.aspx?ID=' + ctx.CurrentItem.Person[0].id;

        var item = '<a href="' + userUrl + '">' +
                   '
<div class="hof-item" style="background-color:' + ctx.CurrentItem.Color + ';">' +
                   '
<div>' + ctx.CurrentItem.Title + '</div>
' +
                   '  <img style="max-height:72px;max-width:72px;" src="' + photo + '"/>' +
                   '</div>
' +
                   '</a>';
        if(ctx.ListData.LastRow == ctx.CurrentItem.ID){
            var closures = '</div>
</div>
';
            return item + closures;
        } else {
            return item;
        }
    }
Here’s what we just did:
- Line 9 we added an Item property to our Templates object and gave it a reference to our hofItem function
- Line 60 this is our template function
- Lines 61-66 is the building of the profile picture image.
- In standard CSR, a person field is returned as an array of objects with additional properties about a person. One of those properties is the picture property which is the URL to the profile picture for a given user.
- If a user does not have a profile picture, this property is not included
- So, we ensure that if the picture is not available we use the standard person placeholder image instead
- Additionally, if your My Site web application is hosted at a different domain (even sub domain) users using machines not joined to the domain (IE iPads) may be prompted to log in for each profile picture you display.
- So, instead of using the profile picture directly, we use the userphoto.aspx page to provide us the picture without leaving the domain
- Line 67 builds the URL to the user profile page using the user id property
- Lines 69-74 builds our actual HTML for each item.
- We wrap everything in a link to the user profile
- We use an inline style to set the background-color to the choice field
- This is not a good idea and is only used as an obvious example, generally you should not directly incorporate values into markup like this. It would be easy to break simply by adding a choice for a color that is not one of the named HTML colors.
- Line 67 checks if this item is the last item returned
- In csrShim we could simply check ctx.CurrentItem.lastRow
- If this is the last item, we close the wrapper divs left open in the header template and return those after the item.
- This is necessary since the Footer template will be in a different div and leaving open HTML tags can cause display issues
- If this wasn’t the last item, we just return the basic item box in line 80
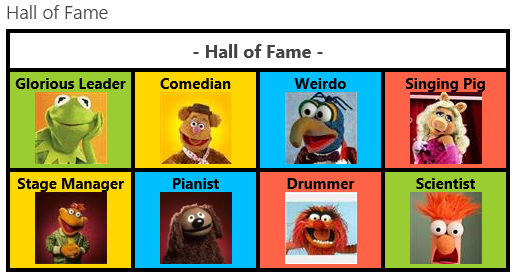
When you refresh the page now things are looking truly amazing:
Example Footer
We’d like to add some instructions to the bottom to remind people to click on these boxes.
    var HallOfFame = {
        BaseViewID: 1,
        ListTemplateType: 100,
        OnPreRender: hofPreRender,
        Templates: {
            Header: hofHeader,
            Item: hofItem,
            Footer: hofFooter
        },
        OnPostRender: hofPostRender
    };
…
    function hofFooter(ctx){
        var footer = '
<div class="halloffame">
<div class="hof-footer">Click on a person to learn more</div>
</div>
';
        return footer;
    }
Here’s what we just did:
- Line 10 we added a Footer property to our Templates object and gave it a reference to our hofFooter function
- Line 84 this is our template function
- Line 85 builds standalone HTML to be used as our footer. We provide another wrapper with the halloffame class so that our global styles still get applied. Then we give an unnecessary message encouraging clicks.
- Line 86 we return the footer
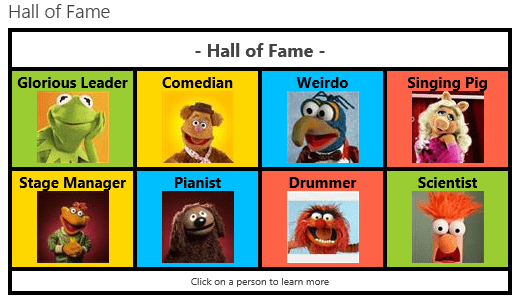
When you refresh the page now you will now be struck at the beauty of our creation:
Continue?
That’s pretty well everything you need to know about client side rendering with list views. However, the final post in the series provides a quick list of best practices to keep in mind while applying CSR to List Views:

[…] details about how CSR templates and event callbacks work see the List View Client Side Rendering (JSLink) Primer series. For this sample, we’ll just take a look at the parts unique to this […]