Applies to: SharePoint 2010
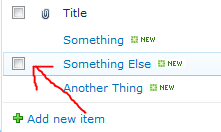
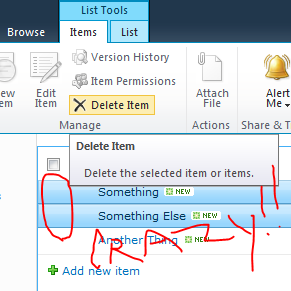
In SharePoint 2010 the standard listviewwebpart adds a checkbox to the left of each row. These only show up on hover and when you check the box the entire row is highlighted. You can check multiple boxes (or even use the helpful checkbox up top to select/unselect them all at once). This allows you to perform the same action on the selected item(s) using the ribbon.
 |
 |
Generally, this is a good feature. However, not everybody agrees. If you’re doing some customization and you don’t want them to show up, you can do it through CSS. Although this is the technique I previously used, I ran across a post by Glyn Clough that made me face palm. I’ll leave the CSS technique in case it helps somebody and since I can think of at least one or two reasons you might want it (simple removal of all select boxes across an entire site or keeping the selection logic without the boxes) but if you want the simple answer just skip right to that solution.
CSS
If you’re deploying a branding solution or already using a custom style sheet just add the following:
.s4-itm-hover .s4-itm-cbx,
.ms-itmhover:hover .s4-itm-cbx,
.s4-itm-selected .s4-itm-cbx,
.ms-inlineEditLink .s4-itm-inlineedit,
.ms-itmhover:hover .s4-itm-inlineedit,
.s4-itm-hover .s4-itm-inlineedit,
.s4-itm-selected .s4-itm-inlineedit
{
    position: relative;
    top: 0;
    display:none;
    visibility:hidden;
    width:0px;
}
Bam! no more selection boxes! However, I’ve got no clue why you would want to hide those for an entire site. More likely you want to hide these from a specific list view or page. To do this you can slap a content editor web part on the page(Edit Page, Add a Web Part, Media and Content > Content Editor) and click inside it. Then choose the HTML drop down and pick Edit HTML Source:
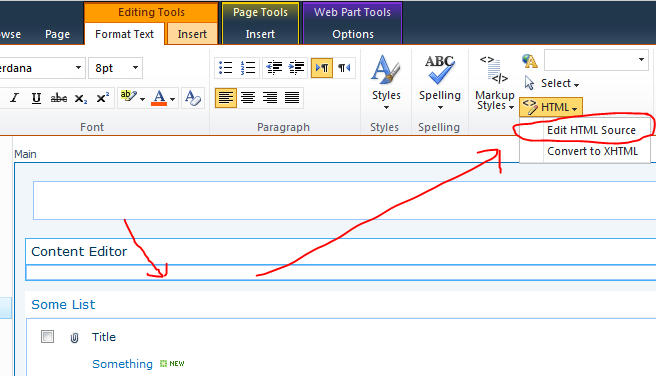
Then paste this inside there:
<style>
.s4-itm-hover .s4-itm-cbx,
.ms-itmhover:hover .s4-itm-cbx,
.s4-itm-selected .s4-itm-cbx,
.ms-inlineEditLink .s4-itm-inlineedit,
.ms-itmhover:hover .s4-itm-inlineedit,
.s4-itm-hover .s4-itm-inlineedit,
.s4-itm-selected .s4-itm-inlineedit {
    position: relative;
    top: 0;
    display:none;
    visibility:hidden;
    width:0px;
}
</style>
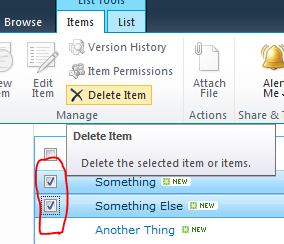
Save the page and you should see that all the list views on the page no longer have the selection box (although you can still click on the item(s) and get selection and multiselection):
 |
 |
So what about that Select All box up there? Why you want to break all the interfaces!?!
Unfortunately this isn’t as straight-forward. Microsoft did provide a convenient class for the checkbox: s4-selectAllCbx. However, until you hover over the web part, that class is not applied to the input control – Very strange. So applying some styles to that class will only take effect after someone has hovered over the part.
If you really want to do this with CSS you can add an additional selector to the above styles to get this (the key is that last selector .ms-vh-icon input):
<style>
.s4-itm-hover .s4-itm-cbx,
.ms-itmhover:hover .s4-itm-cbx,
.s4-itm-selected .s4-itm-cbx,
.ms-inlineEditLink .s4-itm-inlineedit,
.ms-itmhover:hover .s4-itm-inlineedit,
.s4-itm-hover .s4-itm-inlineedit,
.s4-itm-selected .s4-itm-inlineedit,
.ms-vh-icon input {
    position: relative;
    top: 0;
    display:none;
    visibility:hidden;
    width:0px;
}</style>
This hides them all but doesn’t shrink the column. There’s probably a CSS way to do that too, but honestly let’s just use the setting below.
The Real Solution
So everything above has been overkill. I remember looking for a simple setting to turn those boxes off and not finding it. I can’t be the only one since you’re reading this article – but it doesn’t get much easier than this.
Just edit the view (either the view used by the web part or an actual view on the list) and scroll down to the Tabular View section and uncheck the box next to Allow individual item checkboxes:
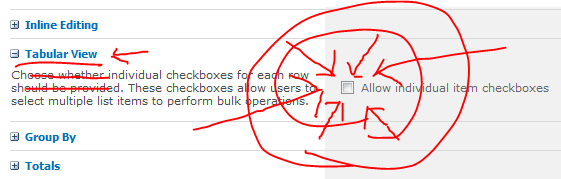
Click OK and now those checkboxes are removed! Unfortunately so is all selection and multi-selection. So if you have some strange need to keep the selection but remove the boxes, see the CSS solution above. If you just wanted to remove them altogether, remember to always look at the settings!
If you take a look at the XML generated for the view you’ll see that all this is doing is adding a TabularView attribute to your View element and setting it to FALSE.

Thanks for posting this. It was helpful. I did find that in order for this to work the “Allow individual item checkboxes check box had to be unchecked before the listview webpart is added to a page. If not the checkbox will persist. In otherwords for this to work if you already have list view webparts on a page you may need to remove them and add them again.
Thank you Chris Kent for your post, it works perfect.