Applies To: SharePoint Framework
Recently, I showed you how to set your WebPart Icon (the image used in the authoring canvas toolbox). But there is another image, called the App Icon that is also important to set. This applies to both client-side webparts and SPFx extension apps.
The concept of an AppIcon is nothing new. When creating an Add-In, you could simply specify the icon property of the AppManifest (although it wasn’t actually stored in this file) and the appropriate rels and feature manifest files would be added to your app package. This is the image that was then used in the Site Contents view of your site.
The SharePoint Framework (SPFx) supports this same type of property. Although, as we’ll see, it’s of limited use on modern pages. Regardless, it is still a nice way to add a professional touch to your app.
Specifying an SPFx app App Icon
Create a suitable image file. App Icons must be 96×96 px. It’s also good practice to make them PNG files with only a white image on a transparent background. This allows them to match the native app icons and to maintain consistency with a site’s theme.
Super Easy Icon Generation
Here’s a terrible way to generate one using PowerPoint (everyone’s favorite image editor). Use the new Icons button on the Insert tab in the ribbon and choose one of the many beautiful icons:
![]()
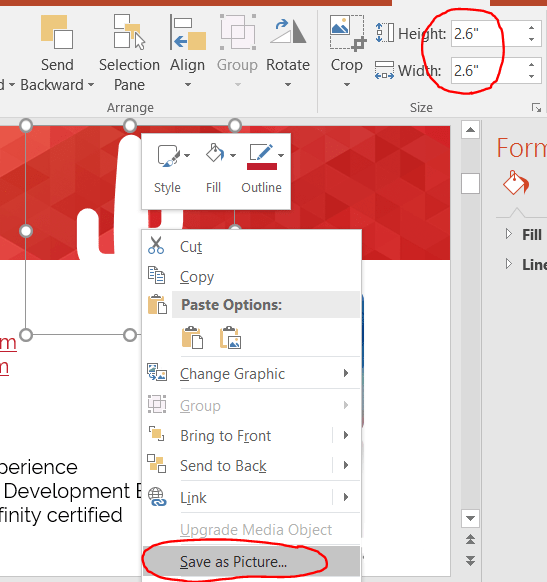
Set the Graphics Fill color to white and set the size to 2.6″ (at least that’s the size that seems to equate to 96×96 px). Then right-click on the image object and choose Save as Picture…:
Navigate to your SPFx solution folder. In the root folder, select the sharepoint folder (if it doesn’t exist, add it). Then save the image somewhere in there as a PNG file. I created a folder called Images and saved it in there:
![]()
Configuring SPFx to Use Your AppIcon
In your SPFx solution, open the config/package-solution.json file. Under solution, add the iconPath property and give it a relative path within your sharepoint folder:

From your console in your project directory, run gulp bundle. When that finishes, run gulp package-solution.
The bundle task has nothing to do with what we’re doing except to point out that the image does not get copied to your dist folder along with your other assets (this will be important later).
Rather, if you look in your sharepoint/solution folder you’ll find your sppkg file. In the accompanying debug folder you can see the contents of your sppkg file and you’ll see your AppIcon and all the rels and feature manifest files were added as expected.
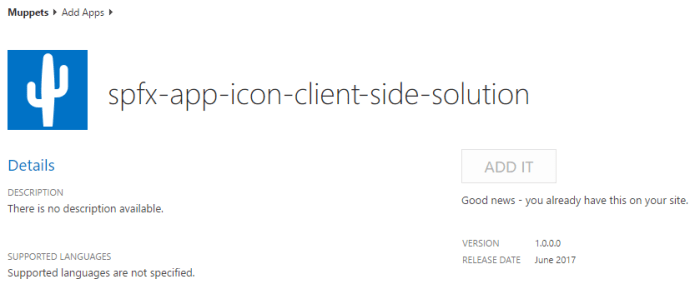
Navigate to your app catalog and upload your sppkg file into the Apps for SharePoint library. Click the Deploy button when prompted.
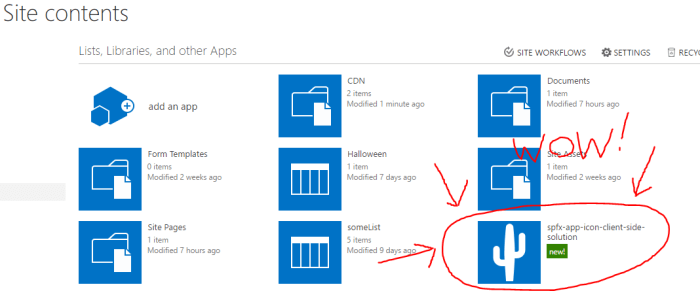
You’ll find that when you add your app to a site that the tiny icon shown on the Modern version of the Site Contents page does not use your fancy new icon. Clicking for details of the app shows the generic app icon as well. However, switching to classic view for the site contents page does show your icon. Success!?
Providing an App Catalog Icon
Just like with Add-Ins, you’ll also need to provide a separate file for your app catalog icon. This can be done by copying your icon file to the same CDN location (or any URL really) where your bundle assets are going to go.
You then edit the properties of your app in the app catalog and specify that URL as the Icon URL property:
![]()
Now your custom icon will be used on the App Details page as well as within classic views:
Conclusion
For modern pages, the SPFx iconPath (AppIcon) property has little to no effect. However, while the option to switch to Classic View still exists and especially while there is no easy option to switch back to the modern view (delete the cookie), providing both the app catalog icon and the AppIcon within your app is the best way to ensure your SPFx app looks professional and consistent to end users.

[…] previously discussed how to specify your SharePoint Framework App Icon and in that post I noted that you should not only specify your icon in the solution package itself, […]
Thank You very much!
Best regards,
Gennady