Despite getting sick and being unable to attend in person, the organizers were still kind enough to let me present!
More details later, probably. But for now… Slides!
Advanced List Formatting
Despite getting sick and being unable to attend in person, the organizers were still kind enough to let me present!
More details later, probably. But for now… Slides!
Advanced List Formatting
This is the 3rd of a series that could easily be called “Doing Stuff Nobody Asked for in Power Apps”. You can find the previous parts here:
Now it’s time to extend our binary conversions a little farther to allow us to get the binary value of an ASCII Character just like you’ve always wanted! Again, allow me to give another unclear reassurance that there are legitimate reasons why you would do these things and I promise the next part in this series will make that clear.

I recently needed to get the binary value of an ASCII character (as you do). So, I just figured I’d get the ASCII value for a character and then use my handy Integer to Binary conversion method to take care of it. As you have likely guessed (by the fact the I’m writing a whole post about it), this wasn’t nearly as straightforward as I had thought.
If you know the ASCII code (value) for a character, Power Apps makes it very easy to get that character by using the Char function. You can literally use Char(65) and you’ll get A. Nearly every language that has this function has its reverse usually called something like Asc and you could call that with A and get 65. But if you’ve been using Power Apps for very long you’re likely not surprised to learn that Power Apps has no equivalent function. Blarg!
A quick search came across this excellent article by Tim Leung, Text – How to convert a character to its ASCII numeric value. In this post, Tim lays out a method to generate a collection using the Char function against numbers 0-255 that can then be used to lookup the ASCII value and he does it all in a single line. If that’s all you’re here for, then click on that link and you’re done. In our case, we need to go just a little farther and be able to get the binary equivalent of the ASCII value for a character so we’ll be combining Tim’s technique with our integer to binary conversion logic laid out previously.
To make this a little more understandable, I’m going to break this down into pieces. The first is the generation of a collection that will contain the values. Later I’ll show you how to use the collection to get individual values.
I’ve setup a beautiful Canvas Power App with this screen:
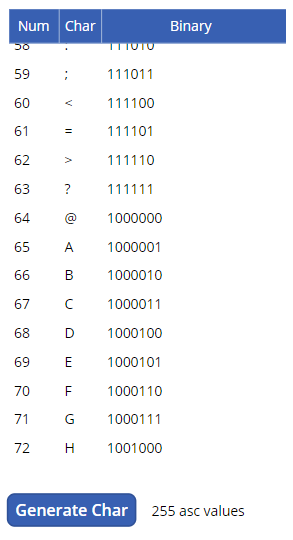
asc collection, a label that counts the values for debugging and a button to generate the collectionI’ve done this all in a button to make it easier to demonstrate but in reality you’d probably put this code in your App.OnStart if using it frequently. You wouldn’t need any of the other controls above either.
For those that read the last part in this series, we will be reusing / adapting some of that code. You don’t need to read that article to get this to work but it would probably help make sense of this stuff.
Here’s the code from the OnSelect of that button:
Let’s look at what’s happening line by line:
intToBinary) to store results as we calculate the binary equivalent of the ASCII value. So, we clear it out before starting.asc collection which is the actual collection we are building.firstDigit is set to the total number of rows in the binaryDigits collection minus one. This allows us to know what the “size” of the number will be without having to hardcode it.input is set to the number we get from the Sequence function. This is the ASCII value and what we’ll be using in our binary conversion.itbOffset is the current number of rows in the intToBinary collection. We store this because we cannot clear a collection within a ForAll yet we need to use it 255 times. So we store the offset to know which set of records in our collection apply to which value.binaryDigits collection. It’s this loop that will do the conversion of the ASCII value that we’ll be referencing later. The details of what this code is doing were covered in the last article.asc collectionNum and this is the ASCII value. If you only need the binary value this step can be eliminated.intToBinary collection using the LastN function to only pull those values after our itbOffset to ensure we only get the binary conversion calculation values for the number we’re on. There is extra code here to trim the leading zeros from the binary values. Again, more details on how this code works can be found in the previous article.You can use the collection by pulling values using the LookUp function. For instance, if we wanted to pull the ASCII value for the letter A we could write LookUp(asc,Char="A").Num and the result would be 65. If we wanted the binary value we would modify it to LookUp(asc,Char="A").Binary and the result would be 1000001
That’s it! Now you can get the binary value of any character’s ASCII code – WOWEE!!
Want to learn how to use this collection to do more stuff that probably has no place in Power Apps? Come back for Part 4: Calculating a DJB2 Hash in Power Apps!
This is the 2nd part of a series that should probably be called “Silly Challenges in Power Apps for Nerds”. You can find the first part here: Converting Binary to Integers in Power Apps.
Once again I will vaguely allude to the fact that there are good reasons to do this and all shall be revealed in the fullness of time. In the meantime, if you need it – here ya go!

Converting numeric values to their binary equivalent (as text) is a little more challenging than the reverse. This isn’t really because the concept is much harder, it’s more that Power Apps makes us work a little harder. But speaking of concepts, here’s Chris’ 2 minute summary of binary to integer math:
The main thing we need to know is that binary digits (1 or 0) indicate if the value they represent are “on” or “off”. In our case, when the digit is “on” (1) then the value it represents will be added with all the other “on” values and this total will be the number we’re looking for.
Something to keep in mind that we didn’t have to directly worry about when we were going from binary to number is the “size” of the numeric data type. This just means the number of digits (bits). The bigger the number, the more bits required. For instance, 255 in binary is 11111111. 8 digits = 8 bits. More on this in a moment.
Once again, a beautiful screen was created in my Canvas Power App:
Here’s what is in the OnSelect for the button:
Let’s look at what’s happening line by line:
App.OnStart.binaryDigits collectionbinaryDigits collection for every time we loop through our temporary collection from Sequenceindex value is set to the number we get from Sequence. Later we’ll use this value to determine if we’re on the first digit or not (this allows us to change the “size” of our temporary collection without having to update our conversion code).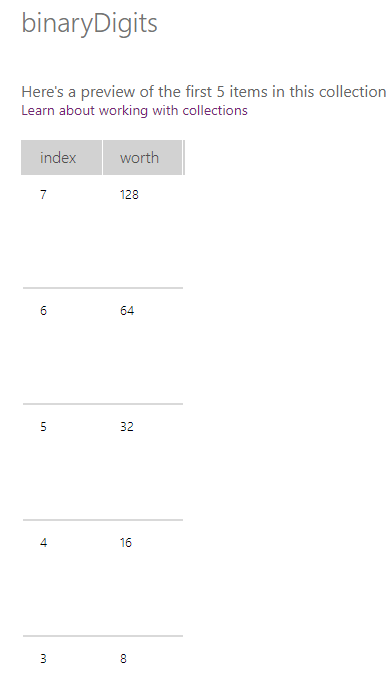
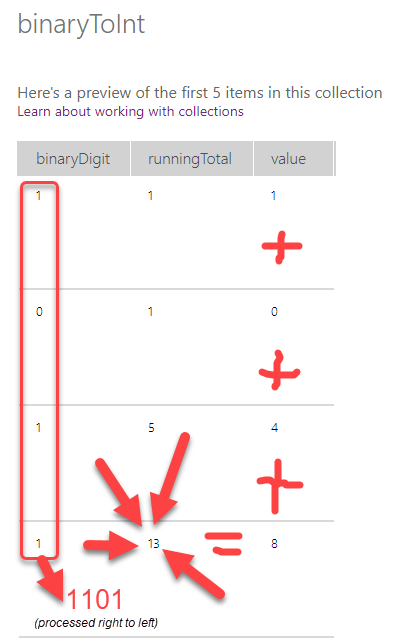
intToBinary) to store results as we process the binaryDigits collections. So, we clear it out before starting.firstDigit is set to the total number of rows in the binaryDigits collection minus one. This allows us to know what the “size” of the number will be without having to hardcode it.input is set to the Text Input’s Value so that we don’t have to reference it directly each time making our code more portable.binaryDigits collection we just generated above.remainder. We get this by using the Last function to pull in our most recently added item in the collection (the last iteration of the loop) unless this is the first iteration (index = firstDigit) in which case we use the full value of the input.binaryResult to this directly. But, we want to trim all the leading zeros to make it easier to read.binary columns of our temporary collection into a single line of text. This works because we evaluated from left to right meaning our calculated digits are already in order.Perhaps looking inside the intToBinary collection will help make sense of what we built:

There you have it! Now you can FINALLY convert numbers to binary strings. Wowee!
Looking for more exciting low level looping in Power Apps? Come back for Part 3: Getting the Binary Value of an ASCII Character in Power Apps!
I promise there are legitimate reasons why you might have to work with binary integers in Power Apps and that’ll be more obvious near the end of this series which should probably be titled “Doing low level operations in Power Apps for masochists”. For now, know it’s possible and if you need to do it here’s the guide.

Converting binary values (as text) to their numeric values is “relatively” straight-forward (at least for this series). There are a bunch of guides on how to convert from base 2 to base 10 conceptually and if you’re interested in all the details, go check em out! For our purposes, here’s a basic overview (don’t weep hardcore computer scientists):
Binary digits (1 or 0) indicate if the value it represents is “on” or “off”. In this case, “on” (1) means that value should be included when calculating the result. The values start with 1 and double each time so that the values are 1, 2, 4, 8, 16… etc. to whatever “size” for the data type (read right to left):
As you can see from the image above, the values (1,2,4,8,16…) are really just increasing powers of 2. We’re going to use that fact to our advantage.
So to convert binary to a number, add the values to each other whenever there’s a 1 in the corresponding positions.
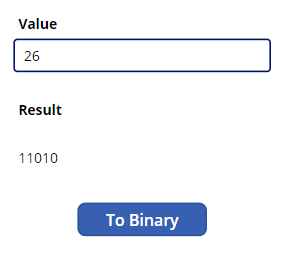
I went all out in my Canvas Power Apps design skills and created the following screen:

Here’s the contents of the OnSelect for the button:
Let’s look at what’s happening line by line:
binaryToInt) to store intermediate results as we process the binary text character by character. So, we clear it out before starting.input which we can reference rather than the Text Input’s Value each time (and it gets cleaned up at the end)binaryDigit, we want to work with.Value keyword which in this case references the number from the Sequence function we used earlier.Value keyword which references the number from the Sequence function used earlier. However, we have to subtract one because Sequence starts with 1 (rather than 0).Value=1) in which case it’s just 0.Looking in our temporary collection, binaryToInt might make it a little easier to understand:
Or maybe it didn’t?! Oh well!
The good news is that it works – so copy and paste as you please. And for those of you who can’t get enough of doing things in Power Apps that were not intended to be done in Power Apps, be sure to come back for Part 2: Converting Integers to Binary in Power Apps!
I had the opportunity to speak at the M365 Collaboration Conference in Las Vegas this past week and it was awesome! I loved seeing all the friends I haven’t been able to see and I always enjoy the energy and excitement of a bunch of people gathered to learn and teach about stuff we all care about.
I helped teach 2 full day workshops and was able to once again give one of my favorite sessions: Advanced List Formatting. I love presenting this session because it’s demo heavy and it’s so fun being creative with lists and watching people’s eyes light up at all the possibilities.

For those that are interested, my Advanced List Formatting slides can be downloaded here:
Feel free to use the slides in your own presentations (internally or externally). If you feel like giving me credit, that’s great! But it’s not required. Sharing is caring afterall! The slides have several extra slides we didn’t go over (I prefer the demos) that will hopefully provide some additional insight. Feel free to reach out with questions.
Here is the list of samples I used in the demos so you can recreate what we went over:


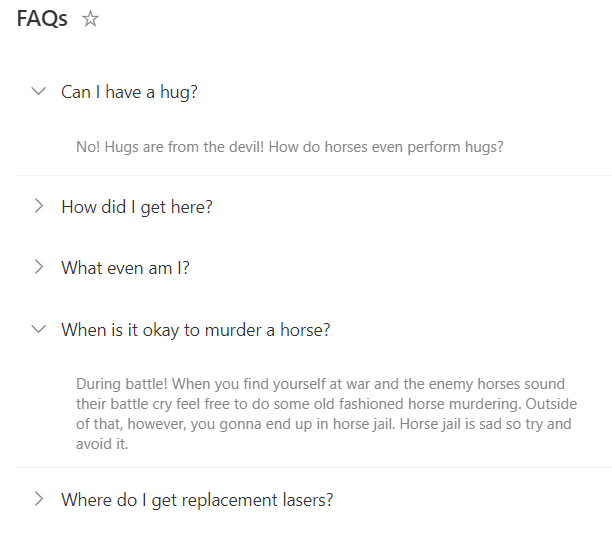
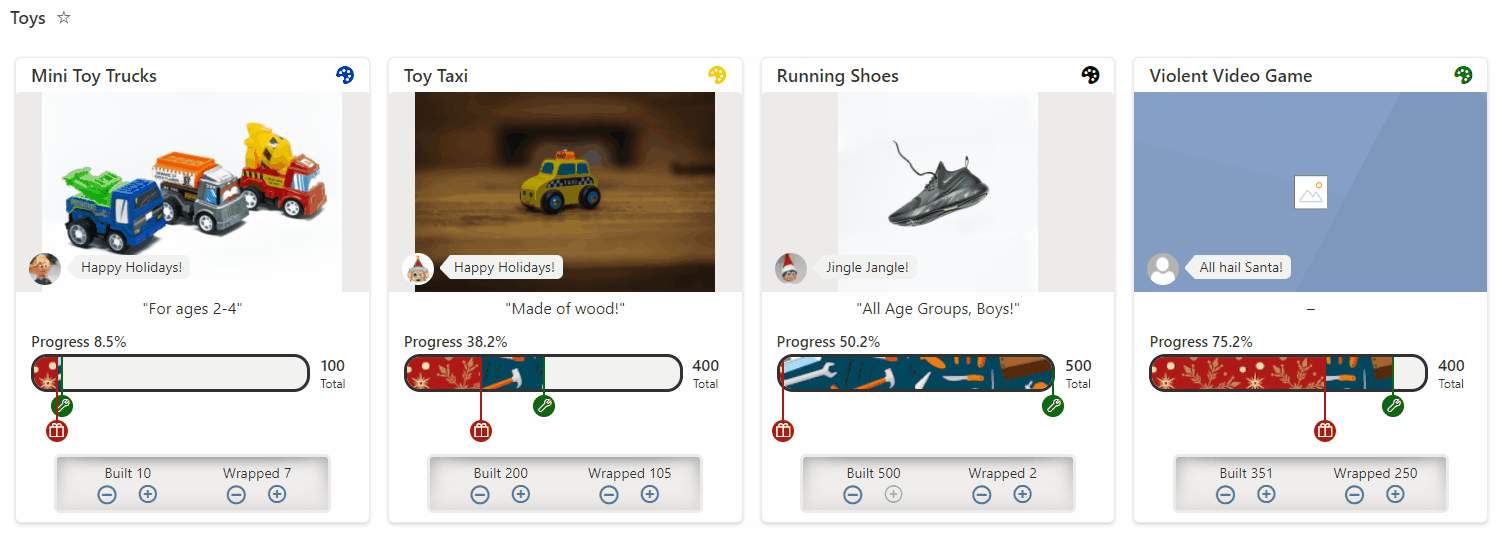
groupProps to customize grouped fields to create a miniature application. We also briefly looked at an alternative FAQ Format