Applies to SharePoint 2013
Managed Navigation allows you to build navigation using managed metadata. It’s a cool feature but can get pretty confusing (and frustrating). One of the best features is setting up global navigation for your publishing site collection and having each subsite inherit the settings.
When it comes to navigation in SharePoint, the primary areas we are talking about are Global Navigation (Top Bar) and Current Navigation (Quick Launch). You can use Managed Navigation for both or either and choose to inherit both or either at the subsite level as well. Wowee!
The Problem
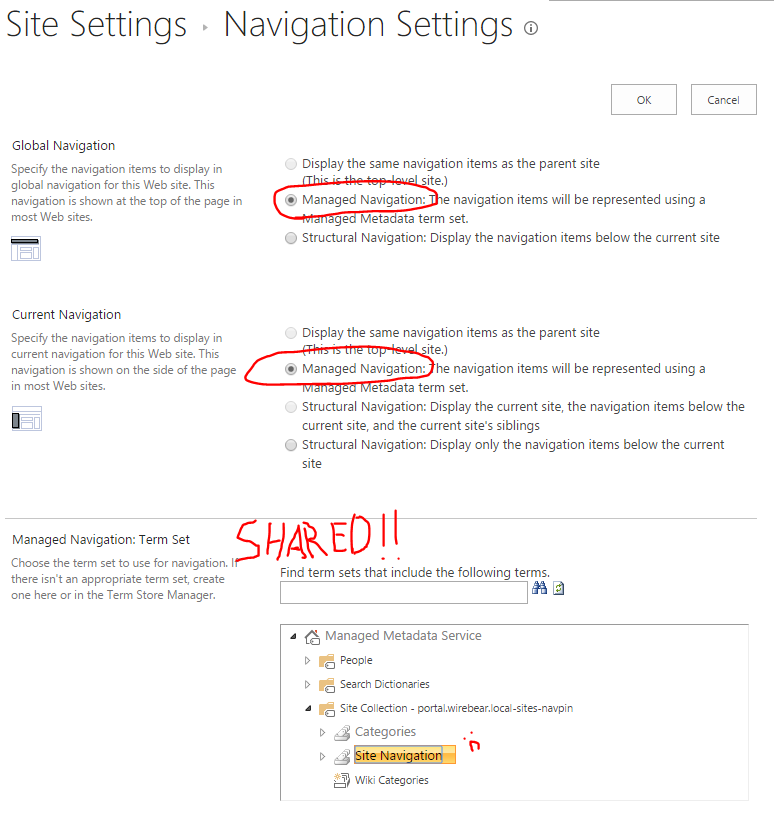
One of the frustrations, however, is trying to use separate termsets for your Global and Current navigation. The UI only allows you to select a single termset when you choose managed navigation for either area. The same termset is then used for both:
The Almost Solution
On a subsite you can choose to inherit from the parent site one or both of your navigations. Then you can choose a different termset for that site. Rejoice!
For instance, if you wanted to share Global navigation across all your sites but wanted to have an independent Current navigation on your subsite, you would inherit the Global and choose Managed Navigation with your own termset for the Current. However, by using the termset on the subsite you cannot use it on any other site. So now, if you want to have a shared Global navigation as well as a shared Current navigation, you’re out of luck using the OOTB UI. Even if that wasn’t the case, you couldn’t have separate termsets on the root site.
This gives me a sad. If you do a quick search you’ll find all sorts of people struggling with this. In fact, maybe you came here from one of your own sad searches. Well be sad no longer!
The Solution
CSOM (or more specifically in the following examples, JSOM) to the rescue! Within the SP.Publishing.Navigation namespace there is an object called WebNavigationSettings that can be used to set the termsets independently of each other.
The bad news is you have to use code to do this. The good news is that it’s pretty simple code. The even better news is that you can easily undo the settings with the UI and the code is only needed to set the setting (it doesn’t have to stick around).
So, here’s the JSOM (this can be done with PowerShell or .NET using CSOM as well):
'use strict'
var NavSwitcher = NavSwitcher || {};

jQuery(function ($) {

    NavSwitcher.SafeLog = function (message) {
        if (window.console && window.console.log) {
            window.console.log(message);
        }
    };

    NavSwitcher.SiteConfig = function () {
        var safeLog = NavSwitcher.SafeLog;
        var ctx, wns, nav, tsId, tsGlobal;

        return {
            Configure: configure
        };

        function configure() {
        	tsId= $('#tsId').val();
			tsGlobal = $('#tsTypeG').prop('checked');

			if(tsId){
        		SP.SOD.executeFunc('sp.js', 'SP.ClientContext', function(){
		            //Load up SP.Publishing
		            SP.SOD.registerSod('sp.publishing.js', SP.Utilities.Utility.getLayoutsPageUrl('sp.publishing.js'));
		            SP.SOD.executeFunc('sp.publishing.js','SP.Publishing.Navigation.NavigationTermSet',function(){

						safeLog('Setting Navigation...');
						ctx = SP.ClientContext.get_current();
						wns = new SP.Publishing.Navigation.WebNavigationSettings(ctx,ctx.get_web());
						ctx.load(wns);
						if(tsGlobal){
							nav = wns.get_globalNavigation();
						} else {
							nav = wns.get_currentNavigation();
						}
						ctx.load(nav);

						//load em up!
		                ctx.executeQueryAsync(
							Function.createDelegate(this, switchNavigation),
		    				Function.createDelegate(this, function(s, a){
		    					safeLog(a.get_message());
		    				}));
		            }); //end publishing sod
		    	}); //end clientcontext sod
	    	} else {
	    		safeLog('Provide an Id, yo!');
	    	}
        }

        function switchNavigation() {
        	try{
	        	safeLog('Initial nav object load complete');
	        	nav.set_termSetId(new SP.Guid(tsId));
	        	wns.update();
	        	ctx.load(wns);
	        	ctx.executeQueryAsync(
					Function.createDelegate(this, function(){
    					safeLog('Navigation Successfully Updated!');
    				}),
    				Function.createDelegate(this, function(s, a){
    					safeLog('**Navigation Update Failure!');
    					safeLog(a.get_message());
    				}));
	        }catch(e){
	        	safeLog('**Navigation Setting Failure!');
	        	safeLog(e);
	        }
        }

    }();

    $('#configButton').click(NavSwitcher.SiteConfig.Configure);
});
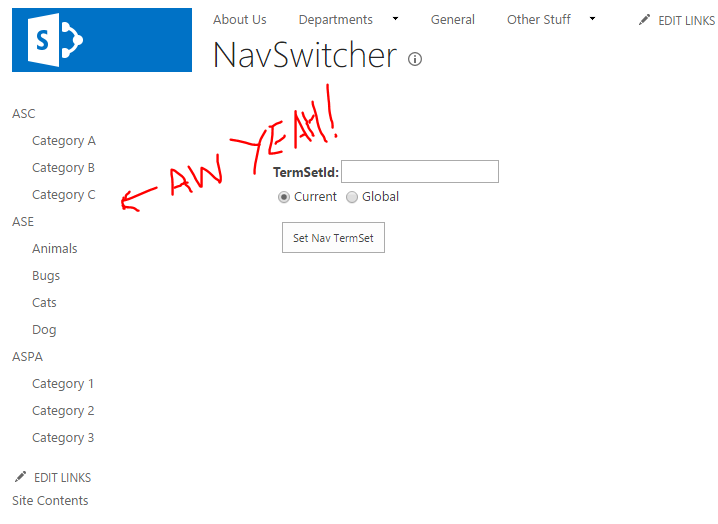
In the code above I’m using jQuery to pull the values from a simple HTML page I’ve got loaded in a Content Editor Web Part (see below). This is totally not necessary. This is just some Proof of Concept code you can strip out and learn from. It’s really just the configure and switchNavigation functions above that matter, but we’ll cover it all.
Lines 1-4 are just boiler plate code to establish a namespace and grab that jQuery ready event. Lines 6-10 establish a SafeLog function that lets me write to the console without worrying about crashing IE. Sheesh. None of this is required for this specific solution.
Lines 12-18 are just me using the Module Pattern. The important thing to note is my “private” variables in line 14. I set them up here so that I can access them when I’m doing all the CSOM load calls and then also in the Callback function.
In lines 21 and 22, I pull the values from my HTML form. The Id (tsId) is expected to be the termset GUID (as a string). The tsGlobal variable just indicates if we are setting the global navigation termset or the current navigation termset. These could be replaced with a hardcoded string and boolean if you wanted.
Gathering the Objects
Now for some SODs (Script on Demand)! SODs let you delay your code until the proper scripts have been loaded. In addition, you can request SharePoint to load some it might not otherwise load on a particular page. In this case, we have 2 script files we need to have loaded before our code runs: sp.js and sp.publishing.js.
The sp.js script file is going to load on the page so we can just use the executeFunc method to call our code once it does. This is needed so that we can use CSOM (The SP.ClientContext namespace is essential for that). We do this in line 25.
The sp.publishing.js script file may or may not load on a given page. So in line 27 we use the registerSod method to ensure it will get loaded. This is immediately followed by another executeFunc call in line 28 that will call our function once SP.Publishing.Navigation.NavigationTermSet has loaded.
Now that all the objects are available to us, it’s time to run our actual logic. We grab the current context in line 31. Then we grab the WebNavigationSettings for the current web in line 32. We of course have to load that up in line 33.
Since I’ve made which navigation (Global vs Current) configurable, I do a check to see which one was requested in line 34 and load the corresponding StandardNavigationSettings object in lines 35 or 37 respectively. Then of course we load it up too in line 39.
Now that we’ve got our shell objects, it’s time to fill them with a call to executeQueryAsync in lines 42-46. On successful load we’ll go the switchNavigation function and on failure we’ll write a sad message to the console.
Making the Change
The switchNavigation function in lines 54-72 is where the “magic” happens (we change a setting, wow)! Since the Id I’m working with is a string, I create an SP.Guid from it when setting the StandardNavigationSettings termSetId property in line 57. However, if you already had that guid (say from pulling directly from the TaxonomySession) you could use that directly.
Now that we’ve set the value, time to tell SharePoint. So line 58 updates the WebNavigationSettings object (there is no update method on the StandardNavigationSettings object), loads it up in line 59, and sets up another call to the executeQueryAsync method in lines 60-67.
That’s it. Once that code runs, the navigation settings will be updated. You might have to wait a minute or refresh a couple of times (caching), but there you go!
Other Stuff
Getting the TermSetId
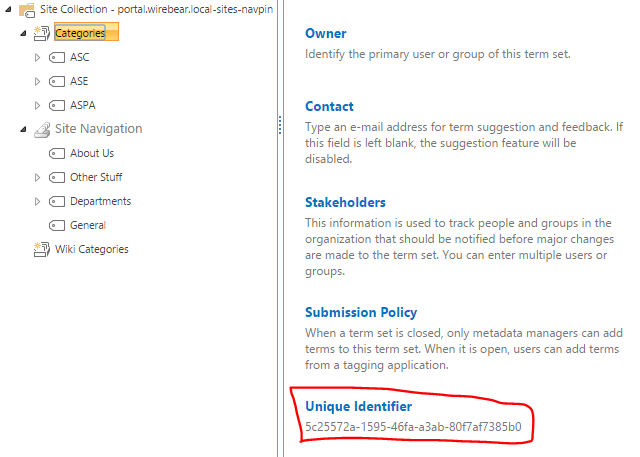
I used a string for the TermSetId which I then used as a GUID. This works great. A better option, however, might be to pull this directly from the Term Store blah blah blah. But, if you’re just looking to set this up quickly, you can get the GUID as a string from the Term Store Management Tool (The link is in Site Settings). Just click on the Term Set you want and copy that Unique Identifier in the General tab:
The HTML
Here’s the HTML I used. I just put it inside a content editor web part then clicked the configButton. Feel free to use this, but more likely you’ll be writing this as part of a larger solution.
<!DOCTYPE html>

<html lang="en" xmlns="http://www.w3.org/1999/xhtml">
<head>
    <meta charset="utf-8" />
    <title></title>
</head>
<body>
<table>
<tr>
<td><strong>TermSetId:</strong></td>
<td><input type="text" id="tsId" value=""/></td>
</tr>
<tr>
<td><input type="radio" value="C" name="tsType" checked="checked"/><label for="C">Current</label></td>
<td><input type="radio" id="tsTypeG" value="G" name="tsType" /><label for="G">Global</label></td>
</tr>
</table>
<input type="button" id="configButton" value="Set Nav TermSet" />

    <script type="text/javascript" src="/sites/navpin/Style%20Library/ns/jquery-2.2.0.min.js"></script>
    <script type="text/javascript" src="/sites/navpin/Style%20Library/ns/navswitcher.js"></script>
</body>
</html>
Wowsers!