List Formatting Quick Tip: Format Only Columns

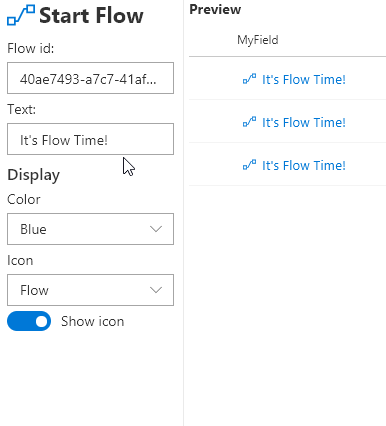
Sometimes you want to create a column but you don’t care about it’s contents. I do this all the time when creating Flow buttons:

LaunchFlowFormat

By providing a button directly in the list view that launches a flow for the given item you make it far easier for users to know about the availability of the flow, make it easy to quickly get their job done, and you can even provide additional context such as a tooltip or specific icon. You can see how to do this (and then just cut/paste/modify the format) using the Launch Flow for the Selected Item column formatting sample.

It’s a great sample and a great use case for column formatting. However, the quick tip I want to share with you is how to easily make a format only column. A format only column is part of your view but doesn’t get in the way while editing or creating items.

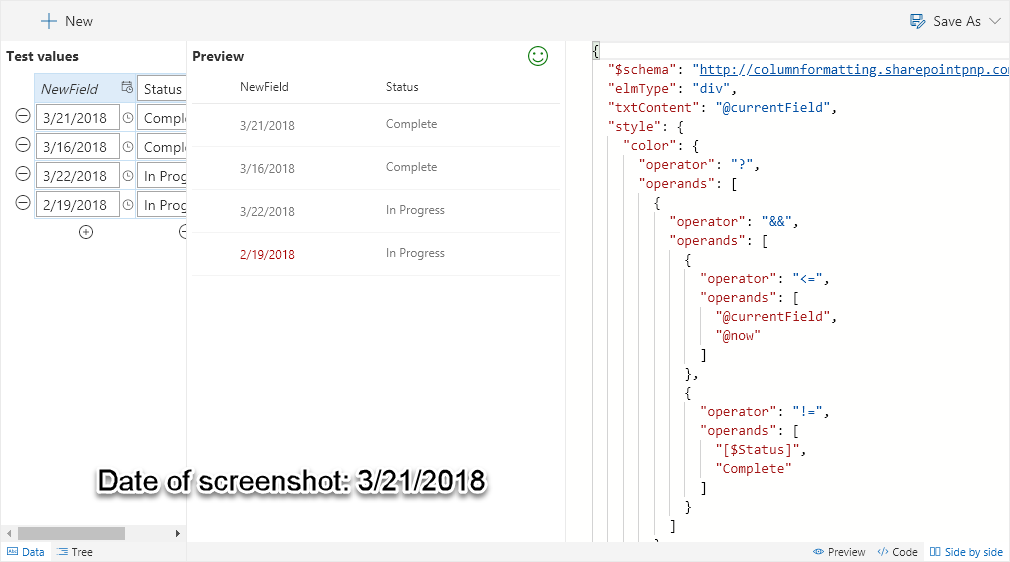
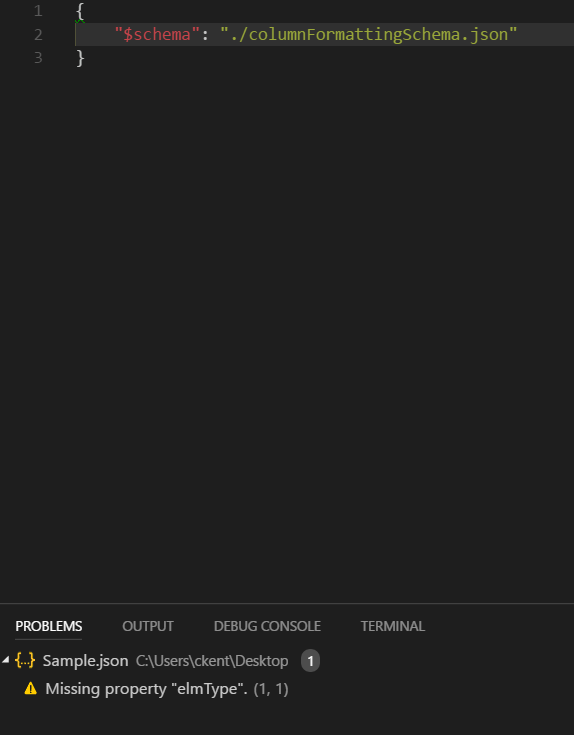
The values of Calculated columns can’t be retrieved in list formatting, but these columns can still have column formats associated with them. So the trick is to use an empty calculated column!

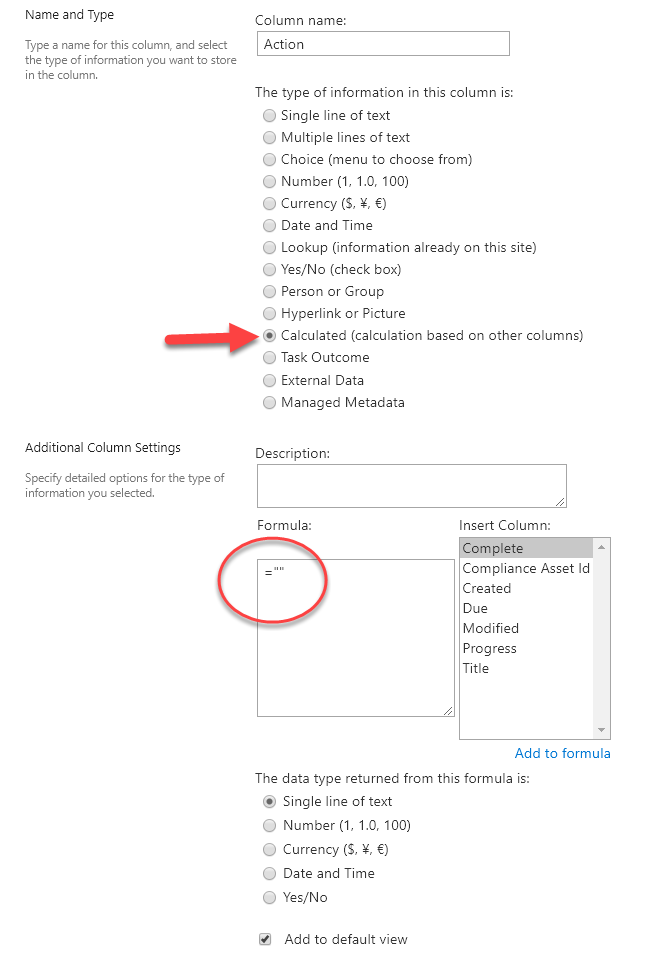
  1. In your list view choose Add column then in the list of types choose More…
    AddAColumnMore
  2. Give the column a name and choose Calculated for the type. In the formula box enter =”” then click OK:
    EmptyCalculatedColumn
  3. Now you can apply whatever format you want by using the column menu and choosing Column Settings > Format this column and pasting it in.

Now you have a column that can have a format applied to make your views look awesome, but won’t show up in the information panel!

FormatOnlyInformationPanel

Update!

See this demoed on the PnP Call (Live from MVP Summit):

Love List Formatting?

Join the Bi-weekly (every other Thursday) SharePoint Patterns and Practices special interest group for general development call where I will be presenting a new List Formatting Quick Tip on each call!

Also, come get the full picture in my sessions about List Formatting at the SharePoint Conference in Las Vegas in May, or the European Collaboration Summit in Germany in May:

Join me at SharePoint Saturday Charlotte on August 11th!

I will be presenting Getting Started with the SharePoint Framework (SPFx) and O365 List Formatting on Saturday, August 11th 2018 in Charlotte as part of SPSCLT!

SPSCLTvan

Last year’s event was awesome! Don’t miss this opportunity for free training with keynotes by Bill Baer, Brian Alderman, AND Naomi Moneypenny (Not to mention all the other great speakers)!

I’ll be presenting Getting Started with the SharePoint Framework (SPFx) at 10 am. This session will provide an overview of all your customization options and focus on where the SharePoint Framework fits in that ecosystem. You’ll leave this session knowing what the SharePoint Framework is, what it can do, when to use it, and how to get there. I’ll also provide you a bunch of tips and tricks to get you going right away.

Then I’ll be presenting O365 List Formatting at 11:15 am. We’ll cover Column Formatting and take a look at the soon to be released View formatting. We’ll talk about both the power and flexibility of this approach along with some of the limitations. I’ll share the basics of list formatting, tips and tricks, and tools and resources available to enable you to get started immediately (including a demo of Column Formatter 2.0).

I’m really excited to return to SPS Charlotte. Great attendees, great speakers, and great SWAG all at a FREE event – don’t miss it!

Use Font Awesome icons in Column Formatting

Applies to: Office 365

I was reading through the issue list on the sp-dev-column-formatting repository and came across a question from Marc Anderson about using icons from external sources – specifically Font Awesome.

The good news is this is totally possible! In fact, I’ve just submitted a sample that addresses Marc’s use case of having a color-coded, custom icon display for a Gender column using Font Awesome icons:

screenshot

The bad news is this isn’t nearly as simple as just specifying the iconName attribute like you do with UI Fabric Icons (but it isn’t that hard either).

The basic idea

One of the awesome things about column formatting is the ability to use an inline SVG element as one of the elmType values. Inside you can add a path element and specify the d attribute.

However, one of the not so awesome things about column formatting is that that is currently about as fancy as you can get with SVGs. The biggest hurdle in this case is the lack of a viewbox attribute. So we’ll have to adjust our icon SVG to not rely on the viewbox for proper scaling and then extract the d attribute for use in our format.

It’s really not as scary as that might have sounded.

Once we have the path instructions for our icon(s) we can use them like any other value with conditional operators and more. In fact, we can even dynamically build those paths if we want to get crazy about it (In fact, this is exactly how the Donut wizard in Column Formatter works).

Get the SVG for an icon

Many icon providers will allow you to download the SVG version of an icon. Both Material icons and Font Awesome allow this and there are many more. You can even mix and match since you aren’t bringing in a dependency on the actual fonts, you’re just using the SVG for individual icons.

For this post, we’ll be using Font Awesome. Here’s how to get an SVG for one of their icons:

  1. From the Font Awesome site, find the icon you want to use in your format and click on it
  2. Click the Download SVG button:
    DownloadSVG
  3. If you haven’t paid for a pro license, you’ll be prompted with an attribution notice. Click Agree & Download the SVG and the file will either open in the browser (in which case, right-click and save) or download directly

Unlike traditional images, you won’t actually upload this file anywhere and you won’t be using it in the src tag of an img element. Instead, we’ll be pulling the instructions directly out of the file (which is actually an XML file).

Format & extract path

Unfortunately, Font Awesome icons rely on a viewbox attribute (like they should) and so they won’t scale properly without some manipulation since we can’t specify the viewbox. We’ll use a free, open-source tool to do this called Inkscape:

  1. Open the icon SVG in Inkscape
  2. We’ll adjust the page size to have the path coordinates drawing at a 1:1 scale instead of relying on the viewbox translation. So choose File > Document Properties to open the Document Properties dialog
  3. Under Custom Size, set the Width and Height both to 13px (or whatever size you are wanting, this is just the default size of icons in column formatting). The Viewbox should also have the same width and height:
    SVGDocumentProperties
  4. Close the Document Properties dialog
  5. That tiny square under your icon is the actual document, so let’s scale down our object to fit. Select the icon object.
  6. In the toolbar, click the lock next to the W (width) property to lock the icon’s ratio:
    LockRatio
  7. Set either the W or the H property (whichever is bigger) to 13
  8. Set both X and Y to 0
  9. You’ll probably want to zoom in now
  10. If it is square, skip to step 12. Otherwise, you’ll want to align the icon either horizontally or vertically as needed. You can do this using the Align and Distribute dialog. Choose Object > Align and Distribute
  11. In the Relative To dropdown select Page then click the Center on vertical axis button if your icon is tall (Y>W) or Center on horizontal axis button if your icon is fat (W>Y):
    AlignAndDistribute
  12. Save your SVG
  13. Open the SVG file in a text editor like VS Code
  14. Scroll down to the only path element (near the bottom) and copy everything in the d attribute:
    ExtractPath

Using the path in a format

Instead of a span with an iconName attribute, you’ll use an svg with a path and a d attribute. A quick example should help clear that up.

Here is a simple format that shows an icon along with the current field’s value. A span with an iconName attribute is used (along with some padding and color) for the icon and then another span to show the field’s text (gist here):

IconFormat

Here’s what that looks like using the fly icon from Font Awesome (gist here):

svgIconFormat

Here’s what’s different:

  • The icon span has been replaced with an svg element
  • We have to specify the height and width since SVG’s have a large default size
  • Instead of the color style attribute, we use fill
  • We add a child element of path and set it’s d attribute to a complicated value (pulled from the icon’s SVG file) instead of a simple icon name

So… not as easy, but this opens up tons of options!

Fortunately, conditionally selecting an icon stays relatively simple since column formatting always allows either an operation or a value. So, where you might have used a conditional statement for the iconName attribute, you can just do the same thing for the d attribute.

Here’s what that looks like in the generic-svgicon-format sample:

ConditionalD

The icons shown here and included in the gist code were adapted from Font Awesome which is available under the Creative Commons Attribution 4.0 International license.

What’s new in Column Formatter 1.2?

Applies to: Office 365

Column Formatter 1.2 is now available! Column Formatter is the Easy editor for modern listview Column Formatting. It is a free webpart available from SharePoint PnP that brings the full power of VS Code editing while providing easy to use templates and browsers all within the browser – and now it’s even better!

Quick start

What’s new

Editor properties

Layout options

A height property was added in 1.1, and with 1.2 Column Formatter now supports full-width sections. With these changes you can dramatically increase the size of the editor on your page:

FullCanvasish

Line Numbers

You can optionally enable line numbers in the editor. This is especially helpful when working with longer formats:

PropertyLineNumbers

Indent Guides

The editor has always had indent guides on by default, but now you can disable them if you prefer a “cleaner” code surface:

PropertyIndentGuides

Mini Map

You can optionally enable the Mini Map navigation/preview in the editor. This is especially helpful for quickly scrolling through long formats:

MiniMap

Site column saving/loading

In addition to downloading, copying to the clipboard, saving to a document library, and applying directly to a list field, you can now save your format at the Site Column level. You can even have those changes pushed to all lists that are using your column!

ApplyToSiteColumn

You can, of course, also load site column formats as needed.

Wizards

With v1.2, Column Formatter now has 14 wizards/templates covering every column type:

WizardCoverage

New wizard: Donut

The new Donut wizard for number columns allows you to create dynamic donut or pie charts:

WizardDonut_Display

You can provide a custom range, size, colors, value display, and more.

This wizard is adapted from the number-piechart sample by Aaron Miao.

New wizard: Start Flow

The new Start Flow wizard makes it easy to create an inline button to launch a flow for a selected item:

WizardStartFlow_Options

Just provide the Flow id and then quickly customize the look and feel to make launching flows even easier for users.

This wizard is adapted from the generic-start-flow sample by Yannick Borghmans.

New template: Overdue Task

The new template Overdue Task takes the concept of highlighting a due date when it’s past due and demonstrates how to add an additional condition based on another column. In this case, the due date will only be highlighted if it’s both past due AND the status column isn’t Complete:

WizardOverdueTask

New wizard: Twitter Pic

The new wizard Twitter Pic makes displaying Twitter profile pictures super easy:

WizardTwitterPic_Options

Now it’s even easier to go bug Marc or write a Dear Vesa style tweet!

Localization

Column Formatter is now more accessible than ever!

Thanks to PooLP, Column Formatter is available in French. Magnifique!

French

Also, thanks to Thomas Goelles, we’ve got German as well. Glücksschweine!

German

Everything else

  • Theme options have moved to the property pane to clean up the editor and to ensure preferences are saved as expected.
  • Each wizard has it’s own documentation page.
  • In fact, there’s quite a bit more documentation in general.
  • New wizard controls made for reuse:
    • Standard colors dropdown (UI Fabric colors)
    • Icons dropdown (UI Fabric icons)
    • Spin button with suffix
  • Updated solution to use SPFx 1.4.1 and PnPJS
  • Several minor bugs were murdered
  • The Mini Map wizard was renamed to Tiny Map to avoid confusion with the new editor feature

Conclusion

If you’re interested in contributing, please do! If you find any bugs or have ideas or are lonely or have questions or whatever, please post in the Issues list – it is greatly appreciated!

Let me know what you think, thanks!

Thank you O365 Seattle!

Last week while attending the MVP Summit, I had the honor of presenting at the O365 Seattle meetup as part of their MVP night.

I presented O365 Column Formatting with Column Formatter. It seemed to resonate well and I think more people with take advantage of both O365 Column Formatting and the PnP Column Formatter.

O365SeattlePresentation
Photo by Tom Resing

There were other great presentations by Kevin Crossman and Seb Levert along with a great Q&A with a full panel of MVPs from across the globe.

MVP Panel
Photo by Tom Resing

It was a fantastic event and I was grateful to be a part of it. My only regret is that I was on an early flight out and had to skip SharePint. Thank you to the organizers, MVPs, and all the attendees!

Resources:

Thank you North American Collaboration Summit 2018!

Over the weekend I was able to attend and speak at the North American Collaboration Summit (Sharepointalooza) in Branson, Missouri. It was an extremely well run and attended event. It’s unbelievable to me that attendees were only paying $65 for content and experience that would cost $1500-2000+ elsewhere!

I spoke on Understanding SharePoint Patterns and Practices (PnP). I love this topic because it allows me to show off amazing stuff that always has immediate “Monday” value. People always leave this session with at least one or two things they’ll start using as soon as they get back to work. SharePoint PnP is awesome but it can be difficult to know about everything that is available.

I was able to demo:

  • SharePoint PnP PowerShell
  • Remote Provisioning
  • Site Designs with Remote Provisioning
  • PnPJS
  • Column Formatter

I even demonstrated how to do the simplest (but still very much appreciated) contribution by live fixing documentation!

Thanks to everyone who attended. I got a lot of great questions and once again people were really impressed with what PnP has to offer! Awesome event, awesome sponsors, awesome speakers, and awesome attendees!

Resources


Column Formatting Client-Side Web Part: Column Formatter

Applies To: Office 365

Update

This solution is now officially a part of SharePoint PnP! Please use this repo for all updates, issues, contributions, and more. Whoo Whoo!


Modern listviews support the addition of custom formatting for most field types. This is an awesome feature designed to make custom formatting simpler and less administratively difficult than packaged solutions.

Unfortunately, the tooling is still very minimal. Users are given a simple text field within a panel to paste the JSON code and a preview and save button. The panel is clearly not designed to enable editing meaning that not only do users have to write code, they have to find someplace to do it.

The official suggestion is to use VS Code which will provide some auto completion using the standard schema. However, there are several downsides to this approach:

  • Requires a desktop client to be installed
    • Non developers that may have hung on past the initial mention of JSON are mostly gone by now
  • Once you do get VS Code up and running and begin editing your JSON:
    • The intellisense and syntax checking are very limited
    • There is no preview of your format
    • While some examples exist, there’s still a huge learning curve

I previously released a verbose schema which makes editing in VS Code a lot easier, but still doesn’t solve the preview problems, learning curve, or the need to use a tool outside of O365.

Column Formatter

ColumnFormattingChristmas4

Column Formatter is a SharePoint Framework client-side webpart I’ve created using React and Redux. It’s designed to give the full power of VS Code editing while providing easy to use templates and wizards all within the browser! The goal is to make writing and applying Column Formatting easier and quicker for both developers and end users.

Development Details

I originally set out to make an Application Customizer SPFx extension that would sit directly on the modern listview page. Unfortunately, there aren’t APIs available (at least that I could find) to load the CustomFormatter library on the page if none of the columns are using it yet, nor a way to trigger applying the formatting to the listview without actually changing the field’s CustomFormat value.

So I’ve extracted the CustomFormatter library into my project and am faking it by providing it only the dependencies it actually needs. While this gives me full control to enable “as you type” live preview of rendering, it also means that things could get out of sync with O365 development. For now, I’ll do my best to keep things updated but ultimately I’d like to be able to load the office CustomFormatter module on demand.

Similarly, I had to extract the styles of the modern listview and the unique classes for CustomFormatter.

The editor is a custom build of the Monaco Editor (the editor that powers VS Code). Getting this built as a module that worked in SPFx was a real challenge, but worth it because of the immense power it adds.

This was my first experience with Redux. It was hard to wrap my head around at first and there is a significant amount of boilerplate code required (largely to play nice with Typescript), but I wouldn’t do any React webpart of even minor complexity without it! It simplifies state management and makes additional iterations of features much easier.

What’s next

There are a few templates and wizards included currently, but there are way more that could be added. I plan to keep adding these and am open to both pull requests and suggestions.

DataBarsWizard
Wizards make it easy to generate Column Formatting without writing any code

TrendingTemplate
Templates provide you with starter code and sample data

I have submitted this webpart as an entry in the Hack Productivity 3 hackathon (Go vote for it, please!) which is why it’s currently hosted on my github. I’d like to get it included in SharePoint PnP if they’re open to it, although I’m not sure where it should go just yet.

More Information

You can find a lot more details about features and how to use Column Formatter in the ReadMe in the repo. I also created a demonstration video that covers a lot of the features:

A Verbose Schema for SharePoint Column Formatting (Proposal)

Declarative customization through Column Formatting in SharePoint Online is a really cool new way to customize how fields in lists and libraries are displayed. It’s all done through JSON and it’s pretty awesome.

I think there are a few minor areas it’s currently falling short, however. Such as:

Unfortunately, although there is an open source repo of great samples, Column Formatting itself is not something we can directly contribute to (outside of issues and user voice like the above). But, I had another issue that I really wanted solved so I solved it (at least for me) and thought I’d share and suggest it (or some version of it) should be adopted officially.

While a UI for generating the JSON would be awesome, the alternative suggestion of writing your column formatter in VS Code using the schema.json is a good one. However, I really wanted better intellisense to help me track down what I can and can’t do. So, I added a bunch of stuff to the schema.json file to do exactly that.

A Verbose Schema

Using my version of the columnFormattingSchema.json (currently available as a gist), you get fancy stuff like this:

VerboseColumnFormatting

Here’s what’s in here compared to the original:

  • Valid operations toLocalString(), toLocaleDateString(), and toLocaleTimeString() are no longer marked as invalid (added them to the operator enum)
  • The style property now only allows values corresponding to supported style attributes
    • Additionally, each style property has enum values corresponding to possible values
  • Valid attributes iconName, rel, and title are no longer marked as invalid
  • class attribute provides enum values (using the predefined classes)
  • target attribute provides enum values
  • role attribute provides enum values
  • rel attribute provides enum values
  • iconName attribute provides enum values
  • Most properties (like txtContent and operators) provide special string enums (@currentField, @me, @now, etc.)

It’s important to note that every value can still be an expression and even where enums are provided for convenience (like class or txtContent), you can still supply a string not in the list.

Using the Schema

When you apply column formatting the JSON is validated, but the actual schema isn’t really restricted like you might expect (this is why you could previously specify an iconName property without issue even though it was technically invalid). This also means that using the Verbose schema won’t cause any problems for you (I’ve actually tested it against every sample available to me) and is actually much more likely to prevent you from getting multiple console error messages about unsupported style attributes, etc.

For now, you can just save the file to your machine and use a local reference (as shown in the image above) or, even better, you can reference it directly from the gist (raw) like this:

{
    "$schema": "https://gist.githubusercontent.com/thechriskent/2e09be14a4b491cfae256220cfca6310/raw/eb9f675bf523208eb840c462d4f716fa92ce14c2/columnFormattingSchema.json"
}

Now, as long as you save that file with a .json extension, VS Code will automatically add the intellisense and extra validation!

You don’t even need to remove the $schema property (you can even leave it out, it is not currently used by SharePoint at all).

Also, for anyone that is wondering what the column formatter shown in the animation above looks like, here it is for a Person field:

Final
My name is red since I’m the logged in user